E-paper Price Tags Combined To Create A Large Wireless Display

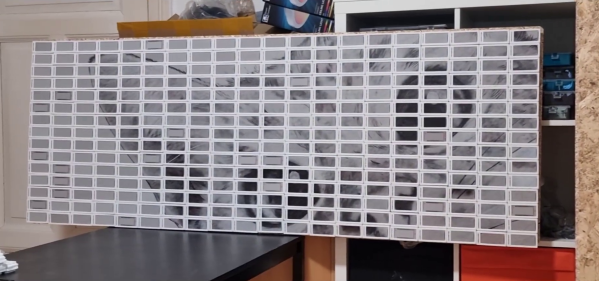
E-paper price tags have become popular for retail stores over the past few years, which is great for hackers since we now have some more cheap commodity hardware to play with. [Aaron Christophel] went all on creating grid displays with E-paper price tags, up to a 20×15 grid.

E-paper price tags are great for these kinds of projects, since they are wireless, lightweight, and can last a long time with the onboard batteries. To mount the individual tags on the plywood backboard,[Aaron] simply glued Velcro to the backboard of the tags. The displays’ firmware is based on the reverse engineering work of [Dmitry Grinberg], flashed to a few hundred tags using a convenient 3D printed pogo pin programming jig. All the displays are controlled via a Zigbee USB dongle plugged into a PC running station software.

[Aaron] is also experimenting with the displays removed from their enclosure and popped into a 3D printed grid frame. The disadvantage is the loss of the battery holders and the antenna, which are both integrated into the enclosure. He plans to get around this by powering the displays from a single large battery, and connecting an ESP32 to the displays via ISP or UART.

This project comes hot on the heels of another E-ink grid display project that uses Bluetooth and a rather clever update scheme.

Continue reading “E-paper Price Tags Combined To Create A Large Wireless Display”

BPS.Space Succesfully Lands A Model Rocket

If you’ve been following [Joe Barnard]’s rocketry projects for the past few years, you’ll know that one of his primary goals has been to propulsively land a model rocket like SpaceX. Now, 7 years into the rollercoaster journey, he has finally achieved that goal with the latest version of his Scout rocket.

Rocket touching down
We have touchdown!

Many things need to come together to launch AND land a rocket on standard hobby-grade solid fuel rocket motors. A core component is stabilization of the rocket during the entire flight, which achieved using a thrust-vectoring control (TVC) mount for the rocket motors and a custom flight computer loaded with carefully tuned guidance software. Until recently, the TVC mounts were 3D printed, but [Joe] upgraded it to machined aluminum to eliminate as much flex and play as possible.

Since solid-fuel rockets can’t technically be throttled, [Joe] originally tried to time the ignition time of the descent motor in such a manner that it would burn out as the rocket touches down. The ignition time and exact thrust numbers simply weren’t repeatable enough, so in his 2020 landing attempts, he achieved some throttling effect by oscillating the TVC side to side, reducing the vertical thrust component. This eventually gave way to the final solution, a pair of ceramic pincers which block the thrust of the motors as required.

Another interesting component is the landing legs. Made from light carbon fiber rods, they are released by melting a rubber band with nichrome wire and fold into place under spring tension. They also had to be carefully refined to absorb as much impact as possible without bouncing, which killed a few previous landing attempts.

Scrolling back through [Joe]’s videos and seeing the progress in his engineering is absolutely inspiring, and we look forward to his future plans. These include a functional scale model of the belly-flopping starship, a mysterious “meat rocket”, and the big one, a space shot to exceed 100 km altitude.

Continue reading “BPS.Space Succesfully Lands A Model Rocket”

3D Printed Braiding Machine Brings Back Some History

Mechanizing the production of textiles was a major part of the industrial revolution, and with the convenience of many people are recreating the classic machines. A perfect example of this is [Fraens]’ 3D printed braiding machine, which was reverse engineered from old photos of the early machines.

The trick behind braiding is the mesmerizing path the six bobbins need to weave around each other while maintaining the correct tension on the strands. To achieve this, they slide along a path in a guide plate while being passed between a series of guide gears for each section of the track. [Fraens] cut the guide plate components and the base plate below it from acrylic and mounted them together with standoffs to allow space for the guide gears.

Each of the six bobbins contains multiple parts to maintain the correct tension. The strands are fed through a single guide ring, where the braid is formed, and through pair of traction gears. All the moving parts are driven by a single 24 V motor and can produce about 42 cm of a braided cord per minute, and you can even set up the machine to braid around an inner core.

This braiding machine is just one in a series of early industrial machines recreated by [Fraens] using 3D printing. The others include a sewing machine, and a power loom, and a generator.

Continue reading “3D Printed Braiding Machine Brings Back Some History”

Hackaday Prize 2022: A Hefty Hoverboard Rover

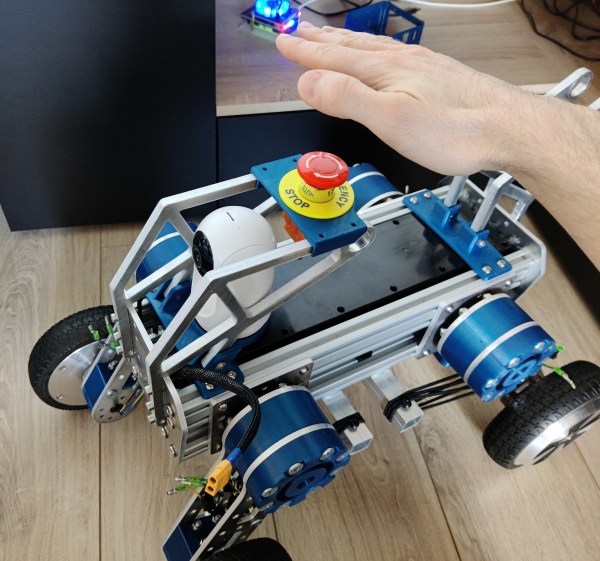
Popular consumer products often become the basis of many hacker projects, and hoverboards are a good example of this. [Tanguy] is using the drivetrain from a pair of hoverboards to build a beefy little rover platform with independent suspension.

Since hoverboards were designed to move around fully grown humans, the motors have the torque to spare for this 25 kilogram (55 pound) rover. For rough terrain, each of the four motor/wheel combos is mounted to arms bolted together with 3D printed parts and thick laser-cut aluminum. Suspension is simple and consists of a couple of loops of bungee cord. The chassis uses aluminum extrusion bolted together with aluminum plates and more printed fittings.

It doesn’t look like the rover is running yet, but [Tanguy] intends to power it with an electric scooter battery and control it with his own Universal Robot Remote. He also added an E-stop to the top and a cheap indoor PTZ camera for FPV. We look forward to seeing the functional rover and how it handles terrain.

We’ve seen hoverboard motors get used in other rover projects, but also for scootersskateboards, and even a hydroelectric turbine. It’s also possible to use them as is by mounting them to existing chassis’ to create electric carts.

Continue reading “Hackaday Prize 2022: A Hefty Hoverboard Rover”

Ultimate Bokeh With A Projector Lens

Bokeh is a photography term that’s a bit difficult to define but is basically soft, aesthetically pleasing background blur, often used to make a subject stand out. Also called “background separation” or “subject isolation”, achieving it optically requires a fast lens with an aperture below 2.8 or preferably lower. These lenses can get very expensive, but in the video after the break [Matt] from [DIY Perks] blows all the commercially available options out of the water. Using an old episcope projector, he built a photography rig with background separation equivalent to that of a non-existent 35mm f0.4 lens.

Unlike most conventional projectors used to project a prerecorded image, episcopes were used to project an image of physical objects, like books. To use this lens directly in a camera is impossible, due to the size of the imaging circle projected out the back of the lens. At a diameter of 500mm, there is simply no imaging sensor available to capture it. Instead, [Matt] built a projection screen for the image and photographed it from the opposite side with a normal camera.

The projection screen was made by sandwiching a sheet of diffuser film between two sheets of clear acrylic held in a frame of aluminum extrusions. To block out all other light, [Matt] added aluminum shrouds on either side of the screen, which also serves to mount the lens and a camera. The shroud on the lens’ side is mounted on a separate aluminum frame, enabling the image to be focused by adjusting the distance between the screen and lens. Linear rods and bearings on 3D printed mounts allow smooth motion, while a motor-driven lead screw connected to a wired remote does the actual adjustment. The gap between the two halves was covered with bellows made from black paper. Continue reading “Ultimate Bokeh With A Projector Lens”

RC Lawnmower Is Built To Last

Mowing the lawn is one of those tasks that someone will always be optimizing or automating. To allow him to mow the lawn while seated comfortably in the shade, [Workshop from Scratch] built an RC Lawnmower in his signature solid steel frame style.

The chassis consists of a heavy welded steel frame from square tubing, with a pair of knobbly go-kart wheels on the back and large caster wheels on the front. The actual grass-cutting part is a 173cc petrol lawnmower engine with a steel hull, mounted on an articulating subframe which can be remotely raised and lowered using a linear actuator. The rear wheels are attached to a pair of custom sprocket hubs, driven via chain by two 200 W geared DC motors to allow skid steering.

The motors and electronics are powered by a set of 18 Ah lead-acid batteries wired in parallel. The petrol engine can also charge the batteries, but its current isn’t enough to keep up while mowing. However, it does help to extend the range. All the electronics are housed in a plastic enclosure with a power switch, key start for the engine, and battery charge indicator on the lid. The power from the batteries runs through a pair of automotive relays connected to the power switch and a set of fuses for protection. For safety [Workshop from Scratch] wired a relay to the engines’ coil to shut it off remotely, or when the radio link to the controller is lost. An action cam was also mounted on the electronics box to stream a first-person view to a smartphone over WiFi.

Overall this is a very well built project, especially mechanically, and looks like the perfect platform for further self-driving using Ardurover. [rctestflight] has demonstrated the capabilities of the open source autopilot with several rovers, including a tiny lawnmower that cuts grass with Exacto blades.

Continue reading “RC Lawnmower Is Built To Last”

The Rollercoaster Of Developing The Ultimate Hackable Keyboard

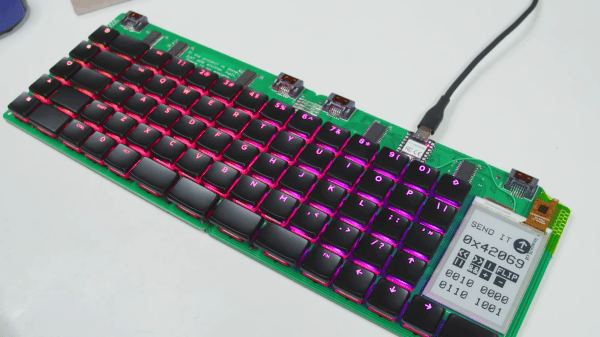
When designing anything with “hackable” in the punchline, scope creep is an integral part of the process. You end up trying to create something to potentially be an infinite number of things for an infinite number of users. [Zack Freedman] is going really deep down the rabbit hole with his MiRage keyboard and has been documenting the progress in his usual entertaining style, with some cautionary notes included.

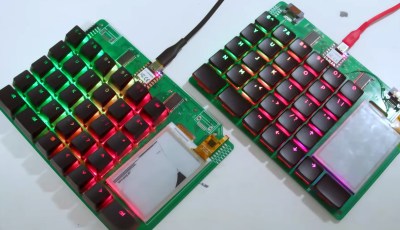
The most fascinating tale from this come about as a result of adding RGB LEDs beneath the keys, while still allowing everything to function when the keyboard is split in two. Thanks to an IO expander chip in one side of the board, a standard TRRS audio cable is enough to link both sides together. But the addition of addressable LEDs meant more lines were required.

[Zack] thought he had found a solution in the form of SATA cables, but it turns out all SATA cables internally connect pins 1,3, and 7, making them useless for this application. He realized he had no choice but to add a second microcontroller to the “dumb” side of the keyboard and return to I2C over a TRRS cable. However, the RP2040-based Seeed XIAO’s I2C absolutely refused to play along. After a fortnight of frustrating debugging, it turns out there was a bug in the pin definitions. Fortunately, this also revealed that the XIAO had an undocumented secondary I2C interface, which he plans to configure as a peripheral to make the keyboard almost infinitely expandable with additional keys.

An earlier version of the MiRage featured tactile OLED displays, but it turns out the thin panes of glass don’t handle repeated flexing well, so they had to be scrapped. In their place came a touchscreen E-paper display, but now this seems to be evolving into a pluggable module for any input device that your heart desires, including possibly a haptic SmartKnob. Another major update are PCB footprints that support both CHOC and MX switches.

It all started with the MiRage V1 keyboard intended to for use in an updated version of [Zack]’s cyberdeck. After realizing how many people were interested in the keyboard but not the cyberdeck, he shifted focus to refining the MiRage.

This project still has some way to go, so we’ll certainly be keeping our eye on it. In the meantime, we’ve recently covered another exceptionally customizable keyboard that might catch your fancy.

Continue reading “The Rollercoaster Of Developing The Ultimate Hackable Keyboard”