Marimbatron: A Digital Marimba Prototyping Project

The Marimbatron is [Leo Kuipers] ‘s final project as part of the Fab Academy program supervised by [Prof. Neil Gershenfeld] of MIT’s Center for Bits and Atoms. The course aims to teach students how to leverage all the fab lab skills to create unique prototypes using the materials at hand.

The final polyurethane/PET/Flex PCB stack-up for the sensor pad

Fortunately, one of the main topics covered in the course is documentation, and [Leo] has provided ample material for review. The marimba consists of a horizontal series of wooden bars, each mounted over a metal resonator tube. It is played similarly to the xylophone, with a piano-type note arrangement, covering about five octaves but with a lower range than the xylophone. [Leo] converted this piano-type layout into a more logical grid arrangement. The individual pads are 3D printed in PETG and attached to a DIY piezoresistive pressure sensor made from a graphite-sprayed PET sheet laid upon a DIY flexible PCB. A central addressable LED was also included for indication purposes. The base layer is made of cast polyurethane, formed inside a 3D-printed rigid mould. This absorbs impact and prevents crosstalk to nearby sensors. The sensor PCB was initially prototyped by adhering a layer of copper tape to a layer of Kapton tape and cutting it out using a desktop vinyl cutter. While this method worked for the proof of concept, [Leo] ultimately outsourced the final version to a PCB manufacturer. The description of prototyping the sensor and dealing with over-moulding was particularly fascinating.

Continue reading “Marimbatron: A Digital Marimba Prototyping Project”

Long-Awaited SLS4All 3D Printer Now Shipping

We touched on the open source SLS4All DIY SLS 3D printer a year or two ago when the project was in the early stages. Finally, version one is complete, with a parts kit ready to ship and all design data ready for download if a DIY build or derivative is your style. As some already mentioned, this is not going to be cheap: with the full parts kit running at an eye-watering $7K before tax. But it’s possible to build or source almost all of it a bit at a time for those on a budget.

Try printing THIS benchy on an FDM machine!

It’s important to note that to access the detailed information, you’ll need to create an account, which is a bit inconvenient for an open source design. However, all the essential components seem to be available, so it’s forgivable. In terms of electronics, there are two custom PCBs: the GATE1 (GAlvo and Temperature Control) and the ZERO1 (Zero-crossing dimming) controller. Other than that, all the electronics seem to be standard off-the-shelf components. Both of these PCBs are designed using EasyEDA.

Unfortunately we couldn’t find access to the PCB Gerbers, nor does there appear to be a link to their respective EasyEDA projects, just the reference schematics. This is a bit of a drawback, but it’s something that could easily be reproduced with enough motivation. Control is courtesy of a Radxa Rock Pi, as there were ‘problems’ with a Raspberry Pi. This is paired with a 7-inch touchscreen to complete the UI. This is running a highly modified version of the Klipper together with their own control software, which is still undergoing testing before release.

The laser head is built around a 10 W 450 nm laser module from China and a high-end galvanometer set. Two 200 W halogen tube heaters heat the print bed, and 200 W silicone heating pads heat both the powder bed and the print bed.

Continue reading “Long-Awaited SLS4All 3D Printer Now Shipping”

Studying The Finer Points Of 3D Printed Gears

[How to Mechatronics] on YouTube endeavored to create a comprehensive guide comparing the various factors that affect the performance of 3D printed gears. Given the numerous variables involved, this is a challenging task, but it aims to shed light on the differences. The guide focuses on three types of gears: the spur gear with straight teeth parallel to the gear axis, the helical gear with teeth at an angle, and the herringbone gear, which combines two helical gear designs. Furthermore, the guide delves into how printing factors such as infill density impact strength, and it tests various materials, including PLA, carbon fiber PLA, ABS, PETG, ASA, and nylon, to determine the best options.

The spur gear is highly efficient due to the minimal contact path when the gears are engaged. However, the sudden contact mechanism, as the teeth engage, creates a high impulse load, which can negatively affect 
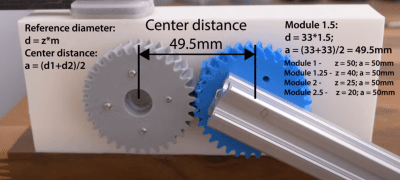
durability and increase noise. On the other hand, helical gears have a more gradual engagement, resulting in reduced noise and smoother operation. This leads to an increased load-carrying capacity, thus improving durability and lifespan.

It’s worth noting that multiple teeth are involved in power transmission, with the gradual engagement and disengagement of the tooth being spread out over more teeth than the spur design. The downside is that there is a significant sideways force due to the inclined angle of the teeth, which must be considered in the enclosing structure and may require an additional bearing surface to handle it. Herringbone gears solve this problem by using two helical gears thrusting in opposite directions, cancelling out the force.

Continue reading “Studying The Finer Points Of 3D Printed Gears”

Bidirectional Data Transfer Through Mud?

We take easy communications for granted these days. It’s no bother to turn on a lightbulb remotely via a radio link or sense the water level in your petunias, but how does a drilling rig sense data from the drill head whilst deep underground, below the sea bed? The answer is with mud pulse telemetry, about which a group of researchers have produced a study, specifically about modelling the signal impairments and strategies for maintaining the data rate and improving the signal quality.

If you’re still confused, mud pulse telemetry (MPT) works by sending a modulated pressure wave vertically through the column of mud inside the drilling tube. It’s essential to obtain real-time data during drilling operations on the exact angle and direction the drill bit is pointing (so it can be corrected) and details of geological formations so decisions can be made promptly. The goal is to reduce drilling time and, therefore, costs and minimize environmental impact — although some would strongly argue about that last point.

Continue reading “Bidirectional Data Transfer Through Mud?”

A Peek Inside Apple Durability Testing Labs

Apple is well-known for its secrecy, which is understandable given the high stakes in the high-end mobile phone industry. It’s interesting to get a glimpse inside its durability labs and see the equipment and processes it uses to support its IP68 ingress claims, determine drop ability, and perform accelerated wear and tear testing.

Check out these cool custom-built machines on display! They verify designs against a sliding scale of water ingress tests. At the bottom end is IPx4 for a light shower, but basically no pressure. Next up is IPx5, which covers low-pressure ambient-temperature spray jets from all angles – we really liked this machine! Finally, the top-end IPx7 and IPx8 are tested with a literal fire hose blast and a dip in a static pressure tank, simulating a significant depth of water. An Epson robot arm with a custom gripper is programmed to perform a spinning drop onto a hard surface in a repeatable manner. The drop surface is swapped out for each run – anything from a wooden sheet to a slab of asphalt can be tried. High-speed cameras record the motion in enough detail to resolve the vibrations of the titanium shell upon impact!

Accelerated wear and tear testing is carried out using a shake table, which can be adjusted to match the specific frequencies of a car engine or a subway train. Additionally, there’s an interview with the head of Apple’s hardware division discussing the tradeoffs between repairability and durability. He makes some good points that suggest if modern phones are more reliable and have fewer failures, then durability can be prioritized in the design, as long as the battery can still be replaced.

The repairability debate has been raging strong for many years now. Here’s our guide to the responsible use of new technology.

Continue reading “A Peek Inside Apple Durability Testing Labs”

Embrace IPv6 Before Its Too Late?

Many hackers have familiar sayings in their heads, such as “If it ain’t broke, don’t fix it” and KISS (Keep it simple, stupid). Those of us who have been in the field for some time have habits that are hard to break. When it comes to personal networks, simplicity is key, and the idea of transitioning from IPv4 to IPv6 addresses seems crazy. However, with the increasing number of ‘smart’ devices, streaming media gadgets, and personal phones, finding IPv4 space for our IoT experiments is becoming difficult. Is it time to consider embracing IPv6?

The linked GitHub Gist by [timothyham] summarizes the essential concepts for home network admins to understand before making changes. The first major point is that IPv6 has a vastly larger address space than IPv4, eliminating the need to find spare IPv4 addresses. IPv6 assigns multiple addresses to the same interface. The 128-bit addresses are split into a 64-bit prefix assigned by your ISP and a 64-bit interface identifier. Using SLAAC (Stateless Address Autoconfiguration), clients can manage their own addresses. You don’t have to use SLAAC, but it will make life easier. The suffix typically remains static, allowing integration with a local DNS server.

Continue reading “Embrace IPv6 Before Its Too Late?”

The Cheap CNC3018 Gets A Proper Revamp

Many people have been attracted to the low price and big dreams of the CNC3018 desktop CNC router. If you’re quick, you can pick one up on the usual second-hand sales sites with little wear and tear for a steal. They’re not perfect machines by any stretch of the imagination, but they can be improved upon, and undoubtedly useful so long as you keep your expectations realistic.

[ForOurGood] has set about such an improvement process and documented their journey in a whopping eight-part (so far!) video series. The video linked below is the most recent in the series and is dedicated to creating a brushless spindle motor on a budget.

As you would expect from such a machine, you get exactly what you pay for.  The low cost translates to thinner than ideal metal plates, aluminium where steel would be better, lower-duty linear rails, and wimpy lead screws. The spindle also suffers from cost-cutting, as does the size of the stepper motors. But for the price, all is forgiven. The fact that they can even turn a profit on these machines shows the manufacturing prowess of the Chinese factories.

We covered the CNC 3018 a while back, and the comments of that post are a true gold mine for those wanting to try desktop CNC. Warning, though: It’s a fair bit harder to master than 3D printing!

Continue reading “The Cheap CNC3018 Gets A Proper Revamp”