3D Printed Printing Plates Made Using Modern Tools

It’s widely accepted that the invention of the printing press by Gutenberg in the 15th Century was the event that essentially enabled the development of the modern world, allowing access to knowledge beyond anything that came before, even if the Chinese got in on the bookmaking act some 500 years previously. Fast-forward a few centuries more and we’ve got the ability to design electronics from our arm chairs, we can print 3D objects from a machine on the coffee table, and 3D modeling can be done by your kids on a tablet computer. What a time to be alive! So we think it’s perfectly fine that [Kris Slyka] has gone full circle and used all these tools to make printing plates for a small press, in order to produce cards for her Etsy business.

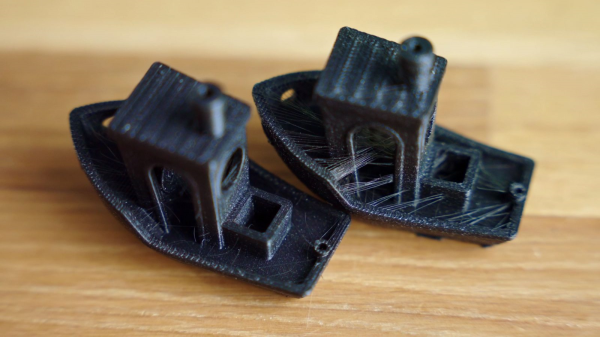
Now before you scoff, yes she admits quite quickly that KiCAD wasn’t the best choice for designing the images to print, since she needed to do a lot of post-processing in Inkscape, she could have just dropped the first step and started in Inkscape anyway. You live and learn. Once the desired image was fully vectorised, it was popped into OpenSCAD in order to extrude it into 3D, thickening the contact to the base to improve the strength a little.

[Kris] demonstrates using the registration marks to align the front and rear side plates, and even (mostly) manages adding a second colour infill for a bit more pizzazz. The results look a little bit wonky and imperfect, exactly what you want for something supposed to be handmade. We think it’s a nice result, even if designing it in KiCAD was a bit bonkers.

For those interested in the OpenSCAD code, have a butchers at this gist. This project is not the first 3D-printed printing press we’ve covered, checkout the Hi-Bred for an example, and here’s the Open Press Project if you’re still interested.

Continue reading “3D Printed Printing Plates Made Using Modern Tools”

NE-2 neon lamp illuminated side-by-side with non-illuminated

The Humble NE-2 Neon Lamp Has A New Trick

Ah, the humble neon lamp. The familiar warm orange glow has graced the decks of many a DIY timepiece, sometimes in a purely indicating duty, and sometimes forming a memory element in place of a more conventional semiconductor device. Capable of many other tricks such as the ability to protect RF circuits from HV transients, its negative resistance operating region after it illuminates gives us usable hysteresis which can used to form a switching element and the way the pair of electrodes are arranged give it the ability to indicate whether a voltage source is AC or DC. Now, due to some recent research by [Johan Carlsson] and the team at Princeton University, the humble NE-2 tube has a new trick up its sleeve: acoustic transduction.

The idea is not new at all, with some previous attempts at using electric discharge in a gas to detect audio, going back to the early part of last century, but those attempts either used atmospheric pressure air or other non-sealed devices that exhibited quite a lot of electrical noise as well as producing noxious gases. Not ideal.

Continue reading “The Humble NE-2 Neon Lamp Has A New Trick”

Is A Diode A Switch?

Many hardware people around these parts will be familiar with devices used as switches, using at least three-terminals to effect this, an input, an output and a gate. Typical devices that spring to mind are bipolar transistors, triacs and and ye olde triode valve. Can you use a diode to switch a signal even if it has only two terminals? Of course you can, and it’s a tried and trusted technique very common in test equipment and circuits that handle RF signals. (Video, embedded below.)

The trick is that diodes block current in one direction but allow it to flow in the other, denoted by the deliberately obvious symbol. So your DC signals can’t swim upstream, but the same isn’t true for AC. Signals can be passed “the wrong way” through a diode by inducing small fluctuations in the current. Put another way, if you bias the diode into conduction, changes in the downstream voltage level result in changes in the current flowing through the diode, and the (smaller) AC signal gets through. But if you take away the bias, by turning off the DC bias voltage source, the diode switches back to non-conducting, blocking the signal. And that makes a diode a DC controlled switch for AC signals.

While [IMSAI Guy] demonstrates this with a signal diode, as he explains, one would typically use a PIN diode, which has an extra intrinsic (undoped) region between the P and the N, allowing the device to fully turn off, reducing leakage significantly.

Of course, we’ve covered diodes many times from different angles, there is always something to learn. Checkout how high voltage diodes are constructed, diodes detecting ionising radiation, and finally this great series about our new favourite two-terminal device.

See, the humble diode can be fun after all!

Continue reading “Is A Diode A Switch?”

Line of electromechanical water valves dispensing a pattern of water droplets

Gravity-Defying Water Drop Display Shows Potential

[3DPrintedLife aka Andrew DeGonge] saw that advert for gatorade that shows some slick stop-motion animation using a so-called ‘liquid printer’ and wondered how they built the machine and got it to work so well. The answer, it would seem, involves a lot of hard work and experimentation.

Conceptually it’s not hard to grasp. A water reservoir sits at the top, which gravity-feeds into a a series of electromechanical valves below, which feed into nozzles. From there, the timing of the valve and water pressure dictate the droplet size. The droplets fall under the influence of gravity, to be collected at the bottom. From that point it’s a ‘simple’ matter of timing droplets with respect to a lighting strobe or camera shutter and hey-presto! instant animation.

As will become evident from the video, it’s just not as easy as that. After an initial wobble when [Andrew] realised that cheap “air-only” solenoids actually are for air-only when they rusted up, he took a slight detour to design and 3D print his own valve body. Using a resin printer to produce fine detailed prints, enabled the production of small internal passages including an ‘air spring’ which is just a small chamber of air. After a lot of testing, proved to be a step in the right direction. Whether this could have been achieved with an FDM printer, is open to speculation, but we suspect the superior fine detail capabilities of modern resin printers are a big help here.

In a nice twist, [Andrew] ripped open and dissolved a fluorescent marker pen, and used that in place of plain water, so when illuminated with suitably triggered UV LED strips, discernable animation was achieved, with an eerie green glow which we think looks pretty neat. All he needs to do now is upgrade the hardware to make a 3D array with more resolution, and he can start approaching the capability of the thing that inspired him. Work on some custom electronics to drive it has started, so this is one to watch in the coming months!

We’ve seen many water-based display device before, like this one that projects directly onto a thin stream of water, and this strangely satisfying hack using paraffin and water, but a full 3D Open Source display device seems elusive so far.

All project details can be found on the associated GitHub.

Continue reading “Gravity-Defying Water Drop Display Shows Potential”

New Part Day: Raspberry Pi LEGO HAT

The Raspberry Pi Foundation have been busy little bees for the last couple of years producing their own silicon, new boards and now in collaboration with the LEGO Education team a new HAT to connect to the LEGO SPIKE education platform. This new HAT board will work with every Raspberry Pi board with a 40-pin GPIO header.

Based on the RPI2040 microcontroller, it makes an interesting detour away from dumb slave boards, although it looks like the firmware is closed (for now) so you’ll have to make do with the pre-baked capabilities and talk to it with the supplied python library.

According to the documentation, the communication between the Pi and the RPI2040 nestled beneath the HAT PCB is plaintext-over-serial, freeing up the majority of the GPIO pins for other uses. The board uses a surface mount pass-through type header which allows pins from the Pi to protrude through the PCB, allowing stacking more HATs on top. Curiously they decided to mount the PCB with active parts facing down, giving a flat rear surface to park things on. We suspect that decision was made to improve access to the LPF2 connectors, especially if they were surface mount parts.

Continue reading “New Part Day: Raspberry Pi LEGO HAT”

3D Printable Scope Probe Adapts To Your Needs

If there’s one this we electronics engineers are precious about, it’s our test gear. The instruments themselves can be obscenely expensive, since all that R&D effort needs to be paid back over a much smaller user base compared to say a DVD player. The test probes themselves can often come with an eye-watering price tag as well. Take the oscilloscope probe, pretty much everyone who tinkers with hardware will be familiar with. It’s great for poking around, looking desperately for inspiration when you’re getting stuck in with some debug, but you’ve only got two hands, and that doesn’t leave any spare for button pushing.

Hands-free probing solutions exist, but they can be pricey, flimsy or just a pain to use. Sometimes you just want to solder a wire and leave the probe attached, hoping the grounding lead doesn’t fall off and short something. We’ve seen many solutions to this, so here’s yet another one you can 3D print yourself, so it’s almost free to make.

The two-part 3D printed assembly embeds a pair of wires with a Molex 0008500113 sprung terminal on one end, which can be terminated with your choice of pins, headers or just a pair of plain ‘ol wires. Once you’ve dropped your wiring of choice inside, simply glue the halves with a little cyanoacrylate and you’re good to go. Designed around the Siglent 200MHz PP215 specifically, it is likely compatible with many other brands. Thingiverse only has STL files (sigh!) so it may be tricky to adapt it to your exact probe dimensions, but the idea is good at least.

There is no shortage of electronics probing solutions out there, and boy have we covered a few over the years, here’s a low-cost current probe, an Open Source 2 GHz scope probe, and if you want to get really hacky, look no further for inspiration than the 2019 Hackaday SuperCon SMD Challenge.

Thanks [daniel] for the tip!

Quit Hunching Over Your Screen With A Little Robotic Help

[Norbert Zare] has identified a problem many of us suffer from – chronically bad posture. Its very common to see computer users hunched forwards over a screen, which eventually will lead to back problems. He mentions that most posture correction devices are pretty boring, so the obvious solution to [Norbert] was to build a simple robot to give you a friendly nudge into the correct position.

This simple Arduino-based build uses the ubiquitous MPU-6050 which provides 3-axis acceleration and 3-axis gyro data all processed on-chip, so it can measure where you’re going, which way you are orientated and how fast you are rotating. This is communicated via the I2C bus, so hooking into an Arduino or Raspberry Pi is a simple affair. There are plenty of Open Source libraries to work with this very common device, which helps reduce the learning curve for those unfamiliar with programming a fairly complex device.

At the moment, he is mounting the sensor on his body, and hard-wiring it, so there’s already some scope for improvement there. The operating premise is simple, if the body angle is more than 55 degrees off vertical, move the servos and shove the body back in to the correct position.

The project GitHub has the code needed, and the project page over on Hackaday.io shows the wiring diagram.

We have seen quite a few projects on this subject over the years, like this one that sends you mobile notifications, an ultrasonic rangefinder-based device, and one that even uses a webcam to keep an eye on you. This one has the silliness-factor, and we like that round these parts. Keep an eye on [Norbert] we’re sure there more good stuff to come!

Continue reading “Quit Hunching Over Your Screen With A Little Robotic Help”