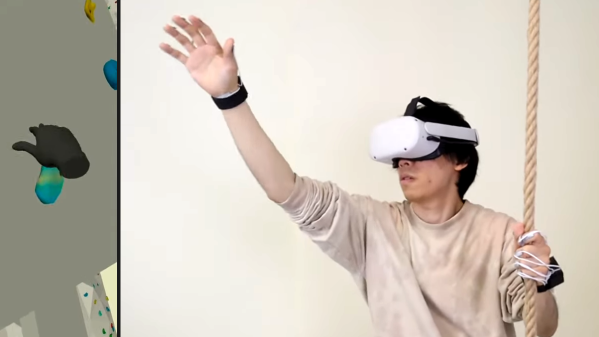
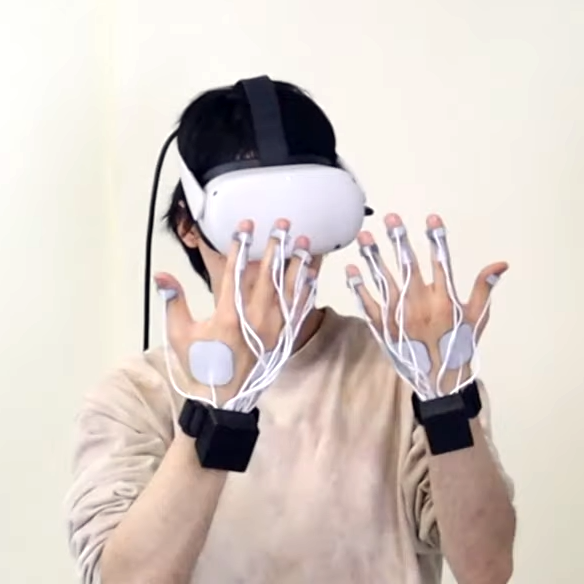
There’s hardware attached to the hands, yes, but only to the backs. Hands and fingers can be used entirely normally while receiving tactile feedback.
The unique device consists of a control box, wires, and some electrodes attached to different spots on the back of the hand and fingers. Carefully modulated electrical signals create tactile sensations on the front, despite originating from electrodes on the back. While this has clear applications for VR, the team thinks the concept could also have applications in rehabilitation, or prosthetics.
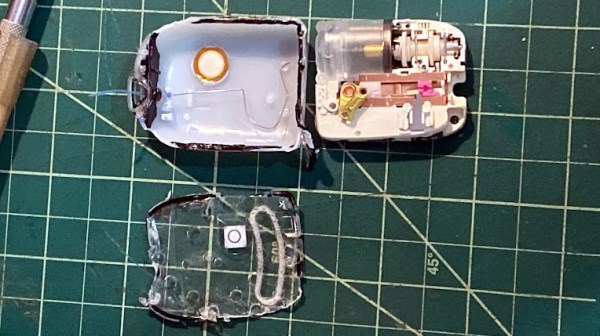
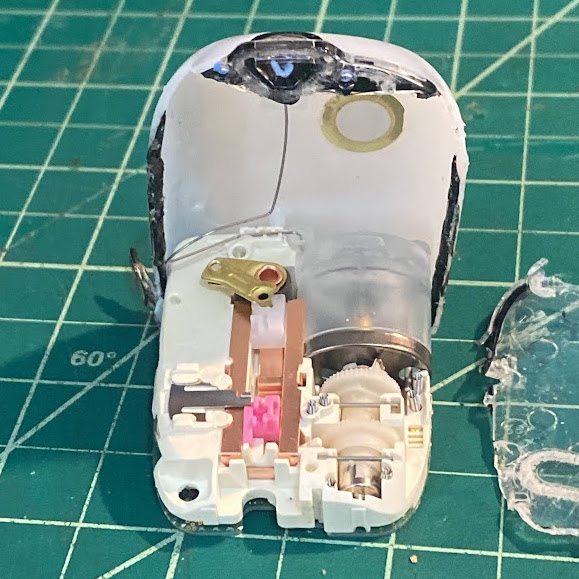
Modern insulin pumps are self-contained devices that attach to a user’s skin via an adhesive patch, and are responsible for administering insulin as needed. Curious as to what was inside, [Ido Roseman] tore down an Omnipod Dash and took some pictures showing what was inside.
A single motor handles inserting the cannula into the skin, retracting the insertion needle, and administering insulin.
These devices do quite a few things. In addition to holding a reservoir of insulin, they automatically insert a small cannula (thin tube) through the skin after being attached, communicate wirelessly with a control system, and pump insulin through the cannula as needed. All in a sealed and waterproof device. They are also essentially disposable, so [Ido] was curious about what kind of engineering went into such a thing.
The teardown stops short of identifying exactly how all the mechanisms inside work, but [Ido] was able to learn a few interesting things. For example, all of the mechanical functions — inserting the cannula with the help of a needle (and retracting the needle afterwards) and pumping insulin — are all accomplished by one motor and some clever mechanical engineering.
The electronics consist of a PCB with an NXP EX2105F 32-bit Arm7 microcontroller, a second chip that is likely responsible for the wireless communications, three captive LR44 button cells, and hardly a passive component in sight.
The software and communications side of an insulin pump like this one has had its RF communications reverse-engineered with the help of an SDR, a task that took a lot more work than one might expect. Be sure to follow that link if you’re interested in what it can take to get to the bottom of mystery 433 MHz communications on a device that isn’t interested in sharing.
[mat kelcey] was so impressed and inspired by the concept of a very slow movie player (which is the playing of a movie at a slow rate on a kind of DIY photo frame) that he created his own with a high-resolution e-ink display. It shows high definition frames from Alien (1979) at a rate of about one frame every 200 seconds, but a surprising amount of work went into getting a color film intended to look good on a movie screen also look good when displayed on black & white e-ink.
The usual way to display images on a screen that is limited to black or white pixels is dithering, or manipulating relative densities of white and black to give the impression of a much richer image than one might otherwise expect. By itself, a dithering algorithm isn’t a cure-all and [mat] does an excellent job of explaining why, complete with loads of visual examples.
One consideration is the e-ink display itself. With these displays, changing the screen contents is where all the work happens, and it can be a visually imperfect process when it does. A very slow movie player aims to present each frame as cleanly as possible in an artful and stylish way, so rewriting the entire screen for every frame would mean uglier transitions, and that just wouldn’t do.
Delivering good dithering results despite sudden contrast shifts, and with fewest changed pixels.
So the overall challenge [mat] faced was twofold: how to dither a frame in a way that looked great, but also tried to minimize the number of pixels changed from the previous frame? All of a sudden, he had an interesting problem to solve and chose to solve it in an interesting way: training a GAN to generate the dithers, aiming to balance best image quality with minimal pixel change from the previous frame. The results do a great job of delivering quality visuals even when there are sharp changes in scene contrast to deal with. Curious about the code? Here’s the GitHub repository.
Here’s the original Very Slow Movie Player that so inspired [mat], and here’s a color version that helps make every frame a work of art. And as for dithering? It’s been around for ages, but that doesn’t mean there aren’t new problems to solve in that space. For example, making dithering look good in the game Return of the Obra Dinnrequired a custom algorithm.
80s-era electronic speech certainly has a certain retro appeal to it, but it can sometimes be a useful data output method since it can be implemented on very little hardware. [luc] demonstrates this with a talking thermometer project that requires no display and no special hardware to communicate temperatures to a user.
Back in the day, there were chips like the Votrax SC-01A that could play phonemes (distinct sounds that make up a language) on demand. These would be mixed and matched to create identifiable words, in that distinctly synthesized Speak & Spell manner that is so charming-slash-uncanny.
Software-only speech synthesis isn’t new, but it’s better now than it was in Atari’s day.
Nowadays, even hobbyist microcontrollers have more than enough processing power and memory to do a similar job entirely in software, which is exactly what [luc]’s talking thermometer project does. All this is done with the Talkie library, originally written for the Arduino and updated for the ESP32 and other microcontrollers. With it, one only needs headphones or a simple audio amplifier and speaker to output canned voice data from a project.
[luc] uses it to demonstrate how to communicate to a user in a hands-free manner without needing a display, and we also saw this output method in an electric unicycle which had a talking speedometer (judged to better allow the user to keep their eyes on the road, as well as minimizing the parts count.)
Would you like to listen to an authentic, somewhat-understandable 80s-era text-to-speech synthesizer? You’re in luck, because we can show you an authentic vintage MicroVox unit in action. Give it a listen, and compare it to a demo of the Talkie library in the video below.
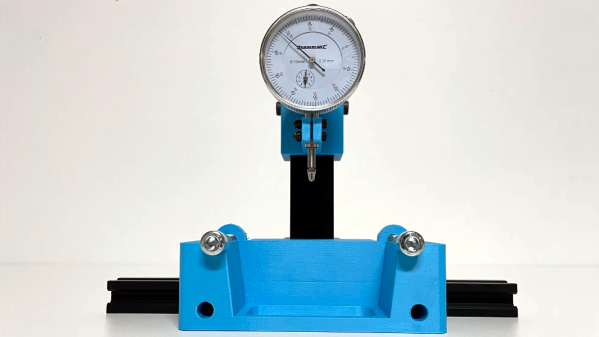
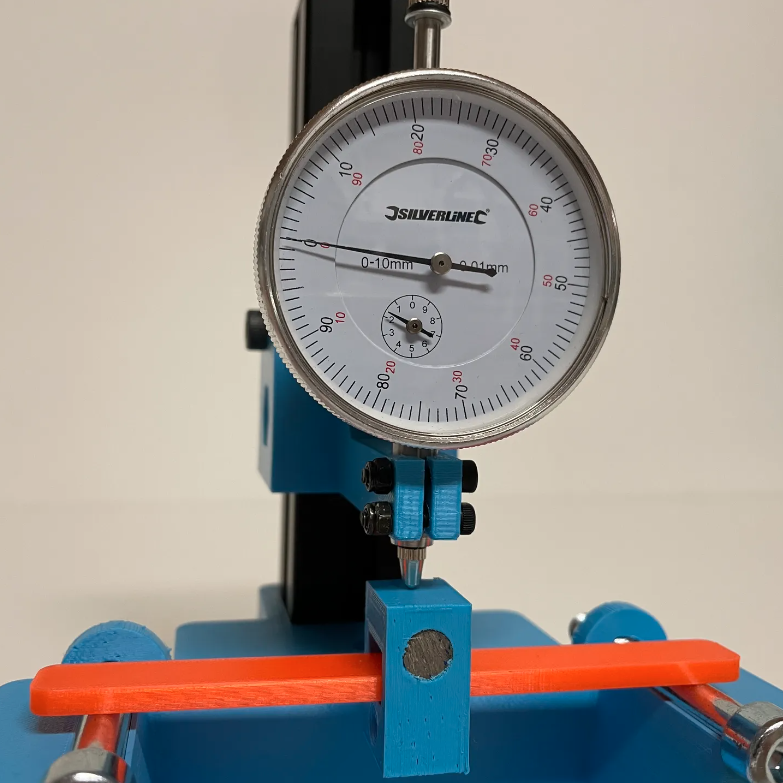
If one is serious about testing the stiffness of materials or parts, there’s nothing quite like doing your own tests. And thanks to [JanTec]’s 3-Point Bending Test rig, there’s no need to reinvent the wheel should one wish to do so.
The dial caliper can be mounted to a fixed height, thanks to a section of 3030 T-slot extrusion.
Some simple hardware, a couple spare pieces of 3030 T-slot extrusion, a few 3D-printed parts, and a dial indicator all come together to create a handy rig that will let one get straight to measuring.
Here is how it works: stiffness of a material is measured by placing a sample between two points and applying a known force to the middle of the sample. This will cause the material to bend, and measuring how far a standardized sample deforms under a known amount of force (normally accomplished by a dial indicator) is how one can quantify a material’s stiffness.
When a material talks about its Young’s modulus (E) value, it’s talking about stiffness. A low Young’s modulus means a material is more elastic, a high value means the material is more stiff. (This shouldn’t be confused with strength or toughness, which are more about resistance to non-recoverable deformation, and resistance to fracture, respectively.)
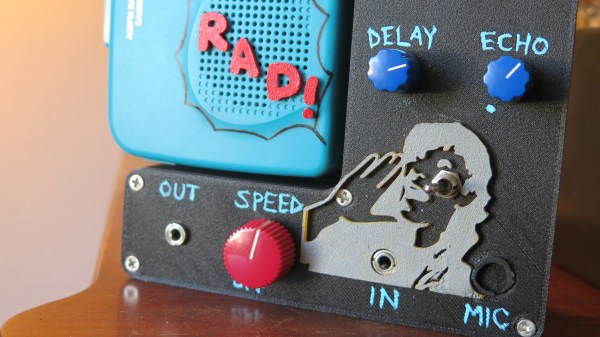
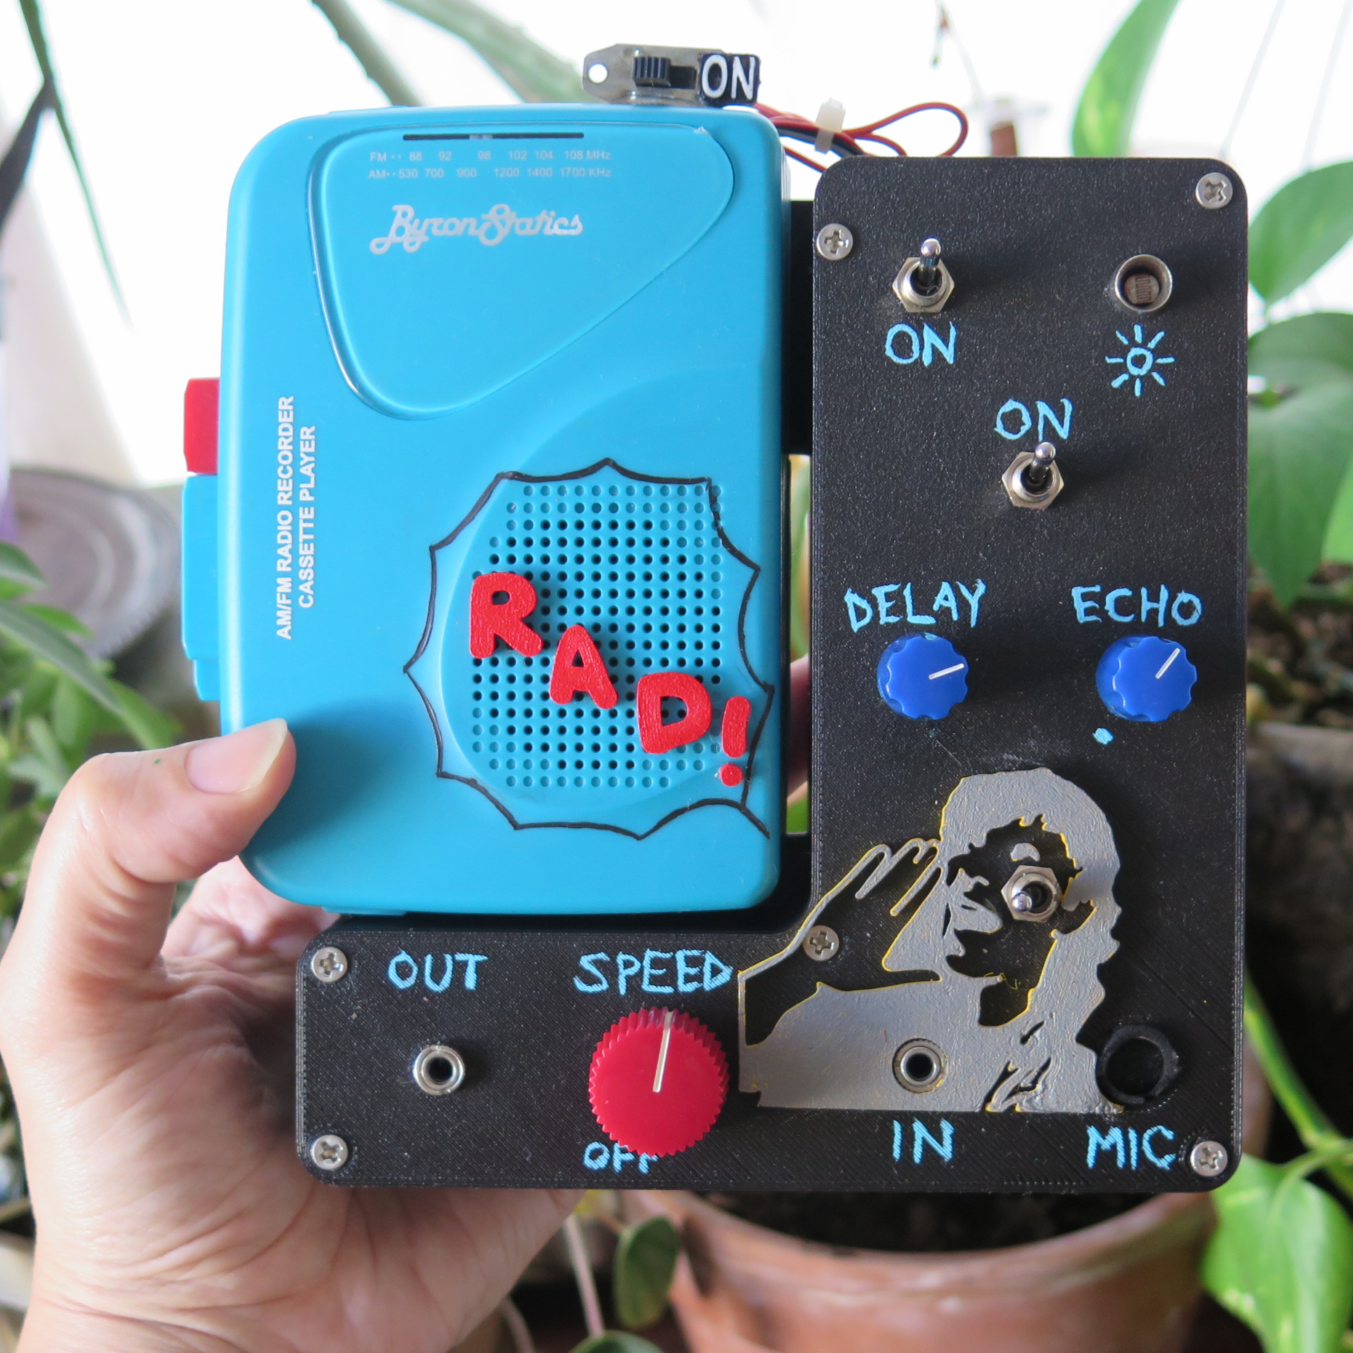
Cassette players and tapes are fertile hacking ground. One reason is that their electromechanical and analog nature provides easy ways to fiddle with their operation. For example, slow down the motor and the playback speed changes accordingly. As long as the head is moving across the tape, sound will be produced. The hacking opportunities are nicely demonstrated by [Lara Grant]’s cassette player mod project.
The device piggybacks onto a battery-powered audio cassette player and provides a variety of ways to fiddle with the output, including adjustable echo and delay, and speed control. At the heart of the delay and echo functionality is the PT2399, a part from the late 90s capable of some pretty impressive audio effects (as long as a supporting network of resistors and capacitors are in place, anyway.)
[Lara] provides a schematic for the PT2399’s interface to the cassette player’s output, which is handy should anyone want to try a similar modification. Speed of playback is controlled by adjusting the cassette player’s motor with PWM. Volume control swaps a photocell in place of a rotary volume potentiometer, and additional audio jacks provide flexibility for mixing and matching input and output with other equipment.
You can see it in action in the video embedded below. Intrigued, and want a few more examples of modified tape players? How about a strange sort of cassette synth, or this unique take on a mellotron that uses a whopping 14 modified tape players under the hood? And really out there is the Magnetotron, which consists of a large rotating cylinder with tape loops stuck to it — the magnetic read head is mounted on a wand which the user manually moves across the tapes to create sounds.
Tape players are accessible, hackable things, so remember to drop us a line if you make something neat!
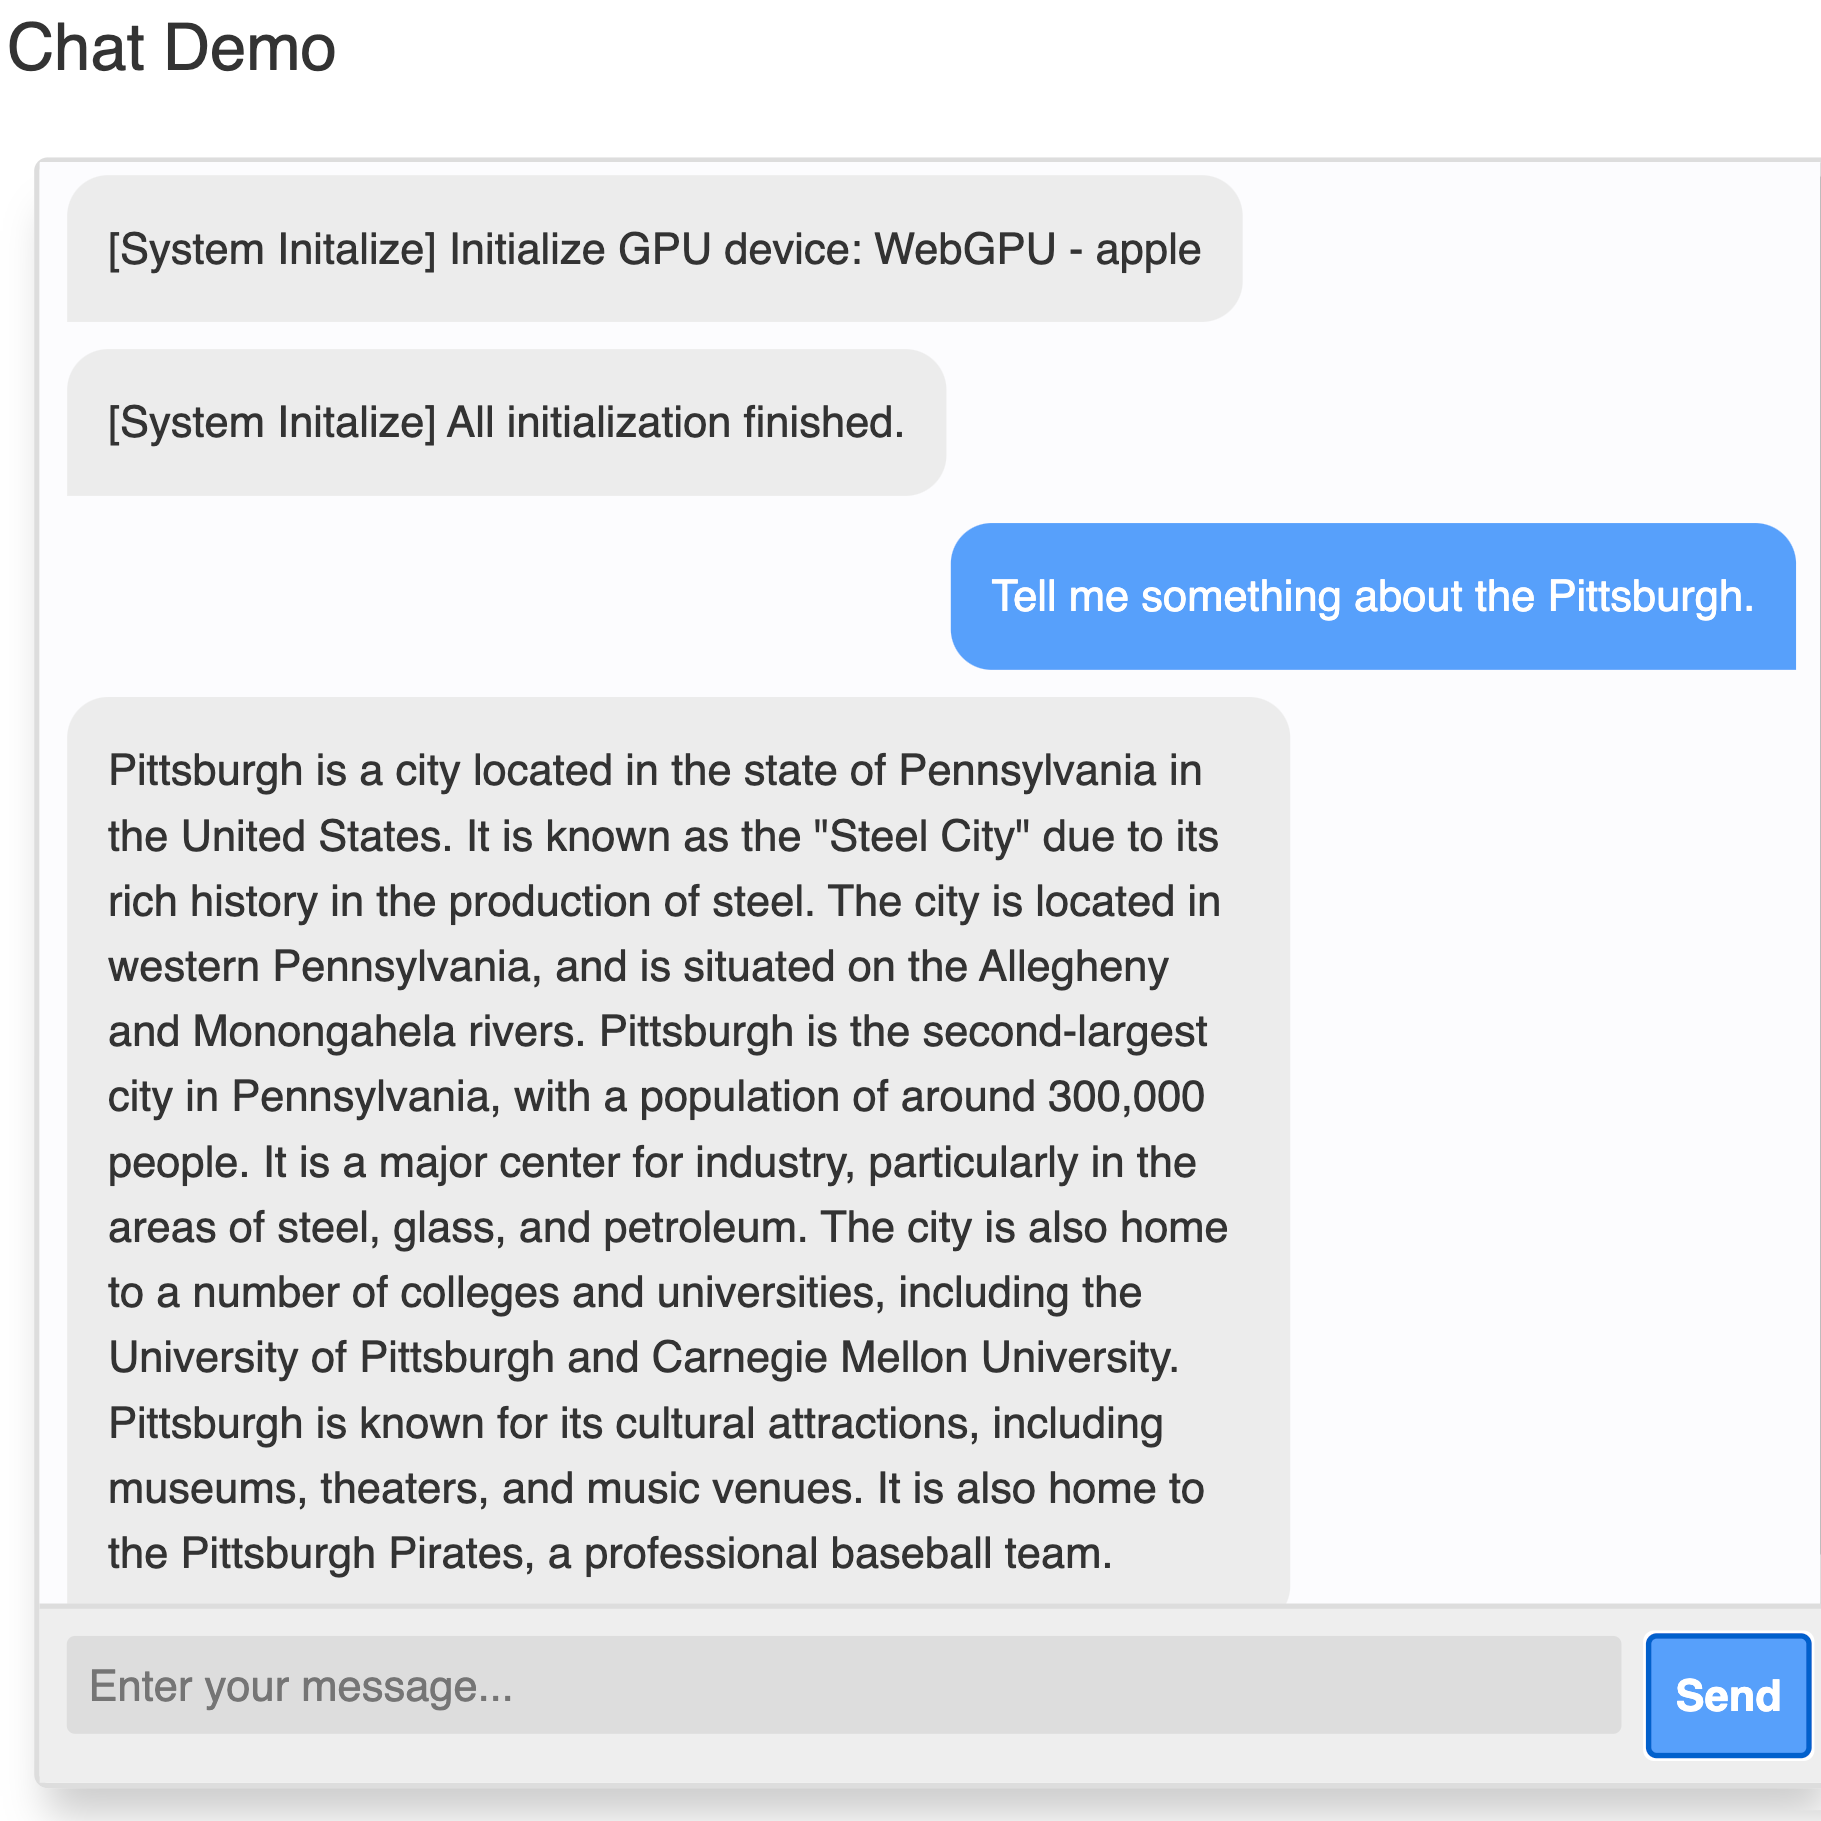
Large Language Models (LLM) are at the heart of natural-language AI tools like ChatGPT, and Web LLM shows it is now possible to run an LLM directly in a browser. Just to be clear, this is not a browser front end talking via API to some server-side application. This is a client-side LLM running entirely in the browser.
The ability to run an LLM (natural language AI) directly in-browser means more ways to implement local AI while enjoying GPU acceleration via WebGPU.
Running an AI system like an LLM locally usually leverages the computational abilities of a graphics card (GPU) to accelerate performance. This is true when running an image-generating AI system like Stable Diffusion, and it’s also true when implementing a local copy of an LLM like Vicuna (which happens to be the model implemented by Web LLM.) The thing that made Web LLM possible is WebGPU, whose release we covered just last month.
WebGPU provides a way for an in-browser application to talk to a local GPU directly, and it sure didn’t take long for someone to get the idea of using that to get a local LLM to run entirely within the browser, complete with GPU acceleration. This approach isn’t just limited to language models, either. The same method has been applied to successfully create Web Stable Diffusion as well.
It’s a fascinating (and fast) development that opens up new possibilities and, hopefully, gives people some new ideas. Check out Web LLM’s GitHub repository for a closer look, as well as access to an online demo.