It’s that time of year again — the 2022 Hackaday Prize has officially launched, and we’re excited to see what it turns out. This year’s theme is “Sustainability, Resilience, and Circularity,” and just in time, too; if the last couple of years has taught us anything, it’s that we’ve got a lot of failure points built into the systems that run our world. As broken as things are, it’s tempting to just curl up in a ball and pretend everything’s fine, but that’s not how hackers respond to adversity. We need to control what we can control, and there’s plenty of work to be done. From sustainable energy ideas to ways to reduce the amount of stuff we throw away, from breathing new life into old equipment to building communities that can take care of themselves, there’s plenty of work to be done. So get over to the Hackaday Prize page, check out the launch summit video if you need some inspiration, and get hacking. And hurry up — things are only going to get better if people like us make it happen.
With the web of undersea cables lacing the continents together now, it’s hard to imagine that it wasn’t until 1956 that the first transatlantic telephone cable was laid. Sure, there were telegraph cables under the Atlantic starting as early as the late 1800s, but getting your voice across the ocean on copper was a long time coming. So what was the discerning 1930s gentleman of business to do when only a voice call would do? He’d have used a radiotelephone, probably at an outrageous expense, which as this video on the receiving end of the New York to London radio connection shows, was probably entirely justified.
The video details the shortwave radiotelephone system that linked New York and London in the 1930s. It starts with a brief but thorough explanation of ionospheric refraction, and how that atmospheric phenomenon makes it possible to communicate over vast distances. It also offers a great explanation on the problems inherent with radio connections, like multipath interference and the dependency on the solar cycle for usable skip. To overcome these issues, the Cooling Radio Station was built, and its construction is the main thrust of the video.
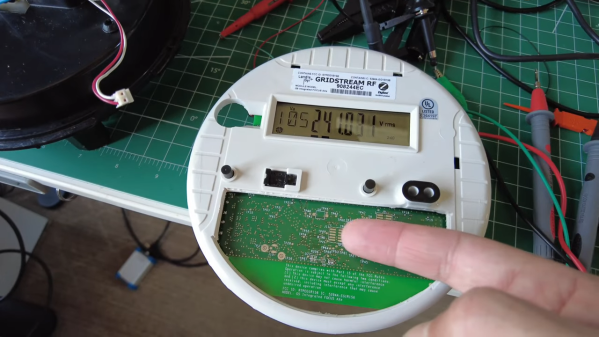
When the widget you’re working on is powered by a battery or a USB charger, running it on the bench is probably pretty safe. But when the object of your reverse-engineering desire is a residential electrical meter, things can get a little dicey.
Not that this elevated danger level has kept [Hash] from exploring the mysteries presented by smart meters. Still, with a desire to make things a little safer, he came up with a neat trick for safely powering electrical meters on the bench. [Hash] found that the internal switch-mode power supply on the meter backplane was easy enough to back-feed with a 12-volt bench supply, rather than supplying the meter with the full 240-volt AC supply it normally gets when plugged into a meter base (these are meters for the North American market, where split-phase 240-volt is the norm for residential connections.) But that wasn’t enough for the meter — it powered up, but stayed in a reset state without fully booting. Something more was needed to bring the meter fully to life.
That something proved to be a small AC signal. Normally, a resistor network divides the 240-volt supply down to about 3 volts, which is used by the sensing circuit in the meter. [Hash] found that injecting a 60-Hz, 600-mV sine wave signal with about a 3-volt DC bias into the sensing circuit was enough to spoof the meter into thinking it’s plugged into the meter base. The video below has a walkthrough of the hack, and some nice shots of the insides of the meters he’s been working with.
[Hash] has been working with these meters for a while now, and some of the stuff he’s learned is pure gold. Be sure to check out his 2021 Remoticon talk on meter hacking for all the fascinating details.
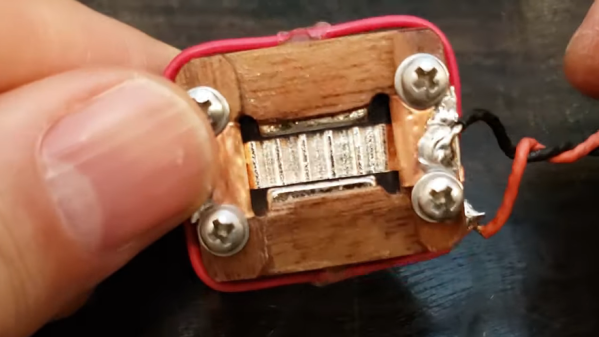
Not too many people build their own microphones, and those who do usually build them out of materials like plastic and metal. [Frank Olson] not only loves to make microphones, but he’s also got a thing about making them from wood, with some pretty stunning results.
[Frank]’s latest build is a sorta-kinda replica of the RCA BK-5, a classic of mid-century design. Both the original and [Frank]’s homage are ribbon microphones, in which a thin strip of corrugated metal suspended between the poles of magnets acts as a transducer. But the similarities end there, as [Frank] uses stacked layers of walnut veneer as the frame of his ribbon motor. The wood pieces are cut with a vinyl cutter, stacked up, and glued into a monolithic structure using lots of cyanoacrylate glue. The video below makes it seem easy, but we can imagine getting everything stacked neatly and lined up correctly is a chore, especially when dealing with neodymium magnets. Cutting and corrugating the aluminum foil ribbon is no mean feat either, nor is properly tensioning it and making a solid electrical contact.
The ribbon motor is suspended in a case made of yet more wood, all of which contributes to a warm, rich sound. The voice-over for the whole video below was recorded on a pair of these mics, and we think it sounds just as good as [Frank]’s earlier wooden Model 44 build. He says he has more designs in the works, and we’re looking forward to hearing them, too. Continue reading “A New Wrinkle On Wooden Ribbon Microphones”→
If there’s one thing that amateur radio operators are good at, it’s turning just about anything into an antenna. And hams have a long history of portable operations, too, where they drag a (sometimes) minimalist setup of gear into the woods and set up shop to bag some contacts. Getting the two together, as with this field-portable antenna made from a tape measure, is a double win in any ham’s book.
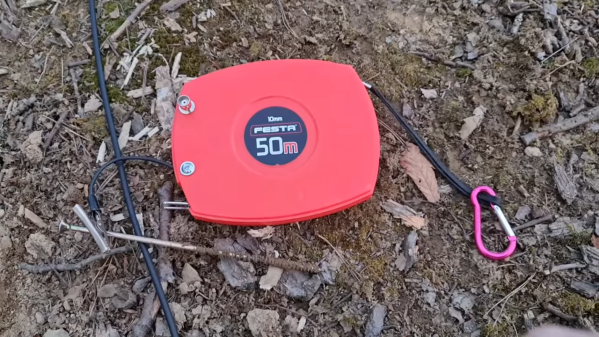
For [Paul (OM0ET)], this build seems motivated mainly by the portability aspect, and less by the “will it antenna?” challenge. In keeping with that, he chose a 50-meter steel tape measure as the basis of the build. This isn’t one of those retractable tape measures, mind you — just a long strip of flexible metal on a wind-up spool in a plastic case. His idea was to use the tape as the radiator for an end-fed halfwave, or EFHW, antenna, a multiband design that’s a popular option for hams operating from the 80-m band down to the 10-m band. EFHW antennas require an impedance-matching transformer, a miniature version of which [Paul] built and tucked within the tape measure case, along with a BNC connector to connect to the radio and a flying lead to connect to the tape.
Since a half-wave antenna is half the length of the target wavelength, [Paul] cut off the last ten meters of the tape to save a little weight. He also scratched off the coating on the tape at about the 40-meter mark, to make good contact with the alligator clip on the flying lead. The first video below details the build, while the second video shows the antenna under test in the field, where it met all of the initial criteria of portability and ease of deployment.
Most of the time, designing a printed circuit board is a little like one of those problems in an introductory physics course, the ones where you can safely ignore things like air resistance. With PCBs, it’s generally safe to ignore things like trace heating and other thermal considerations in favor of just getting everything placed sensibly and routing all the traces neatly.
But eventually, the laws of physics catch up to you, and you’ll come across a real-world problem where you can’t just hand-wave thermal considerations aside. When that happens, you’ll want to have a really good idea of just how much a trace is going to heat up, and what it’s going to do to the performance of your board, or even if the PCB is going to survive the ordeal.
Digging into the thermal properties of PCBs is something that Mike Jouppi has been doing for years. After working in the aircraft industry as a mechanical engineer, he started Thermal Management LLC, which developed software to make the thermal design of PCBs easier. He’ll stop by the Hack Chat to answer your questions about PCB thermal design considerations, and help us keep all our hard work from going up in smoke.
Remember that time back in 2021 when a huge container ship blocked the Suez Canal and disrupted world shipping for a week? Well, something a little like that is playing out again, this time in the Chesapeake Bay outside of the Port of Baltimore, where the MV Ever Forward ran aground over a week ago as it was headed out to sea. Luckily, the mammoth container ship isn’t in quite as narrow a space as her canal-occluding sister ship Ever Given was last year, so traffic isn’t nearly as impacted. But the recovery operation is causing a stir, and refloating a ship that was drawing 13 meters when it strayed from the shipping channel into a muddy-bottomed area that’s only about 6 meters deep is going to be quite a feat of marine engineering. Merchant Marine YouTuber Chief MAKOi has a good rundown of what’s going on, and what will be required to get the ship moving again.
With the pace of deep-space exploration increasing dramatically of late, and with a full slate of missions planned for the future, it was good news to hear that NASA added another antenna to its Deep Space Network. The huge dish antenna, dubbed DSS-53, is the fourteenth dish in the DSN network, which spans three sites: Goldstone in California; outside of Canberra in Australia; and in Madrid, where the new dish was installed. The 34-meter dish will add 8% more capacity to the network; that may not sound like much, but with the DSN currently supporting 40 missions and with close to that number of missions planned, every little bit counts. We find the DSN fascinating, enough so that we did an article on the system a few years ago. We also love the insider’s scoop on DSN operations that @Richard Stephenson, one of the Canberra operators, provides.
Does anybody know what’s up with Benchy? We got a tip the other day that the trusty benchmarking tugboat model has gone missing from several sites. It sure looks like Sketchfab and Thingiverse have deleted their Benchy files, while other sites still seem to allow access. We poked around a bit but couldn’t get a clear picture of what’s going on, if anything. If anyone has information, let us know in the comments. We sure hope this isn’t some kind of intellectual property thing, where you’re going to have to cough up money to print a Benchy.
Speaking of IP protections, if you’ve ever wondered how far a company will go to enforce its position, look no further than Andrew Zonenberg’s “teardown” of an anti-counterfeiting label that Hewlett Packard uses on their ink cartridges. There’s a dizzying array of technologies embedded inside what appears to be a simple label. In addition to the standard stuff, like the little cuts that make it difficult to peel a tag off one item and place it on another — commonly used to thwart “price swapping” retail thefts — there’s an almost holographic area of the label. Zooming in with a microscope, the color-shifting image appears to be made from tiny hexagonal cells that almost look like the pixels in an e-ink display. Zooming in even further, the pixels offer an even bigger (smaller) surprise. Take a look, and marvel at the effort involved in making sure you pay top dollar for printer ink.
And finally, we got a tip a couple of weeks ago on a video about jerry cans. If that sounds boring, stop reading right now — this one won’t reach you. But if you’re even marginally interested in engineering design and military history, make sure you watch this video. What is now known to the US military as “Can, Gasoline, Military 5-Gallon (S/S by MIL-C-53109)” and colloquially known as the NATO jerry can, started life as the Wehrmacht-Einheitskanister, a 20-liter jug whose design addresses a long list of specifications, from the amount of liquid it could contain to how the cans would be carried. The original could serve as a master class in good design, and some of the jugs that were built in the 1940s are still in service and actively sought by collectors of militaria. Cheap knockoffs are out there, of course, but after watching this video, we’ve developed a taste for jerry cans that only the original will sate.