The internals of a home built 10 MHz frequency reference.

Low Cost Lab Frequency Reference

[Mark] wanted an accurate frequency reference for his electronics lab. He specified some requirements for the project, including portability, ability to work inside a building, and low cost. That ruled out GPS, cesium standard clocks, rubidium standard clocks, and left him looking for a low cost Oven Controlled Crystal Oscillator (OCXO).

The Low Cost 10 MHz Frequency Reference is based around a Morion OCXO. These Russian oscillators are available from eBay second hand at about $40 a pop. With a stability well within the requirements, [Mark] order a few.

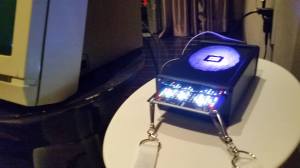
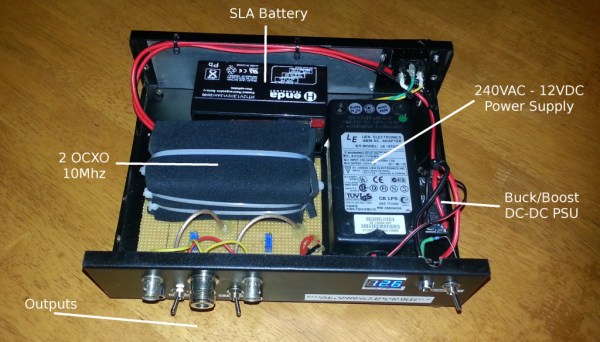
The next step was to stick all the components in a box. The two OCXOs in the box need about 3 amps to heat up, which is provided by a 12 V PSU. For portability, a sealed lead acid battery was added. The front panel shows the supply voltages, switches between mains and battery supplies, and provides connectivity to the OCXOs.

Since OCXOs work by heating a crystal to a specific temperature, they can use quite a bit of power in the heating element. To increase battery life, a neoprene foam insulator was wrapped around the OCXOs.

For less than $100, this portable tool will aid in calibrating equipment or creating very accurate clocks.

The badge from Queercon 11 at Defcon

The Queercon 11 Badge

DEFCON is known for its unique badge designs, which have featured displays, radios, and tons of LEDs in the past. This year, there was another digital badge at DEFCON. The Queercon 11 badge featured an MSP430, a LED display, an IR interface, and an ISM band radio.

Queercon started off as a DEFCON party for LGBT hackers. Over the past eleven years they’ve run events at DEFCON including parties, mixers, and networking events. Over time the group has grown, become a non-profit, and provided a social network for LGBT people in tech. We must admit that they throw quite a good pool party.

This badge gave you points for meeting other people. When held near another QC11 badge, the IR link sends the identifier for each person. Both badges light up and display the other person’s name, and store the event. This process became known by a variety of colloquialisms, and “badginal intercourse” was a common occurrence at events.

The reader for Queercon 11 badges
The QC11 Badge Reader

The RF radio, implemented using a HopeRF RF69 module, shows how many people with QC11 badges are near you. A base station at events sends out data to give badges points for attendance. As points are accumulated, the rainbow LEDs on either side of the display light up.

At Queercon parties, a reader connected to a dumb terminal read data off the badges. It then shows who the badge has paired with, and what events its been to.

The hardware design and source code have all been released on the Queercon website. The full functionality is discussed in the README.

A DIY CNC dust collector

DIY CNC Dust Collection

CNC machines are great at churning out custom parts, but they tend to make a mess in the process. [Darcy] has built up his own CNC dust collection rig to collect the dust and keep his workspace clean.

To capture the dust, a custom dust skirt encloses the cutting tool and directs the vacuum. This was made by gluing acrylic parts together, creating a box that contains the dust and provides a connection for the vacuum system.

For $1, [Darcy] built a cyclone dust extractor. This spins air around in circles, causing the dust to fall to the bottom of a container. The result is less dust reaching the vacuum, and much less money spent on vacuum bags.

Since the vacuum makes quite a bit of noise, a muffler was needed. This is just a simple wood box to contain the machine. It can also be used to vent the exhaust outside to further prevent polluting the workspace.

While we’ve seen some similar builds in the past, [Darcy]’s design could be helpful for those looking to build their own system. He also gives us a video which shows the effectiveness of the dust skirt, which you can find after the break.

Continue reading “DIY CNC Dust Collection”

The CC3200 dev board with Energia

Energia On The CC3200

If you’re looking to connect things to the internet, with the goal of building some sort of “Internet of Things,” the new CC3200 chip from TI is an interesting option. Now you can get started quickly with the Energia development environment for the CC3200.

We discussed the CC3200 previously on Hackaday. The chip gives you an ARM Cortex M4 processor with a built-in WiFi stack and radio. It supports things like web servers and SSL out of the box.

Energia is an Arduino-like development environment for TI chips. It makes writing firmware for these devices easier, since a lot of the work is already done. The collection of libraries aids in getting prototypes running quickly. You can even debug Energia sketches using TI’s fully featured IDE.

With this new release of Energia, the existing Energia WiFi library supports the built-in WiFi radio on the CC3200. This should make prototyping of WiFi devices easier, and cheaper since the CC3200 Launchpad retails for $30.

A Hackable Hi-Fi Audio DSP

DSP 01 Hi-fi Signal Processor


Audiophiles tend to put analog systems on a pedestal. Analog systems can provide great audio performance, but they tend to be quite costly. They’re also hard to tinker with, since modifying parameters involves replacing components. To address this, [tshen2] designed the DSP 01.

The DSP 01 is based around the Analog Devices ADAU1701. This DSP chip includes two ADCs for audio input, and four DACs for audio output. These can be controlled by the built in DSP processor core, which has I/O for switches, buttons, and knobs.

[tshen2]’s main goal with the DSP 01 was to implement an audio crossover. This device takes an input audio signal and splits it up based on frequency so that subwoofers get the low frequency components and tweeters get the higher frequency components. This is critical for good audio performance since drivers can only perform well in a certain part of the audio spectrum.

Analog Devices provides SigmaStudio, a free tool that lets you program the DSP using a drag-and-drop interface. By dropping a few components in and programming to EEPROM, the DSP can be easily reconfigured for a variety of applications.

TiLDA MKe: The EMF 2014 Badge

The TiLDA badge from EMF 2014


Hardware conference badges keep getting more complex, adding features that are sometimes useful, and sometimes just cool. The Electromagnetic Field (EMF) 2014 badge, TiLDA MKe, is no exception.

This badge displays the conference schedule, which can be updated over an RF link with base stations. It even notifies you when an event you’re interested in is about to start. Since we’ve missed many a talk by losing track of the time, this seems like a very useful feature.

Beyond the schedule, the device has a dedicated torch button to turn it into a flashlight. A rather helpful feature seeing as EMF takes place outdoors, in a field of the non-electromagnetic sort. They’re also working on porting some classic games to the system.

The badge is compatible with the Arduino Due, and is powered by an ARM Cortex M3. It’s rechargeable over USB, which is a nice change from AA powered badges. It also touts a radio transceiver, joystick, accelerometer, gyroscope, speaker, infrared, and is compatible with Arduino shields.

For more technical details, you can check out the EMF wiki. EMF 2014 takes place from August 29th to the 31st in Bletchley, UK, and you can still purchase tickets to score one of these badges.

An FPGA Based 6502 Computer

A diagram of the CHOCHI Board

It’s no secret that people love the 6502 processor. This historic processor powered some of our favorite devices, including the Apple II, the Commodore 64, and the NES. If you want to play with the 6502, but don’t want to bother with obtaining legacy chips, the CHOCHI board is for you.

While many people have built modern homebrew 6502 computers, the CHOCHI will be much easier for those looking to play with the architecture. It’s based on a Xilinx XC3S50 FPGA which comes preconfigured as a 6502 processor.

After powering on the board, you can load a variety of provided binaries onto it. This collection includes a BASIC interpreter and a Forth interpreter. Of course, you’re free to write your own applications in 6502 assembly, or compile C code for the device using the cc65 compiler.

If you get bored with the 6502 core, you can always grab Xilinx’s ISE WebPACK for free and use the board as a generic FPGA development tool. It comes with 128K of SRAM and 31 I/O pins. Not bad for a $30 board.