Bluetooth Network Monitor

Bluetooth Network Monitor

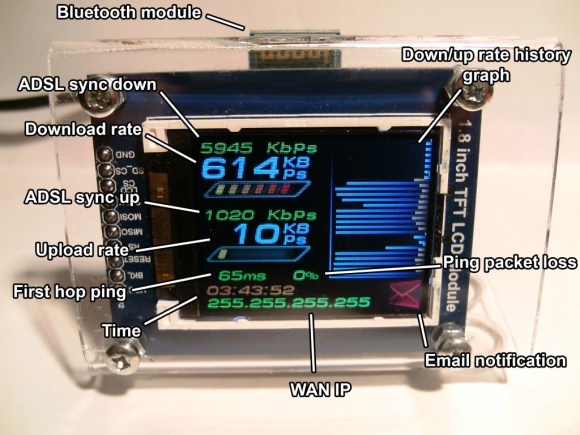
[Zak] wanted to keep tabs on his network connection without needing to log into his router. Since his router was a PC running Debian Linux, he rigged up a Bluetooth Network Monitor to display the information.

The monitor is based on a ATMega328P that reads data from a Bluetooth serial connection and displays it on the TFT screen. It uses a low cost Bluetooth module to receive data from a router. A shell script fetches the data and formats it into a string that can be sent over the Bluetooth link.

A USB connection with a desktop computer is used to power the device, but [Zak] also added USB support using V-USB. He plans to use it to get data from the desktop. For example, he could display CPU load and temperature data.

Overall, this is a nice project for fetching data wirelessly and displaying it on your desk. [Zak] has provided the code and Eagle files with his write up for anyone interested in building their own.

Solar Powered Wifi Radiation Sensor

Solar Radiation Detector

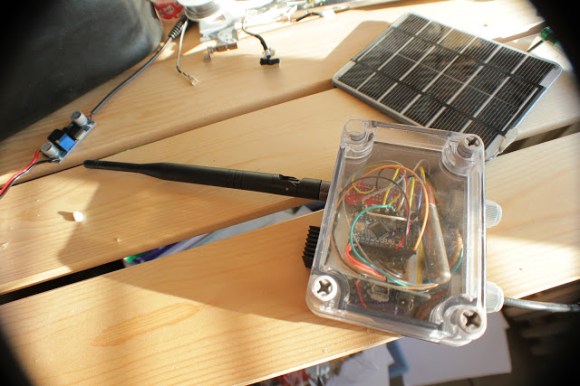
[Manish] packed lots of functionality into this radiation sensor module. The device is completely solar powered and weatherproof, so it can be mounted anywhere. It uses a Geiger Muller tube to monitor radiation and connects to the internet using wifi network to report the readings.

The design uses an Arduino Pro Mini to perform the monitoring and reporting. Wifi connectivity is provided by a RN-XV wifi module. A solar panel, Adafruit’s solar charger, and a LiPo battery are used to provide power to the device. It’s enclosed in Adafruit’s IP-66 rated weatherproof enclosure.

A custom Geiger Muller tube interface is used to interface with the tube. The interface is simple and cheap. It provides the high voltage required to drive the tube, and circuitry needed to detect the ionization events.

Once the device is connected to the internet, it uploads data directly to Cosm. This service lets the data be shared using Twitter, or accessed using an API. The project shows how to build a wireless networked sensor that directly connects to the internet for about $100.

Olin College Penny Press

Olin Penny Press

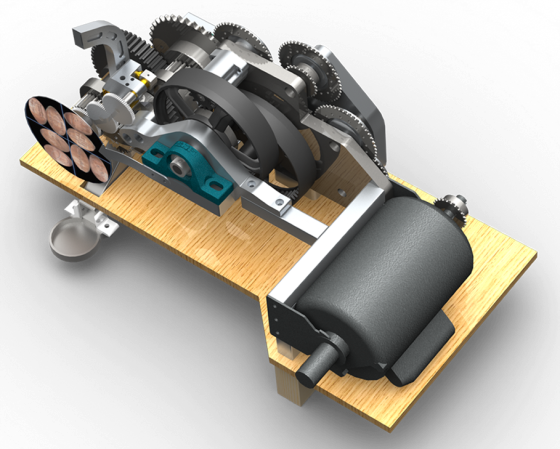
Inspired by souvenir penny presses, [Robert] built the Olin College penny press. This machine stamps out coins with the school’s name and a variety of other patterns. He built it as part of a mechanical structures course, with the goal of designing something that used large forces.

Crushing a penny takes about five tons of force. To deliver that force, [Robert] used a 1 horsepower motor coupled to a custom 1190:1 reduction drive train, which consisted of sprockets, gears, and chains. The aluminium frame supporting the drive train also had to be designed to withstand large forces.

This required of a lot of custom parts, which were made using a CNC mill, a water jet cutter and a mill. All of the CAD drawings are available for anyone who wants to replicate the design.

This beast of a machine weighs about 90 pounds and can squish 12 pennies every minute. Olin College installed the penny press on their campus for anyone to use for free.

FireHero: Raspberry Pi Controlled Pyrotechnics

Fire Hero 3

To put on a live pyrotechnic show at a music festival, [Chris] built the FireHero 3. The result is remotely controlled flames shooting up to 100 feet in the air.

The system is controlled by a Raspberry Pi and an Arduino. A server runs on the Pi and allows a remote computer to control the system. The Pi sends commands over serial to the Arduino, which switches solid state relays that actuate the valves.

There’s also some built in safety features: the system won’t boot unless you have the right key and RFID tag, and there are pressure transducers and temperature sensors to ensure the system is operating safely. A CO2 actuated valve can quickly stop fuel flow in an emergency.

Vaporized propane creates the fireballs. The vapor is created by heating the supply tank in a hot water bath. An accumulation tank stores the vapor and custom built manifolds distribute it to the various flame cannons. At each cannon, a silicon nitride hot surface igniter (HSI) is used to ignite the flames once the valve is opened.

After the break, watch a video the the FireHero making some flames.

Continue reading “FireHero: Raspberry Pi Controlled Pyrotechnics”

3D Printing Records

3D Printed Record

This is a working record created with a 3D printer. [Amanda] came up with a process that converts audio files into 3D models. These models can be printed and played on a standard record player.

The real work is done by a Processing sketch that creates a STL file. [Amanda] started off by trying to create a sine wave. She used this test to optimize the printing process. Then she used Python to extract audio data from WAV files and modified the processing script to process the data. After more tweaking, she was able to get a reasonable signal to noise ratio and minimize distortion.

The resulting records have a sample rate of 11 kHz and 5-6 bit resolution. The sound quality isn’t going to be the same as commercially pressed vinyl, but you can still make out the song.

Objet Connex 500 was used to print the records. This UV printer has a 600 dpi resolution, which is means it’s more accurate than extrusion printers. Your mileage may vary using different printers, but all of the Processing and Python code is available with the project write up.

After the break, watch [Amanda] spin some 3D printed records.

Continue reading “3D Printing Records”

The Hexapod Hexacopter

Hexapod Hexacopter

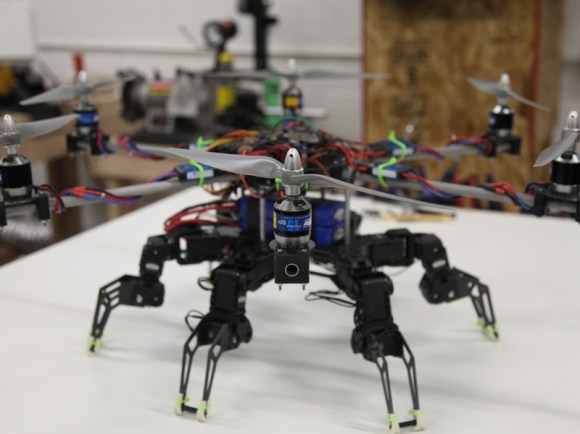
Over at Mad Lab Industries, they had the idea of building a quadcopter that could walk and fly. By combining a hexapod with a hexacopter, they ended up with this creation.

The hexapod part started off with PhantomX Hexapod Kit, but it was far too heavy to fly. To reduce weight, they manufactured carbon fibre parts for the frame and legs. Even with the weight reductions, they still needed to six rotors to keep it stable.

The hexacopter part of the build uses more custom carbon fibre parts to mount the motors. The booms and mounts are also custom built out of aluminium. They used six E-Flite motors, propellers, and ESCs to provide lift.

A variety of controllers are used to run the robot. Two Arbotix devices handle the hexapod control, and a Hoverfly flight controller keeps it in the air. It’s controlled remotely using a Spektrum controller.

They have some ambitious next steps, including a mechanism that disconnects and reconnects the hexacopter and the base. After the break, check out a video of this impressive build in action.

Continue reading “The Hexapod Hexacopter”

Digital IR Theremin

Digital IR Theremin

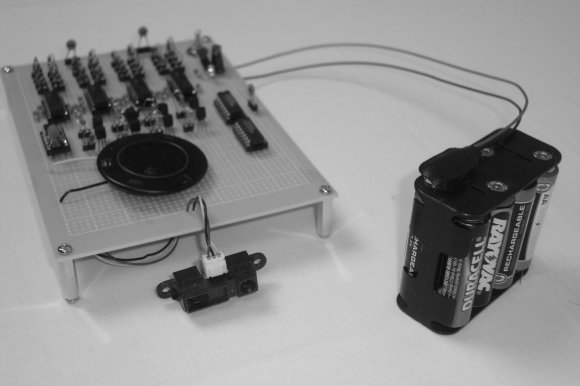
This Digital IR Theremin creates tones based on the distance of an object from its IR sensor. There’s no microcontroller here, since the project is part of an Introduction to Digital Electronics course. Instead, it uses a handful of comparators, transistors, AND gates, and a 555 timer to make noise.

The comparators are connected to create window comparators. This configuration will output a digital 1 if the input is between two reference voltages, and 0 if it is not. Using this, the analog output of the IR range sensor can be converted to digital values.

The 555 timer takes care of creating the output waveform. A specific resistor is switched in to the timer’s RC circuit depending on which window comparator is active. This allows for a different tone to be played depending on the distance from the IR sensor.

The result is a square wave, which has a frequency dependant on how close an object is to the IR sensor. By selecting the right resistances for each distance, the theremin can be tuned to play a specific scale.

This is a neat project for people looking to learn digital electronics, and the write up does a great job of explaining the theory. After the break, check out a video of the theremin generating some tones.

Continue reading “Digital IR Theremin”