These are batteries. Don't put them in your mouth.

PSA: Don’t Let Kids Eat Lithium Batteries

We get a lot of press releases at Hackaday, but this one was horrific enough that we thought it was worth sharing. Apparently, some kids are accidentally eating lithium coin cell batteries. When this happens with bigger cells, usually greater than 20 millimeters (CR2032, CR2025, and CR2016) really bad things happen. Like burning esophaguses, and even death.

The National Capital Poison Center has done some research on this, and found that 14% of batteries swallowed over the past two years came from flameless candles like the ones above. We know some of our readers also deal with batteries in open trays, which are apparently pretty dangerous for children.

The National Capital Poison Center’s website has an entire page dedicated to battery safety, which is probably worth a read if you deal with batteries and small children on a regular basis. Should an incident occur, there’s even a hotline to call for assistance.

So, please, don’t swallow batteries, or let children put them in their mouths. After the break, a Canadian PSA song about not putting things in your mouth.

Continue reading “PSA: Don’t Let Kids Eat Lithium Batteries”

Counting Laps And Testing Products With OpenCV

It’s been about a year and a half since the Batteroo, formally known as Batteriser, was announced as a crowdfunding project. The premise is a small sleeve that goes around AA and AAA batteries, boosting the voltage to extract more life out of them. [Dave Jones] at EEVblog was one of many people to question the product, which claimed to boost battery life by 800%.

Batteroo did manage to do something many crowdfunding projects can’t: deliver a product. Now that the sleeves are arriving to backers, people are starting to test them in the wild. In fact, there’s an entire thread of tests happening over on EEVblog.

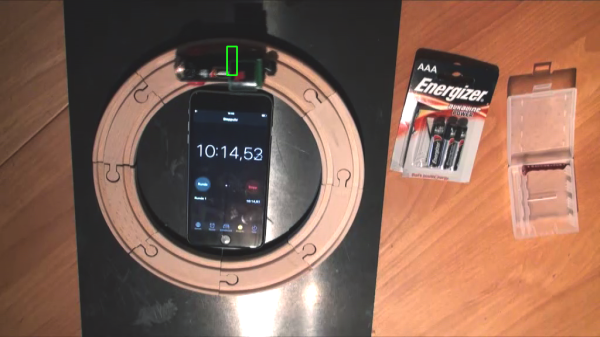
One test being run is a battery powered train, running around a track until the battery dies completely. [Frank Buss] wanted to run this test, but didn’t want to manually count the laps the train made. He whipped up a script in Python and OpenCV to automate the counting.

The script measures laps by setting two zones on the track. When the train enters the first zone, the counter is armed. When it passes through the second zone, the lap is recorded. Each lap time is kept, ensuring good data for comparing the Batteroo against a normal battery.

The script gives a good example for people wanting to play with computer vision. The source is available on Github. As for the Batteroo, we’ll await further test results before passing judgement, but we’re not holding our breath. After all, the train ran half as long when using a Batteroo.

A DIY Vacuum Pickup Tool For $75

If you’re assembling prototypes of SMD boards on your own, placing the parts accurately can be a pain. Of course, it’d be nice to have a full pick and place machine, but those are rather expensive and time consuming to set up, especially for a small run of boards. Instead, a vacuum pickup tool can help you place the parts quickly and accurately by hand.

The folks over at Ohmnilabs have put together their own DIY pickup tool for about $75, and it’s become part of their in-house prototyping process. They grew tired of placing components with tweezers, which require you to remove parts from the tape before lifting them, and have a tendency to flip parts over at the worst time.

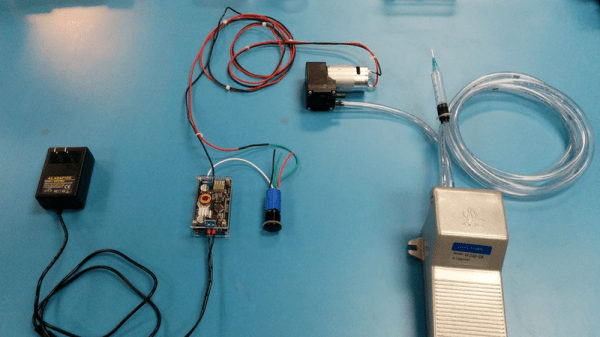
The build consists of a couple parts that can be bought from Amazon. An electric vacuum pump does the sucking, and the vacuum level is regulated with an adjustable buck converter. A solid foot switch keeps your hands free, and syringe tips are used to pick the parts up.

This looks like a simple afternoon build, but if you’re prototyping, it could save you tons of time. To see it in action, check out the video after the break.

Continue reading “A DIY Vacuum Pickup Tool For $75”

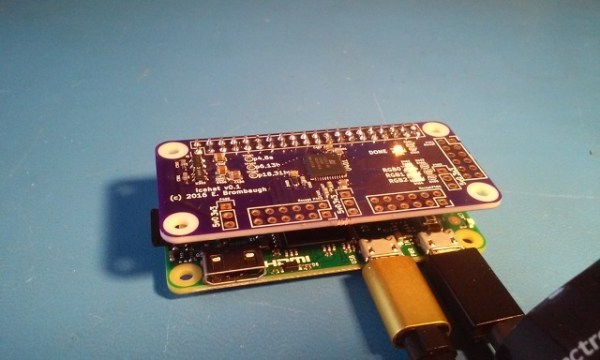
Icehat on a Raspberry Pi Zero

Give Your RPi A Cool FPGA Hat

Need additional, custom IO for your Raspberry Pi? Adding an FPGA is a logical way to expand your IO, and allow for high speed digital interfaces. [Eric Brombaugh]’s Icehat adds a Lattice iCE5LP4K-SG48 FPGA in a package that fits neatly on top of the Raspberry Pi Zero. It also provides a few LEDs and Digilent compatible PMOD connectors for adding peripherals. The FPGA costs about six bucks, so this is one cheap FPGA board.

The FPGA has one time programmable memory, but can also be programmed over SPI. This allows the host Pi to flash the FGPA with the latest bitstream at boot. Sadly, this particular device is not supported by the open source Icestorm toolchain. Instead, you’ll need Lattice’s iCEcube2 design software. Fortunately, this chip is supported by the free license.

Icehat is an open source hardware design, but also includes a software application for flashing a bitstream to the FPGA from the Pi and an example application to get you started. All the relevant sources can be found on Github, and the PCB is available on OSHPark.

While this isn’t the first pairing of a Raspberry Pi and FPGA we’ve seen, it is quite possibly the smallest, and can be built by hand at a low cost.

The 2016 Queercon Badge

What We Learned From The 2016 Queercon Badge

DEF CON has become known for the creative electronic badges, and now we get to see a variety of them dangling from lanyards every year. This year, the Queercon badge stood out as the one that got the most people asking “where did you get that?!” Once again, [Evan Mackay], [George Louthan], [Jonathan Nelson], and [Jason Painter] delivered an awesome badge for this con-within-a-con for LGBT hackers and their friends.

The badge is a squid shape, with a nifty clear solder mask, printed on black FR4, and routed with natural curved traces. The squid eyes consist of sixty cyan LEDs, with RGB LEDs on the tentacles. The eyes make expressions, and the tentacles light up with a selectable pattern. Hitting the “ink” button shoots your pattern out to all nearby devices using the 2.4 GHz radio on board, and a set of small connectors can be used to “mate” with other badges to learn patterns. Yes, the Queercon badge always has suggestive undertones.

After playing with it for the whole con, we think this badge has some good lessons for electronic badge designers:

Variable Brightness

The 2016 Queercon Badge with two hats
The Queercon Badge with Two Hats

This badge used a phototransistor as a light sensor to measure ambient light and set the brightness accordingly. With over 60 LEDs, this helped the two AA batteries last for nearly the entire conference.

Power Switches

This badge has a power switch. That switch turns the badge off. This probably sounds very obvious, but it’s also unfortunately uncommon on electronic badges. The switch means people turn the badge off at night, and don’t have to yank batteries when firmware glitches.

Hats!

The badge had two expansion ports on the squid’s head for adding hats. These were given power, and the connector spec was published before the event. Our favourite? A unicorn horn with a rainbow LED inside.

Social Badges are Fun

This has been the fourth Queercon badge in a row that communicated with other badges to unlock things. This is actually a neat way to get people to interact, and leads to a whole host of suggestive puns. Badginal intercourse, anyone?

We’ve heard that next year’s badge is already in the works, and we look forward to seeing what these folks come up with next. For now, you can grab all the hardware design files and get inspired for your own electronic badge build.

Distributed, Open Source Chat With Vector And Matrix

When it comes to chat, you have many choices. Facebook Messenger, Google Talk, Whatsapp, Kik, and Slack are all viable options. However, all of these choices are proprietary, and require you to use servers that you can’t run yourself. They’re highly centralized, closed source tools.

In the open source world, IRC has been the go to solution for chat for many years, and for good reason. Anyone can run a server, there’s many clients, and it’s built on open standards. But IRC comes from a pre-mobile world, and relies on clients to maintain persistent connections to the server. It’s not the best experience on a phone.

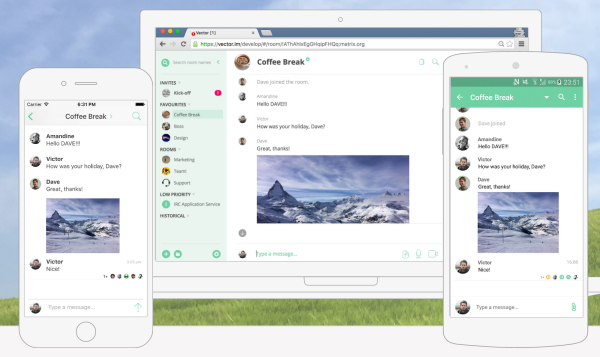
Matrix.org and Vector.im aim to be a modern solution to chat. Matrix is a standard for passing messages around, and Vector is a chat solution built on top, with support for iOS, Android, and your browser.

What makes this solution different is the concept of Homeservers. A Homeserver manages messages for users, recording them when they are received and providing them to users when they connect. Homeservers also “federate” to communicate amongst each other. This means anyone can run a Homeserver and connect it to the greater network of Matrix, providing a distributed approach to building a chat network.

Under the hood, Matrix is just HTTP. You send messages into the network with POST requests, and receive new messages by polling with GET requests. This means no persistent connections are required, which is perfect for mobile and low power devices.

On the topic of devices, Matrix is designed for general purpose messaging, not just chat. It should be pretty simple to connect hardware up to Matrix, which would provide a simple way to get data in and out of connected devices. Since it’s all HTTP, a device based on the ESP8266 could hop into your chat room with relative ease.

Matrix and Vector are very much in beta, but are definitely usable and worth a try. To get started, you can create an account on Vector.im and start chatting. We’re awaiting some of the features in the works, including end-to-end encryption, and hope to see some future hacks talking to the Matrix infrastructure.

Nanocounter: Frequency Counter With An Android UI

Have you ever started a project, run into an issue, started a new project to solve the issue, and completely forgot about the original project? [Andy] went down a rabbit hole of needing a tool to calibrate an MCU oscillator, but not having an accurate way to measure frequency. Most people would just buy a frequency counter and be done with it, but [Andy] decided to build his own.

The Nanocounter is an accurate, open source frequency counter that uses an Android phone as its display. It’s based on a high accuracy temperature compensated crystal oscillator (TCXO) fed into a phase locked loop (PLL) to create a high frequency, accurate reference clock.

This reference clock, along with the signal to be measured, are sent into a Xilinx FPGA which uses a method called equal precision measurement to determine the frequency. A STM32F072 microcontroller uses a SPI interface to get this data out of the FPGA, and controls the whole system. Finally, a cheap HC-06 Bluetooth module facilitates communication with an Android device.

The project achieves the goal of frequency counting, though [Andy] doesn’t remember what project sparked the idea to build it. (Classic yak shaving!) But the result is a great read of a detailed writeup, and you can watch a video of the Nanocounter in action after the break. That’s a win in our book.

Continue reading “Nanocounter: Frequency Counter With An Android UI”