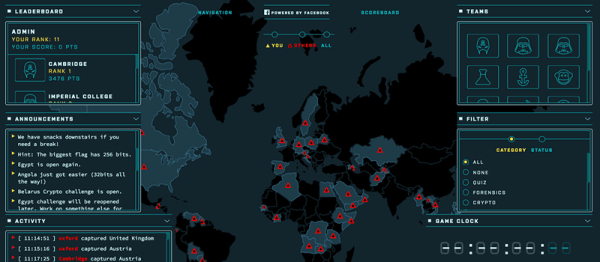
Tiny Matchbox WiFi Weather Station

Sometimes a project doesn’t have to be technically amazing to win over our hearts. [Malte]’s ESP8266-based weather station is so cute, and so nicely executed, that it’s easily worth a look. It could totally be a commercial product, and it’s smaller than a matchbox.

It combines temperature, humidity, and barometric pressure sensors on one side of a PCB, with pads for soldering a pre-built ESP8266 module on the other side. Solder it all together and flash the firmware and you’re almost all set.

The final step is to configure it to work with the network. For this, [Malte] built in a nice web-based configuration (and display) application. It also can log its data to an MQTT system, so there’s a bunch more configuration (which we’re trying to make easier) needed there, and the web frontend makes that light work. Everything, from the hardware to the firmware, and even a pre-compiled binary, is up on his GitHub. Very complete and very well done.

If you can read German, or are willing to run it through a translator, give his personal projects webpage a look as well. Good stuff here. Now all he needs is a matching nice display for inside.

Mike Szczys Ends 8-Bit Vs 32-Bit Holy War!

If you’ve read through the comments on Hackaday, you’ve doubtless felt the fires of one of our classic flame-wars. Any project done with a 32-bit chip could have been done on something smaller and cheaper, if only the developer weren’t so lazy. And any project that’s squeezes the last cycles of performance out of an 8-bit processor could have been done faster and more appropriately with a 32-bit chip.

bits_argument

Of course, the reality for any given project is between these two comic-book extremes. There’s a range of capabilities in both camps. (And of course, there are 16-bit chips…) The 32-bit chips tend to have richer peripherals and run at higher speeds — anything you can do with an 8-bitter can be done with its fancier cousin. Conversely, comparatively few microcontroller applications outgrow even the cheapest 8-bitters out there. So, which to choose, and when?

Eight Bits are Great Bits

The case that [Mike] makes for an 8-bit microcontroller is that it’s masterable because it’s a limited playground. It’s a lot easier to get through the whole toolchain because it’s a lot shorter. In terms of debugging, there’s (often) a lot less that can go wrong, letting you learn the easy debugging lessons first before moving on to the truly devilish. You can understand the hardware peripherals because they’re limited.

And then there’s the datasheets. The datasheet for a chip like the Atmel ATMega168 is not something you’d want to print out, at around 660 pages long. But it’s complete. [Mike] contrasts with the STM32F405 which has a datasheet that’s only 200 pages long, but that’s just going over the functions in principle. To actually get down to the registers, you need to look at the programming manual, which is 1,731 pages long. (And that doesn’t even cover the various support libraries that you might want to use, which add even more to the documentation burden.) The point is, simpler is simpler. And if you’re getting started, simpler is better.

Continue reading “Mike Szczys Ends 8-Bit Vs 32-Bit Holy War!”

Open Robots With Open Roberta

Kids, and Hackaday editors, love robots! The Open Roberta project (OR) takes advantage of this to teach kids about programming. And while the main focus is building a robot programming language that works for teaching grade-school and high-school kids, it’s also a part of a large open source robotics ecosystem that brings a lot more to the table than you might think. We talked with some folks at Google, one of the projects’ sponsors, about where the project is and where it’s going.

csm_Roberta_9e1215fc57Building a robot can be very simple — assembling pre-configured parts or building something small, quick, and cute — or it can be an endeavour that takes years of sweat and tears. Either way, the skills involved in building the ‘bot aren’t necessarily the same as those it takes to program the firmware that drives it, and then eventually the higher-level software that makes it functional and easy to drive.

OR, as an educational project, makes it very, very easy for kids to start off programming robots, but it’s expandable as the user gets more experienced. And since everything is open source, it’s part of a whole ecosystem that makes it even more valuable. We think it’s worth a look (along with something significantly more complex like ROS) if you’re playing around with robotics.

System Architecture

openRoberta.dot
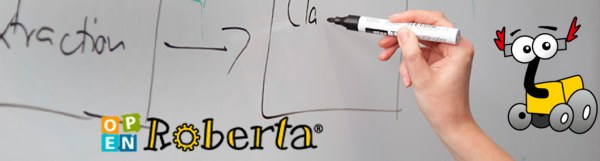
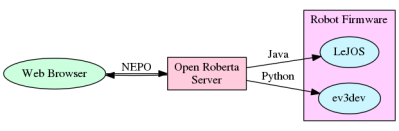
Open Roberta is the user-facing middleware in a chain of software and firmware bits that make a robot work in a classroom environment. For the students, everything runs inside a browser. OR provides a webserver, robot programming interface and language, and then converts the output of the students’ programs to something that can be used with the robots’ firmware. The robots that are used in classrooms are mostly based on the Lego Mindstorms EV3 platform because it’s easy to put something together in short order. (But if you don’t have an EV3, don’t despair and read on!)

The emphasis is on ease of entry for the students and the teachers supervising the class. Everything runs in a browser, so there’s nothing to install on the client side. The students connect to a server that directs the robots, communicating with the robots’ own operating system, and uploading the students’ programs.

Continue reading “Open Robots With Open Roberta”

Overthinking Solenoid Control

No circuit is so trivial that it’s not worth thinking hard about. [Charles Wilkinson] wanted to drive a solenoid air valve that will stay open for long periods of time. This means reducing the holding current to prevent wasting so much power. He stumbled on this article that covers one approach in a ridiculous amount of depth.

[Charles] made two videos about it, one where he debugs the circuit and learns things live on camera, and another where he sums it all up. We’ll be walking you through the long one, but feel free to skip around.

Continue reading “Overthinking Solenoid Control”

Solar FPV Plane Flies Forever

We love solar power. Not only is it environmentally friendly, but it’s relatively lightweight and involves fragile high technology. Just the sort of thing that we’d want to strap onto the wings of a large model aircraft.

Solar power on a remote-controlled plane would get you unlimited cruising range. Now, a normal land-and-swap-battery process might be good enough for some people, but judging from [Prometreus]’s YouTube channel, he’s a fan of long flights over the Alps, and of pushing long-distance FPV links to the breaking point. For him and his friends, the battery power is definitely the limiting factor in how far / long he can fly.

solar-powered-plane-_-drone-_-fpv-_-built-_-rc-aircraft-rmkpjbf6dnqmkv-shot0012

All of the information we have is in the video, but that’s plenty. [Prometreus] didn’t bother with maximum-power-point tracking, but instead wired up his solar cells to work just about right for the voltage of his batteries and the level of sun that he’s seeing. So it won’t work nearly as well on cloudy days. (Check out this MPPT build that was submitted for the Hackaday Prize.)

He could switch the solar cells in an out remotely, and it’s pretty gratifying to see the consumed current in the battery go down below zero. In the end, he lands with a full battery. How cool is that?

Continue reading “Solar FPV Plane Flies Forever”

Minimal MQTT: Building A Broker

In this short series, we’re going to get you set up with a completely DIY home automation system using MQTT. Why? Because it’s just about the easiest thing under the sun, and it’s something that many of you out there will be able to do with material on-hand: a Raspberry Pi as a server and an ESP8266 node as a sensor client. Expanding out to something more complicated is left as an exercise to the motivated reader, or can be simply left to mission creep.

We’ll do this in four baby steps. Each one should take you only fifteen minutes and is completely self-contained. There’s a bunch more that you can learn and explore, but we’re going to get you a taste of the power with the absolute minimal hassle.

In this installment, we’re going to build a broker on a Raspberry Pi, which is the hub of your MQTT network. Next time, we’ll get an ESP8266 up and running and start logging some data. After that, we’ll do some back-end scripting in Python to make the data speak, and in the last installment, we’ll explore some of the useful frills and fancy bits. Let’s get started!

Continue reading “Minimal MQTT: Building A Broker”

X-Ray Everything!

We’re not 100% sure why this is being done, but we’re 110% happy that it is. Someone (under the name of [The X-Ray Playground]) is putting interesting devices under an X-ray camera and posting videos of them up on YouTube. And he or she seems to be adding a few new videos per day.

Want to see the inner workings of a pneumatic microswitch? Or is a running pair of servo motors more your speed? Now you know where to look. After watching the servo video, we couldn’t help but wish that a bunch of the previous videos were also taken while the devices were being activated. The ball bearing wouldn’t gain much from that treatment, but the miniature piston certainly would. [X-Ray Playground], if you’re out there, more working demos, please!

How long the pace of new videos can last is anyone’s guess, but we’re content to enjoy the ride. And it’s just cool to see stuff in X-ray. If we had a postal address, we know we’d ship some stuff over to be put under the lens.

We don’t have as many X-ray hacks as you’d expect, which is probably OK given the radioactivity and all. But we have seen [MikesElectricStuff] taking apart a baggage-scanner X-ray machine in exquisite detail, and a DIY fluoroscope (yikes!), so we’re not strangers. Who needs Superman? We all have X-ray vision these days.

Thanks [OiD] for the tip!