1981 Called, Here’s Your Software

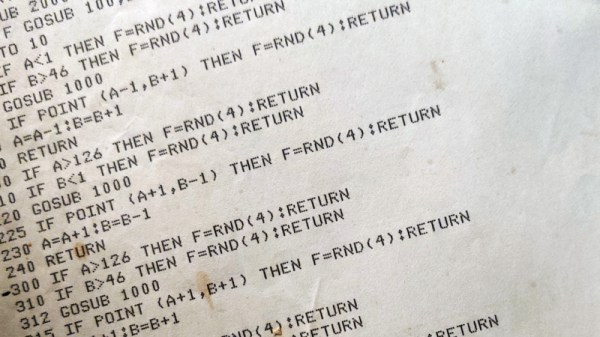
How many of us who have a few decades of adulthood under our belts would like to talk to our 17 year old selves? “Hey kid, it’s all gonna be OK. Also, Duke Nukem Forever does come out eventually, but it’s not going to be pretty!” Being honest, exposure to the hot takes of one’s naive teenage self would almost certainly be as cringeworthy as the time-worn-but-familiar adult would be to the teenager, but there’s one way in which you can in a sense have a conversation with your teenage self. [Mad Ned] had this opportunity, when he discovered a printed BASIC listing for a game he’d written for the TRS-80 back in 1981. Could he make it run again, and what did it tell him about his teenage years?

Grizzled 8-bit veterans will tell you of countless hours spent typing poorly-reproduced listings found in magazines, and the inevitable pain that followed as all those mistypes were ironed out. [Ned] eschewed all that retro experience because this is the 21st century, and we now have much more powerful computers to do our bidding! The reality of incomplete OCR is one we’ll no doubt all be used to, and for 8-bit fans also the debugging that was needed to get the listing to run. Breaker Ball is an odd hybrid of Breakout and Space Invaders, and it’s his analysis of the teenage thinking that led to the game being the way it is that rounds off the piece.  Sadly we’re not treated to the entire listing, but there’s a short gameplay video we’ve placed below the break.

Continue reading “1981 Called, Here’s Your Software”

Drive High-Impedance Headphones With This Stylish USB DAC

For anyone with an interest in building audio projects, it’s likely that an early project will be a headphone amplifier. They’re relatively easy to build from transistors, ICs, or tubes, and it’s possible to build one to a decent quality without being an electronic engineering genius. It’s not often though that we see one as miniaturized as [daumemo]’s USB-C DAC and headphone amplifier combo, that fits within a slightly elongated 3.5 mm jack cover as part of a small USB-to-headphone cable.

The DAC is an off-the-shelf board featuring an ALC4042 IC, it has a line-level output and a handy place to tap off a 5 volt line for the amplifier. This final part is a tiny PCB with two chips, a TPS65135 that produces clean +5 and -5 volt rails, and an INA1620 which is a high-quality audio amplifier set up for 2x gain. All this has been designed onto a very small PCB, which sits inside a 3D-printed housing along with the 3.5 mm earphone socket. The result is a very neat unit far better able do drive high-impedance headphones than the output from an unmodified DAC, but still looking as svelte as any commercial product. We like it.

This may be one of the most compact USB-to-headphone amplifiers we’ve seen, but it’s by no means the first.

Making Coffee With Hydrogen

Something of a Holy Grail among engineers with an interest in a low-carbon future is the idea of replacing fossil fuel gasses with hydrogen. There are various schemes, but they all suffer from the problem that hydrogen is difficult stuff to store or transport. It’s not easily liquefied, and the tiny size of its molecule means that many containment materials that are fine for methane simply won’t hold on to it.

[Isographer] has an idea: to transport the energy not as hydrogen but as metallic aluminium, and generate hydrogen by reaction with aqueous sodium hydroxide. He’s demonstrated it by generating enough hydrogen to make a cup of coffee, as you can see in the video below the break.

It’s obviously very successful, but how does it stack up from a green perspective? The feedstocks are aluminium and sodium hydroxide, and aside from the hydrogen it produces sodium aluminate. Aluminium is produced by electrolysis of molten bauxite and uses vast amounts of energy to produce, but since it is often most economic to do so using hydroelectric power then it can be a zero-carbon store of energy. Sodium hydroxide is also produced by an electrolytic process, this time using brine as the feedstock, so it also has the potential to be produced with low-carbon electricity. Meanwhile the sodium aluminate solution is a cisutic base, but one that readily degrades to inert aluminium oxide and hydroxide in the environment. So while it can’t be guaranteed that the feedstock he’s using is low-carbon, it’s certainly a possibility.

So given scrap aluminium and an assortment of jars it’s possible to make a cup of hot coffee. It’s pretty obvious that this technology won’t be used in the home in this way, but does that make it useless? It’s not difficult to imagine energy being transported over distances as heavy-but-harmless aluminium metal, and we’re already seeing a different chemistry with the same goal being used to power vehicles.

Continue reading “Making Coffee With Hydrogen”

Nifty Chip Adapter Does The Impossible

The semiconductor shortage has curtailed the choices available to designers and caused some inventive solutions to be found, but the one used by [djzc] is probably the most inventive we’ve yet seen. The footprint trap, when a board is designed for one footprint but shortages mean the part is only available in another, has caught out many an engineer this year. In this case an FTDI chip had been designed with a PCB footprint for a QFN package when the only chip to be found was a QFP from a breakout board.

The three boards which make up the adaptor
The three boards which make up the adapter

For those unfamiliar with semiconductor packaging, a QFN and QFP share a very similar epoxy package, but the QFN has its pins on the underside flush with the epoxy and the QFP has them splayed out sideways. A QFP is relatively straightforward to hand-solder so it’s likely we’ll have seen more of them than QFNs on these pages.

There is no chance for a QFP to be soldered directly to a QFN footprint, so what’s to be done? The solution is an extremely inventive one, a two-PCB sandwich bridging the two. A lower PCB is made of thick material and mirrors the QFN footprint above the level of the surrounding components, while the upper one has the QFN on its lower side and a QFP on its upper. When they are joined together they form an inverted top-hat structure with a QFN footprint below and a QFP footprint on top. Difficult to solder in place, but the result is a QFP footprint to which the chip can be attached. We like it, it’s much more elegant than elite dead-bug soldering!

This Audio Mixer Is A Eurorack

Music making and DJing have both become arts predominantly pursued in a computer, as the mighty USB interface has subsumed audio, MIDI, and even DJ turntable interface controllers. There was a time though when an indispensable part of any aspiring performer’s equipment would have been an analog mixer, a device for buffering and combining multiple analog audio signals into a single whole. A mixer is still a useful device though, and [Sam Kent] has produced a very nice one that takes the form of a set of Eurorack modules made from PCB material. There are two types of modules, the main channel module which you can think of as the master module, and a series of isolator modules that handle the individual inputs.

Mixer preferences are as individual as each user, so for example where we’d expect sliders he’s used rotary potentiometers, and for us placing the master channel on the left-hand side is unfamiliar. But that’s the beauty of a modular design, there’s nothing to stop anyone building one of these to simply configure it as they wish. We notice that for a mixer described as for DJs there’s no RIAA preamp for the turntable fans, but it’s not impossible to fix with an off-board preamp. Otherwise, we like it and have a sudden hankering for it to be 1992 again with a pair of Technics SL1200s and a room full of people.

Designing a mixer, even a simple one, isn’t easy. Our own [Lewin Day] wrote a retrospective of his experiences with one.

What Goes Into A High Voltage Diode?

When we use an electronic component, we have some idea of what goes on inside it. We know that inside a transistor there’s a little piece of semiconductor with a junction made from differently doped regions etched into it, and in a capacitor, there will be metalized plates on the surface of some kind of dielectric. Reverse engineering has given us extensive die photography of integrated circuits, but there remain a few component mysteries to be uncovered. One is laid bare by [WizardTim], as he cross-sections a 20KV high-voltage diode.

A conventional low-voltage silicon diode has a forward voltage drop of about 0.7V and a relatively low maximum reverse voltage, for example with the 1N4001 rectifier it’s 50V.  For the higher-spec 1N4007, the reverse voltage rating is 700V. This diode has a 25KV reverse voltage, and a clue to its construction comes in its quoted 45V forward voltage. Sure enough, when mounted in resin and carefully sanded and polished flat it reveals its interior as a stack of diodes in series to increase the reverse voltage at the expense of forward voltage.

Revealing the inner workings of an unusual component is fascinating, and the lapping technique used is definitely worth a look. It’s something we’ve seen before, for example in reducing CPU thickness for increased performance.

Continue reading “What Goes Into A High Voltage Diode?”

A Glowing Potato Peeler Makes A Nernst Lamp

Over the last couple few decades there has been a great shift in electric lighting, first towards more compact and efficient fluorescent lights, and then towards LED bulbs. The old incandescent bulbs, while giving a pleasant light, were not by any means efficient. Digging into the history books the incandescent bulb as we know it was not the only game in town; while suspending a filament in a vacuum stopped it from being oxidized there was another type of light that used a ceramic element at atmospheric pressure. The Nernst lamp required its filament to be heated before it would conduct electricity, and [Drop Table Adventures] has made one using the blade from a ceramic potato peeler.

The right ceramic is not the problem given the ease of finding ceramic kitchen utensils, but two problems make a practical light difficult. The copper connections themselves become too hot and oxidize, and preheating the ceramic with a blowtorch is difficult while also keeping an even heat. Finally, they do manage a self-sustaining lamp, albeit not the brightest one.

If you think the Nernst lamp sounds familiar, maybe it’s because we covered it as part of our retrotechtacular series.

Continue reading “A Glowing Potato Peeler Makes A Nernst Lamp”