This could probably be any of our grandmothers at work. George Grantham Bain Collection [PD], via Wikimedia Commons.In our hackspace, we’ve opened a textile room in the last month. We have high hopes for it as a focal point for cosplayers and LARPers as well as the makers of wearable electronics and more traditional textile users. Putting it in has involved several months of hard work bringing a semi-derelict and previously flooded room that was once the walk-in safe for our local school authority to a point at which it is a light and welcoming space, but a surprising amount of work has also had to go into winning the hearts and minds of our community for the project.
Putting it quite simply, textiles aren’t seen as very cool, in hackspace terms. You know, Women’s stuff. Your mother does it, or even maybe if you are a little younger, your grandmother. It’s just not up there with laser cutting or 3D printing, and as a result those of us for whom it’s a big part of making stuff have had to fight its corner when it comes to resources within the space.
Yet not so long ago when I brought a pair of worn-out jeans into the space on a social night and hauled out our Lervia sewing machine to fix them, I had a constant stream of fellow members passing by amazed at what I was doing. “You can repair jeans?” they asked, incredulously. For some reason this prospect had not occurred to them, I was opening up a new vista in clothing reincarnation, to the extent that before too long in our new facility I may be giving a workshop on the subject as the beloved former trousers of Oxford Hackspace denizens gain a chance of new life.
We have all opened an electricity bill and had thoughts of saving a bit of money by generating our own power. Most of us never get any further than just thinking about it, but for anyone willing to give it a try we are very fortunate in that we live in a time at which technology has delivered many new components that make it a much more straightforward prospect than it used to be. Electronic inverters, efficient alternators, and electronic battery management systems are all easy to find via the internet, and are thus only a matter of waiting for the courier to arrive.
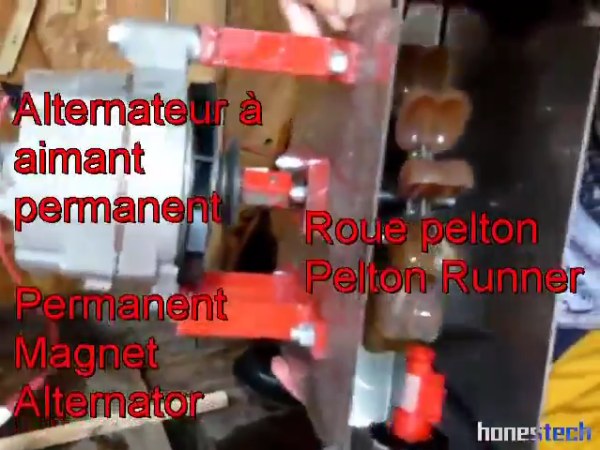
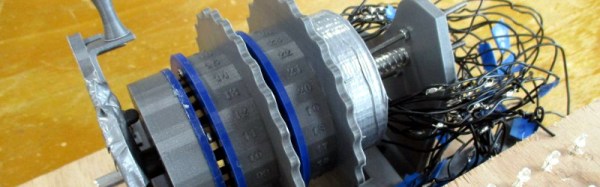
Pelton Wheel
[Frédéric Waltzing] is lucky enough to have access to a 135 foot (38 metre) head of water that those of us in flatter environments could only dream of. He’s used it to generate his own power using a modestly sized but very effective turbine, and he documented it in a Youtube video which you can see below the break.
He brings the water to his turbine house through a 1.5 inch plastic pipe, in which he maintains a 55PSI closed pressure that drops to 37PSI when the system is running. His Pelton wheel develops 835RPM, from which a small permanent magnet alternator provides 6.3A for his battery management system. An Enerwatt 2KW inverter provides useful power from the system.
This hydroelectric installation might not be very large, but its key is not in its size but that it can run continuously. A continuous free 6.3A charge can store up a lot of energy for those times when you need it.
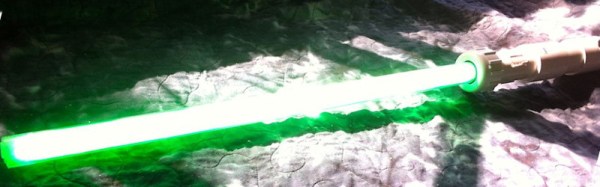
If you are looking for a Star Wars light sabre, sometimes your choices can be a little disappointing. “Replica” sabres from toy and novelty vendors may superficially look the part, but with their tinny speakers and lacklustre show of LEDs they often have less of the Force about them and more of the Farce.
The super-bright sabre uses a 144 LED double-sided strip of Neopixels in a polycarbonate tube, with a DC to DC converter powered by a 1000mAH LiPo battery. Sound effects come from a SparkFun Pro Micro powering a 2W speaker through a small audio amplifier. The handle meanwhile is constructed from PVC pipe fittings.
His first attempt at the sabre had the LEDs at full power, and promptly melted his tube. Thus the final version runs at 40% of its maximum rating, with a “burst” mode for those moments at which combat demands it.
His write-up is a series of posts, with plenty of video at all points. It might seem odd to show you the shortest of them here at only a few seconds long, but since the unique selling point is its brightness we think the best way to show that is at night.
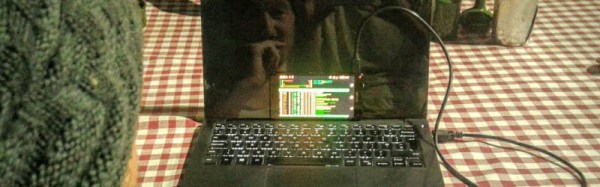
If you’ve ever had the screen break on your laptop, you’ll know it can be rather annoying to have to use an external monitor for a while as you either wait for a replacement panel to arrive from the other side of the world, or wait for that new laptop you were just desperate for an excuse to upgrade to.
Spare a thought, then, for [tom bh] whose laptop screen broke while he was in Ladakh, Northern India. Two days bus ride from the nearest city in which he could hope to source a replacement part, he had to make do with the resources in front of him. A laptop with a broken screen, and his Android phone.
He was fortunate in that a few lines at the top of the screen still worked intermittently. So after logging in blind and finding himself in a shell, he could execute commands and then scroll the results up to the point at which they were visible. He first enabled an SSH server, then connected his phone via USB. A bit of work to find the laptop’s IP address, and he could get himself a laptop shell on his phone with an Android SSH client. He goes into detail about how he was able to use the laptop’s keyboard to emulate a Bluetooth device which he connected to the phone. He could then run a VNC server on the laptop and connect to it with a VNC client on the phone, resulting in a phone-sized laptop display using the laptop’s keyboard as input. Not a perfect physical terminal by any means, but enough for him to continue working.
His writeup is an especially interesting read for its side-by-side evaluation of the various different application choices he made, and contains some useful suggestions as to how anyone might prepare themselves for a dead screen related emergency.
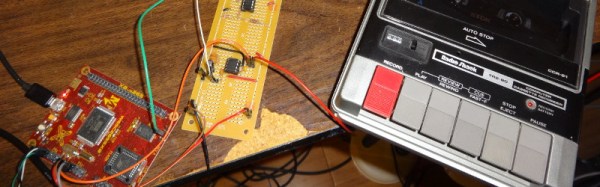
If you are of the generation who were lucky enough to use the first 8-bit home computers in your youth, you will be familiar with their use of cassette tapes as mass storage. Serial data would be converted to a sequence of tones which could then be recorded using a standard domestic cassette recorder, this recording could then be played back into the machine’s decoder and loaded into memory as a complete piece of software. Larger programs could take a while to load, but though it was rather clunky it was a masterful piece of making the best of what was at hand.
Over the years he has returned to the project a couple of times, and his original Atmel processor has been supplanted by a W65C265SXB development board based on the 16-bit derivative of the 6502. This made generating the tones as straightforward using his processor’s built-in tone generator, but decoding still presented a challenge. His earlier attempts used an LM2917 frequency to voltage converter to decode tones to logic levels, but on further consideration he decided to move to the LM567 tone decoder. This chip is designed specifically for an on-off logic output rather than the 2917’s analogue voltage output.
His recording device was originally a hi-fi separate cassette deck after experimenting with microcassettes, but eventually he used a data recorder designed for a Radio Shack TRS-80. All his code can be found in his GitHub repository.
The Enigma machine as used by the German military during World War Two exerts a curious fascination among our community of hardware hackers and makers. Perhaps it is the mechanical complexity of the machine itself, or maybe the tale of how its encoded messages were decrypted by Allied codebreakers that contributes to this interest, but whatever it is we’ve seen a succession of Enigma-related projects over the years that shows no sign of abating.
The latest Enigma project to come our way is a particularly nice one from a group of first year students at CentraleSupélec Rennes, in Northwestern France. Their Réplique Enigma is a fully mechanical Enigma replica using 3D printing techniques, and unlike so many replicas which use modern electronics it has a set of rotors just like those you would have found in the original. The rotors themselves have a 3D-printed plastic shell which houses brass contacts and the associated writing, while the keyboard and lamp board are both made from plywood. Rather than trying to replicate the original switches from the keyboard they are using modern microswitches, however the keys themselves are upright posts that resemble the original. An AZERTY layout may not have been present on the real Enigma machines, but lends a pleasing twist to the build.
It’s worth browsing all the pages for this build, as the front page does not necessarily capture the whole build. The rotors set this Enigma apart from many of the replicas we’ve featured in the past, so you may find it interesting to take a look and make a few comparisons.
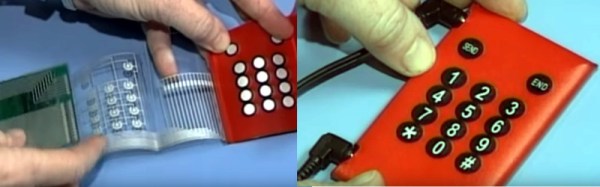
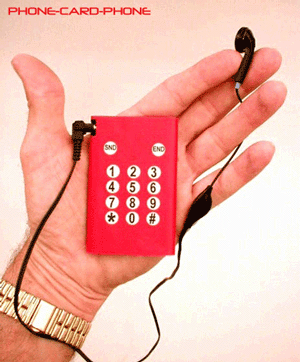
It was one of the more interesting consumer tech stories floating around at the turn of the century, a disposable cell phone manufactured using a multi-layer folded paper circuit board with tracks printed in conductive ink. Its feature set was basic even by the standards of the day in that it had no display and its only function was to make calls, but with a target price of only $10 that didn’t matter. It was the brainchild of a prolific New Jersey based inventor, and it was intended to be the first in a series of paper electronic devices using the same technology including phones with built-in credit card payment ability and a basic laptop model.
The idea of a $10 mobile phone does not seem remarkable today, it’s possible that sum might now secure you something with features far in excess of the Nokias and similar that were the order of the day at that time. But when you consider that those Nokias could have prices well into three figures without a contract, and that the new features people considered exciting were things like integrated antennas or swappable coloured plastic covers rather than the multicore processors or high-res cameras we’re used to today, a phone so cheap as to be disposable promised to be very disruptive.
The web site publicity shot for the disposable paper phone.
The product’s wonderfully dated website (Wayback Machine link, we’ve skipped the Flash intro for you) has pictures of the device, and the video below the break features shots of it in use as its inventor is interviewed. But by the end of 2002 the Wayback Machine was retrieving 404 errors from the server, and little more was heard of the product. No sign of one ever came our way; did any make it to market, and did you have one?
With the benefit of fifteen years hindsight, why did we not have paper mobile phones as part of the ephemera of the early years of the last decade? It was not a product without promise; a ten-dollar phone might have been a great success. And the description of a cheap laptop that talks to a remote server for its software sounds not unlike today’s Chromebooks.
Some of you might claim the product was vapourware, but given that they demonstrated a working prototype we’d hesitate to go that far. The likelihood is that it did not find the required combination of component price and manufacturing ease to exploit its intended market segment before its competition improved to the point that it could no longer compete. If you have ever taken apart a typical mobile phone of the period you’ll have some idea of why they were not cheap devices, for example the RF filter modules of the day were individually adjusted precision components. And paper-and-ink printed circuit boards are still a technology with a way to go even now, perhaps the idea was simply too far ahead of its time. Meanwhile within a relatively short period of time the price of simple candybar phones dropped to the point at which they would tempt the $10 buyer to spend more for a better product, so the window of opportunity had passed.
![This could probably be any of our grandmothers at work. George Grantham Bain Collection [PD], via Wikimedia Commons](https://hackaday.com/wp-content/uploads/2016/10/woman-with-sewing-machine.jpg)