Don’t Mind If I Ski-Do

There is an age-old tradition among hackers of just making it yourself. Whether the real thing is too expensive or you think you can make a better one, the itch strikes, and it can quickly spread. [Homemade Madness] has quite the itch as he builds his own jetski.

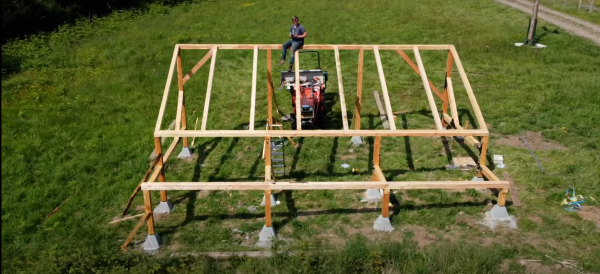
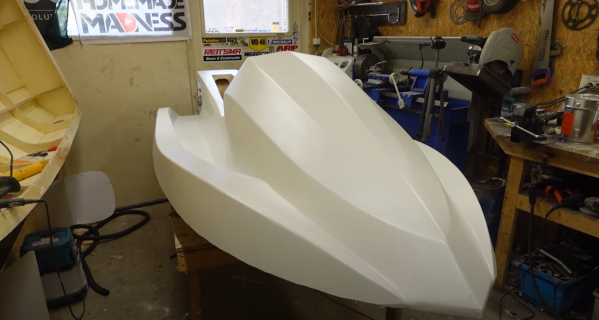
What is a jetski but a boat with a shell on top? In an earlier video, he created a boat out of plywood and, after the usual steps of fiberglass and sealing, was proud to float around in his relatively normal-looking boat. But now that he had a working bottom, it was time to return to CAD. He printed out templates for all various shapes he would need, each labeled with a different designator, and glued them to the plywood. No fancy CNC here, just a steady hand and a jigsaw. We love the professional build instructions he compiled for himself that detail in LEGO-like quality exactly how each piece slots into where and in what order to do them. In addition to the top layer of the jetski, he also designed a stand for the boat to rest on while he made it, which is just going the extra mile. A ceiling-mounted winch made it easy to lift the ship into position. Next, he connected all the various framing pieces with PU glue. Thin plywood acted as cladding on top of the skeleton. Filling, sanding, and fiberglass overlaid the structure, making it waterproof. More sanding and some primer later, and it was ready for another water test.

He designed a version with an outboard motor, but he’s trying to build one with a built-in jet drive. So we’re looking forward to seeing the next step and him flying around on his custom watercraft. But what he has already done is quite impressive. If you’re looking for something a little smaller to pull you around the water, why not take a look at this little 3d printed tug boat? Video after the break.

Continue reading “Don’t Mind If I Ski-Do”

PS5 Goes On Slim-Fast

For the past few decades, most console makers have first come out with a large flagship model, and then a few years later, released a smaller, more compact slim edition. Not content to wait for it, [Matt] at DIY Perks made his own PS5 Slim, and the results are awe-inspiring.

Generally, slim editions are made by lowering the TDP of the chip under the hood. A lower power draw means less cooling is needed, a smaller power supply can be used, and a design that is overall easier to manage. Unfortunately, [Matt] had none of these benefits and instead had to contend with the full 180 W that the AMD CPU inside the PlayStation can draw.

Taking apart the console left him with the main board that was quite thick as it had heat pipes on both sides. His first thought was water cooling as it can rapidly move the heat needed, but even with right-angle fittings, it didn’t fit within the ambitious thickness goal he had set for himself of less than 2 cm (about 3/4″). To do that, [Matt] had to fabricate a copper water block from three sheets of copper. The first one connects to the motherboard via standoffs and has cut-outs for various connectors and parts. The middle layer has a channel through which water can flow, and the last layer seals it together.

With the three layers together, he soldered them in a toaster oven repurposed as a reflow oven. Cleverly, he used silicone grease to prevent solder from getting into areas he didn’t want, like the fins in the CPU block. Luckily, the grease dissolved in alcohol, and after flushing the chamber, he had a solid copper, water-tight, custom loop.  However, on his road to glory, [Matt] ran into a snag. He accidentally covered the intake vent on the radiator, and the PS5 overheated, killing it. With a fried mainboard and a project almost on the cusp of completion, he resorted to using the PS5 he had received for B-roll.

Last-minute motherboard swap aside, the final project is gorgeous. The polished exterior and sheer thinness of it are striking. [Matt] has already disguised his PS5 before and after this, we’re not quite sure where he could possibly take it next. But we’re excited to find out.

Continue reading “PS5 Goes On Slim-Fast”

Can A Drone Push A Bike?

It sounds like a rhetorical question that a Midwestern engineer might ask, something on the order of ‘can you fix this bad PCB spin?’ [Tom Stanton] sets out to answer the title question and ends up building a working e-bike with a drone motor.

You might be thinking, a motor is a motor; what’s the big deal? But a drone motor and a regular e-bike motor are made for very different purposes. Drone motors spin at 30,000 RPM, and an e-bike hub motor typically does around 200-300 RPM while being much larger. Additionally, a drone motor goes in short spurts with a large fan blowing right on it, and an e-bike motor can run almost continuously.

The first step was to use gears and pulleys to reduce the RPM on the motor to provide more torque. A little bit of CAD and 3D printing later, [Tom] had a setup ready to try. However, the motor quickly burned out. With a slightly bigger motor and more gear reduction, version 2 performed remarkably well. After the race between a proper e-bike and the drone bike, the coils were almost melted.

If you’re thinking about making your bike electric, we have some advice. We’ll throw in a second piece of advice for free: use a larger motor than the drone motor, even though it technically works. Video after the break.

Continue reading “Can A Drone Push A Bike?”

Custom Cycling Camper Continues Car-Free

If you own a camper or RV, you might think twice when taking it out after giving gasoline prices a look. Towing all that extra weight and wind drag along can really eat into your fuel efficiency. [Drew] decided to keep the camper but take gasoline out of the equation by building a teardrop trailer he pulls behind his bike.

It’s a relatively simple idea. A 1″ by 1″ steel tube frame makes up the bottom, which [Drew] welded together. On top of that, plywood walls were built up over a plywood base. The wheels were stolen from an older bicycle and the top was made with many bending techniques using a portable fabric steamer for clothing. [Drew] found used doors and windows right in his backyard, which helped lower the cost. The trailer is insulated with sheet foam because it’s cheap and easy to cut.

In addition to the creativity, there’s a big focus on waterproofing and durability throughout this build. [Drew] applied caulk to the threads of every screw to prevent water from getting in and rotting the plywood. Canvas was used instead of fiberglass to save cost as it provides a fairly high level of protection from rain when finished properly. Cheap LEDs and a USB battery pack created stylish and functional lighting inside.

Overall, we think it turned out quite well, and we would love to bike somewhere and camp out in our own teardrop trailer. It’s a gorgeous example of welding, woodworking, and some plain ingenuity in the face of adversity. We’ve seen solar-powered trailers for e-bikes and campers for custom motorcycles before, and we think [Drew]’s trailer would fit right in. Video after the break.

Continue reading “Custom Cycling Camper Continues Car-Free”

Recreating A Camera Shot

People rolling off shields and spears clashing against swords as the camera zooms in and out wildly makes the hallmark action sequences in the movie 300 so iconic. Unfortunately, achieving this effect wasn’t particularly easy. Three cameras were rolling, each with a different lens (100mm, 50mm, and 21mm) to capture a different view of the same scene. In post-production, you can dramatically switch between the three cameras since the shot is synchronized. The folks over at [Corridor Crew] wanted to recreate the effect, but rather than create a custom mount to hold three expensive cameras, they 3d printed a custom mount to hold three costly smartphones.

While there are three cameras on the back of most phones, most phones can’t shoot in slo-mo from all cameras simultaneously. So they would need a rig to hold three phones. The first design was simple and just brackets to hold phones. While nice and sturdy, getting the phones in or out wasn’t easy, and getting to the record button was tricky. iPhones have this handy little magnetic ring on the back. They had a bracket that worked pretty well after a few iterations on the design and some printer issues. Since each camera has optical image stabilization, it is easy for the lenses to get out of alignment, which can mar the shot. However, they somewhat covered up the effect in post. With a working prototype, the only thing left to do was to slice a bunch of piñatas in slow motion with a thrumming soundtrack.

We love seeing exciting camera setups and iterating to find something that works. This dual-camera setup has a very different goal and tries to lean into the parallax effect rather than hide it. Video after the break.
Continue reading “Recreating A Camera Shot”

side by side of upscaling in the AGI engine

Upscaling The Sierras

If you played many games back in the mid-80s to 90s, you might remember the iconic graphics from Sierra’s Online Adventure Games. They were brightly colored (16 colors) and dynamic with some depth. To pay homage, [eviltrout] worked to upscale the images. Despite being rendered at 160×200 at 16 colors and then stretched, storing all those bitmaps even at only 4 bits per pixel would take all the storage available on the floppy disk. The engineers on the game decided instead to take a vector approach to a raster problem.

When [eviltrout] came through to try and upscale the backgrounds, he started by writing some code to extract the draw commands from the engine of the game, known as Adventure Game Interpreter (AGI). Comparing the vector commands to equivalent PNG versions with the best compression, the AGI vector versions were around half the size. Not bad for a couple of game developers in the 80s. Since it is all vector commands under the hood, it should be relatively simple to draw them at a much higher resolution. At least, that’s what he thought. The first issue was with flood fills. Since the canvas is larger, there are gaps between lines, and the flood escapes. A few approaches were taken, such as using a low-resolution reference and marching squares, but neither was satisfactory. Eventually, [eviltrout] expanded flood fills and used thicker lines. He also first rendered to a lower resolution and connected neighboring lines of the same color. Finally, he used ImageMagick to denoise white specs in the output.

We find the effect charming, but some might say you’re distorting art into what the artist never intended to be. But, as with all graphical enhancements, some artistic liberties are being taken without the original artist involved. The code is available on GitHub under an MIT license. Video after the break.

Continue reading “Upscaling The Sierras”

A Solar Frame From Scratch

“From scratch” is a bit of a murky expression. How scratchy does it get? Are you just baking your bread yourself or are you growing your own wheat? Rolling your own solar installation probably doesn’t involve manufacturing your own photovoltaic cells. But when it comes to making the frame to hold your panels, why not machine your own brackets and harvest the wood from trees nearby?. That’s what [Kris Harbour] did with his over-engineered 8.4kW solar stand.

He already had a wind turbine and a few solar panels elsewhere on the property, but [Kris] wanted a bit more power. At the start of the video, [Kris] makes an offhand comment that he wants this to last 30-40 years at a minimum. Everything from the focus on the concrete footings to the oversized brackets and beams reflects that. The brackets were cut on his plasma CNC and the wood was cut to rough dimensions using a sawmill on his property. He admits that the sapwood will rot away a bit after 20ish years, but since the core of the posts is heartwood, structurally they’ll last a long time. After planing down to the right size, cutting hole and grooves was a bit of an involved procedure. The structure is quite tall once erected and we loved watching it come together. The most impressive thing here is that this structure was put together by just a single person. All the rafters were cut and hand-chiseled to the right sizes and hoisted into place. The panels ultimately weren’t delivered on time and he had to switch to using new panels rather than the used panels he was expecting.

Previously, [Kris] had shown off his impressive hydroelectric setup. We’re looking forward to seeing the new solar array power all the projects [Kris] is planning in the future. Video after the break.

Continue reading “A Solar Frame From Scratch”