Reactive Target Range For Nerf, Airsoft, Etc.

reactive-target-range

Taking the time to build a reactive target range really adds to the fun of toy weapons. It lets you move beyond just point and shoot to actual games of skill.

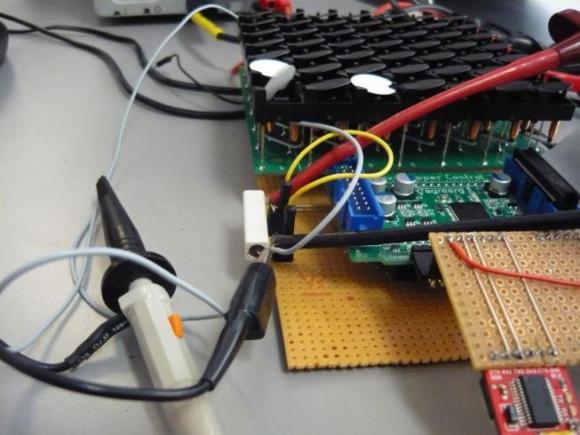
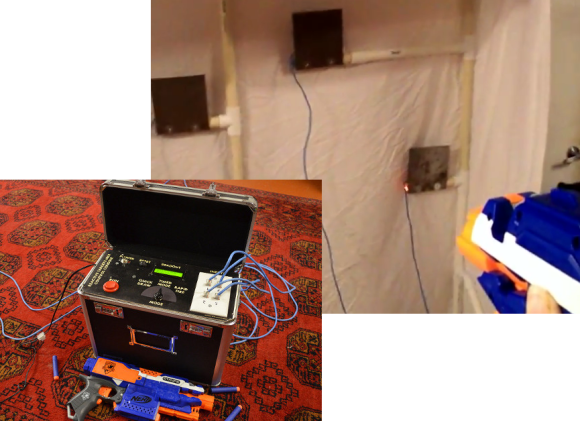
The project is anchored by an Arduino board. It connects to a piezo element on the back of each of these sheet metal targets. Detecting when a projectile hits the target works pretty much the exact same way the ever popular Knock-block works. To provide interactive enjoyment each target has an LED which, when lit, indicates that the target is active. From here it’s just a matter of coding to add different challenges. So far [Viktor Criterion] has implemented quick draw, timed, and rapid fire modes. The demo after the break shows off everything, including the slick modular design he came up with to make the system portable.

We’d love to see these targets mounted on motorized tracks. Each round would have the targets moving closer to you at a faster pace to keep you on your toes.

Continue reading “Reactive Target Range For Nerf, Airsoft, Etc.”

Unreadable Binary Epoch Clock Is Unreadable

binary-epoch-clock

What time is it? For that matter, what is the date? This clock can tell you both of those things, if only you could read it. The inspiration for this Binary Epoch kit came after a friend of [Maniaclal Labs] built an eight-bit binary clock. That’s a pretty common project that gets riffed on for things like mains-timed logic-driven clocks. They figured why not make it bigger? But even then you can make some sense out of the display after studying it for just a bit, you won’t be much closer to answering those two questions.

The problem is that this is unreadable in a couple of different ways. First off, how long did it take you to figure out in your head the decimal equivalent of the binary number displayed above? We gave up. But pounding the number into Google (search for: 0b01010010000010000001001010010011 in decimal) gives us 1376260755. meaningful? Again, not to a human. This is Unix time, which is the number of seconds elapsed since the Epoch: 8/11/13-22:39:15.

Check out the video below that shows how to set the clock, which uses a menu system for human-friendly input. But since it’s Arduino compatible you can also connect an FTDI cable and program it from a computer. Oh, and since this is Open Source Hardware (note the icon in the lower right) you can get all the info to build (or breadboard) your own from their Github repo.

Here’s another complicated clock that uses Nixie tubes to display time and date info which is actually of use.

Continue reading “Unreadable Binary Epoch Clock Is Unreadable”

Retrotechtacular: Understanding A Voltage Doubler

This very stern looking gentleman is about to explain how voltage doubles work in a plodding, yet satisfyingly thorough manner.

We’re not certain when this US Air Training Command video was produced. Obviously it was used to train servicemen who were responsible for keeping electronics running during war time. We’re glad for that, as they really found just the right balance to present a concept that required some knowledge, but is approachable for even the most basic of new electronics hackers.

The demonstration board shown on the right is the voltage circuit highlighted in the lesson. Here the pointing stick is being used to trace out the circuit function during one phase of the input transformer. The capacitor/diode pairs rectify the voltage, with the capacitors discharging in parallel series to double the output voltage. But how does the variable load (RL) affect the output? This is demonstrated under several different conditions using an oscilloscope to illustrate the change.

The discussion of how the diodes work reminded us of a modern tutorial we just ran across this weekend. It’s a bit bizarre, but explains the PN junction in a different way than we’re accustomed to. In this case you will already need to be familiar with how semiconductors work to understand the presentation.

Both clips can be found below the jump.

Continue reading “Retrotechtacular: Understanding A Voltage Doubler”

Galaxy S4 Inductive Charging Hack Keeps Everything Inside The Case

We’ve seen this hack a bunch of times, but this does a great job of internalizing all of the phone-side inductive charging components.

It uses the Palm Pixi wireless charging hardware which seems to be the most popular system out there. We’ve already seen that you can add this to any phone that uses USB for charging. But we don’t like the idea of opening the phone to solder connections to the USB header. We also don’t want a USB plug sticking out the bottom of the phone all the time.

This hack satisfies both issues, and it’s actually thanks to the manufacturer. The Samsung Galaxy S4 just happens to have two contacts available inside the removable back plate which are designed for Samsung’s own inductive charging hardware. Contact with the Palm charging hardware is made by pressing copper foil into place. Mating foil traces on the inside of the back cover patch this into the Touchstone receiver hardware which is a direct transplant from a Palm case.

This is touted as a solution that costs under $30. That beats the current price of a genuine Samsung inductive charging kit by a wide margin.

Continue reading “Galaxy S4 Inductive Charging Hack Keeps Everything Inside The Case”

Converting A Flip-dot Display To Work Like Core Memory

flip-dot-display-as-core-memory

It’s always interesting to see what will come out of a hacker meet-up. At the Observe, Hack, Make festival earlier this month [Bertho] was talking to a guy named [Erik] about how flip-dot displays work. [Erik] mentioned that the control theory is the same as core memory. So when [Bertho] got back to his home workshop he started playing around with it to see if a flip dot display can be made to behave exactly like core memory.

We’re really glad a successor to core memory was found since it’s pretty slow. But the concept still makes for some fun exploration (here’s the obligatory Arduino implementation of core memory). It uses magnetic rings with two conductors running through them that pass at right angles to each other. Sound familiar? This is exactly how flip-dot displays work.

There are, of course, some differences. The biggest one being that the displays don’t have the sense wire present in core memory. That was an easy enough thing for [Bertho] to get around. He added the grey sense wire by threading it through the inside of the hardware. The other hurdle he had to overcome was to alter the controller firmware to match the destructive tendency of core memory (reading the state also resets it).

So far he’s just set this up as a proof of concept, reading the sense wire while repetitively reading and writing to the “memory”. But it’s engaging to see what was captured on the scope. We asked him about his future plans, specifically what he would use to automatically read from the sense wire. His response is found after the jump.

Continue reading “Converting A Flip-dot Display To Work Like Core Memory”

All Wheel Drive Motorcycle

Take one look at the front fork of this dirt bike and you’ll notice that it’s not really a front fork at all. A custom front end replaces the traditional design in order to give this motorcycle all wheel drive. Look closely and you’ll see the chain that drives the front wheel. The swing-arm like addition lets the front end retain all of its suspension and steering and that’s where the project gets tricky.

We actually saw this thing in person at the monthly meeting of our local hackerspace: Sector67. [Martin Lawson] got his seven minutes of fame during the presentations (they use a prototype of this scoreboard to limit each presenter), and then was mobbed with a ton of interest afterwards. We were able to get a pretty good look at how the front drive works. It starts with an additional cog fastened beside the one that drives the chain for the back end. This feeds up through some tensioners and transfers out on the left side (from the rider’s perspective) of the front end. From here the rotational force is transferred to the right right and includes a U-joint to account for steering. The last chain goes straight down to the wheel.

The idea is that when the rear wheel loses traction you’re still being pulled by the front. This is illustrated well in the video after the break. [Marty] — who has a patent on the design — is trying to get some interest from manufacturers. He says the ability ride right through poor traction terrain make this a lot easier than a traditional dirt bike for beginners to ride. But it’s obvious the professionals are having fun on the thing as well!

Continue reading “All Wheel Drive Motorcycle”

Hack VersaPak Battery Modules To Reuse Laptop Cells

retrofit-battery-packs-with-laptop-cells

If you’re familiar with VersaPak tools you’ll note that while the battery pack in this image looks somewhat familiar, it’s not supposed to have a removable cell. This is [Martin Melchior’s] hack to use laptop 18650 Lithium cells with VersaPak tools.

The original NiCad packs used three cells for a total of 3.6V, so it is possible to substitute a Lithium cell in the same voltage neighorhood. The tools are pretty hard on the battery packs, drawing a lot of current in certain situations. But these cells are being harvested from dead laptop battery packs so it’s not a huge concern if their life is a bit shortened.

The hack places an 18650 battery receptacle inside of the VersaPak battery housing. There’s a bit of careful disassembly to get to this point, but it’s well illustrated in [Martin’s] project log. And of course you’ll need to use a proper Lithium battery charger from here on out.

This form factor has been popping up in a lot of hacks lately. Here’s another one that modifies the Goal Zero Bolt flashlight to use them.