Raspberry Pi Helps With 2.4GHz Home Automation

Wanting to extend the capabilities of the radio frequency devices in his home [Kalle Löfgren] turned a Raspberry Pi into an RF control hub. We’ve seen some of his home automation work in the past. In his media room he built a universal remote base station which used the same RF board as in this project. The main difference is that before he went with an AVR microcontroller and this time he’s upgrade to a Raspberry Pi board.

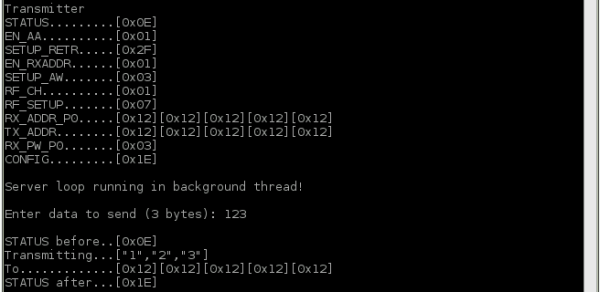
The RPi brings a lot more to the table. Notably, the scripting (whose output is shown above) and networking features. His radio board is an nRF24L01 which he talks to via the SPI protocol. The Raspberry Pi has no problem talking to SPI devices through its GPIO header. [Kalle] just needed to do a bit of setup to configure the pin modes.

A Python script lets him sent commands using his keyboard, but this can also be automated. Combine that with the TCP server script he wrote and it opens up the a wide range of configurations to switch or talk to any device operating on the 2.4 GHz band.

HP16500B Logic Analyzer Controlled With RS-232 And More

hp16500b-logic-analyzer

We’re pretty spoiled these days in that hobby electronics has made a lot of cool tools available on a budget. It’s hard to think of a better example than a logic analyzer, which you can get for a day or two of pay. Consumer-level devices just didn’t exist until a few years ago. [Jouko S] has this HP16500B industrial grade logic analyzer in his shop. It’s from the early 1990’s and it’s got a ton of features. Grabbing a still functional yet super-old model used to be the only way for hobbyists. But one thing you won’t find on it is the ability to connect it to your USB port to get screen captures. Younger readers might not recognize the slot at the top for magnetic media called a floppy disk which is the in-built way of recording your sessions. He set out to find an easier way to get color screen captures and ended up adding RS-232 control to the old hardware.

There is a 25-pin port on the back of the old hulk. But it is a female connector and he didn’t have the adapters on hand to make it work with his serial-to-USB converter. During development he used a breadboard and solder-tail connector to patch into the necessary signals. This was all hooked up to a Raspberry Pi which he planned to dedicate to the system. It worked, and he was able to use an interactive terminal for the rest of his sleuthing. With much trial and error he figured out the commands, and wrote some Python code for the Pi side of the equation. He can now pull color screenshots with ease thanks to the utilities available in the Python Imaging Module.

Build Your Own Backyard Pizza Oven

backyard-pizza-oven

Don’t heat up your house this summer, build your own backyard pizza oven instead. We love to using our garden produce, homemade dough, and fresh farmer’s market mozzarella to whip up a tasty pie in the summer. But it can be tricky to cook it on the grill and we hate heating up the oven when it’s hot out. This could be a perfect solution.

The footprint of the oven used to be a flower bed in [Furiousbal’s] yard. He removed the soil and side walls, laid down a bed of pea gravel, then started building the brick base for the oven. The base is insulated by encasing beer bottles in a bed of clay which he harvested locally. Fire brick then makes the floor of the cooking area as well as the arched opening. To support the clay during construction he built a dome of wet sand and covered it with damp newspaper. The clay is built up in layers before removing the sand from the inside. The final step (not shown above) is to build a little shelter to ensure the elements don’t wash away your hard work.

Of course you need to build your own fire inside to use it. If that’s too much work perhaps you should try solar cooking?

[via Reddit]

Help us decide, should this project gone on LIFE.hackaday?

Reflow Soldering Improved With Carbon Dioxide

co2_reflow-oven

This is exactly what it looks like. [Oleg] calls it soldering in inert atmosphere, but it’s just a toaster oven reflow hack dropped into a container full of carbon dioxide.

Why go to this trouble? It’s all about solder wetting. This is the ability of the molten solder paste to flow into all of the tinned areas of a board. [Oleg] talks about the shelf life of hot air leveled PCB tinning, which is about six months. After this the tin has oxidized. It will certainly not be as bad as bare copper would have, but it can lead to bad solder joints if your PCBs are more than about six months off the production line. This is one of the reasons to use solder flux. The acid eats away at the oxidized layer, exposing tin that will have better wetting.

But there is another way. Soldering in the absence of oxygen will also help the wetting process. CO2 is heavier than air, so placing the reflow oven in a plastic container will allow you to purge air from the space. CO2 canisters are cheap and easy to acquire. If you keg your own homebrew beer you already own one!

If you’ve got everything but the reflow oven just look around for a few examples of how to build your own.

Ambilight Clone Has Meaningful Amount Of Resolution

james-bond-ambilight-clone

We don’t have an Ambilight clone on our own home theater, but seeing this one in action makes us wonder if we shouldn’t add it to the ever-growing list of projects we need to tackle (right below that POV display we’ve been putting off for years). [Falldeaf] built the colored light augmentation system using a set of WS2801 controlled LED pixels. There are a lot of them, and this results in the ‘meaningful resolution’ we mentioned in the title. The image on the screen is the opening to a James Bond film. You’ll remember that the camera shot down a rifle barrel follows him as he walks across the screen. There’s enough LEDs here to have to the light follow him across the screen as well. This is a nice touch that we don’t see in every Ambilight clone project.

A frame of fake-wood angle bracket holds each LED pixel in place. The entire assembly attaches to the VESA mounting holes on the back of the television. An Arduino addresses the lights while the Boblight package processes the video to acquire the lighting instructions. We think the hue is a bit off, but otherwise it’s a solid offering.

We’re still hoping the Microsoft IllumiRoom becomes a thing.

Continue reading “Ambilight Clone Has Meaningful Amount Of Resolution”

Wireless Rover With Android Control

android-rover

[Radu] spend the first portion of this year building and improving upon this wireless rover project. It’s actually the second generation of an autonomous follower project he started a few years back. If you browse through his old postings you’ll find that this version is leaps and bounds ahead of the last.

He purchased the chassis which also came with the gear-head motors and tires. Why reinvent the wheel (har har) when you’ve got bigger things on your plate? To make enough room inside for his own goodies he started out by ditching the control board which came with the Lynxmotion chassis in favor of an AVR ATmega128 development board. He also chose to use his own motor controller board. Next he added a metal bracket system to hold the battery pack. Things start to get pretty crowded in there when he installed his own Bluetooth and GPS modules. Rounding out his hardware additions were a set of five ultrasonic sensors (the grey tubes on top), a character display, as well as head and tail lights. The demo video shows off the control app he uses. We like that tic-tac-toe design for motion control, and that he added in buttons to control the lights.

Continue reading “Wireless Rover With Android Control”

Arduino Particle Light Box Generates Animations From Sound

arduino-particle-display

Simple tools used well can produce fantastic results. The hardware which [Gilad] uses in this project is the definition of common. We’d bet you have most if not all of them on hand right now. But the end product is a light box which seems to dance and twirl with every sound in the room. You should go watch the demo video before reading the bill of materials so that the simplicity doesn’t spoil it for you.

A wooden craft box serves as the enclosure. Inside you’ll find an Arduino board, microphone, and an 8×8 RGB module. The front cover of the project box diffuses the light using a sheet of tracing paper on a frame of foam board. It’s the code that brings everything together. He wrote his own particle system library to generate interesting animations.

If you don’t have a project box on hand this might work with an extra-deep picture frame.
Continue reading “Arduino Particle Light Box Generates Animations From Sound”