Hackaday editors Elliot Williams and Mike Szczys pan for gold in a week packed with technological treasure. The big news is Apple/Google are working on contact tracing using BTLE. From adoption, to privacy, to efficacy, there’s a lot to unpack here and many of the details have yet to take shape. Of course the episode also overflows with great hacks like broken-inductor bike chain sensors, parabolic basketball backboards, bizarre hose clamp tools, iron-on eTextile trials, and hot AM radio towers. We finish up discussing the greatest typing device that wasn’t, and the coming and going of the COBOL crisis.
Take a look at the links below if you want to follow along, and as always tell us what you think about this episode in the comments!
Take a look at the links below if you want to follow along, and as always, tell us what you think about this episode in the comments!
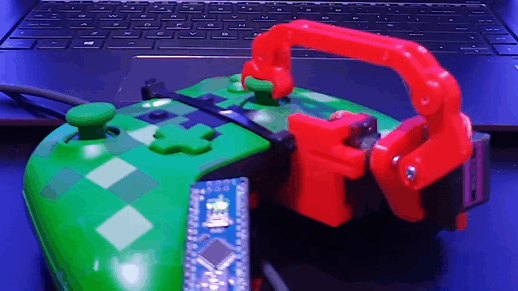
First the robots took our jobs, then they came for our video games. This dystopian future is brought to you by [Little French Kev] who designed this adorable 3D-printed robot arm to interface with an Xbox One controller joystick. He shows it off in the video after the break, controlling a ball-balancing physics demonstration written in Unity.
Hats off to him on the quality of the design. There are two parts that nestle the knob of the thumbstick from either side. He mates those pieces with each other using screws, firmly hugging the stick. Bearings are used at the joints for smooth action of the two servo motors that control the arm. The base of the robotic appendage is zip-tied to the controller itself.
The build targets experimentation with machine learning. Since the computer can control the arm via an Arduino, and the computer has access to metrics of what’s happening in the virtual environment, it’s a perfect for training a neural network. Are you thinking what we’re thinking? This is the beginning of hardware speed-running your favorite video games like [SethBling] did for Super Mario World half a decade ago. It will be more impressive since this would be done by automating the mechanical bit of the controller rather than operating purely in the software realm. You’ll just need to do your own hack to implement button control.
The coolest stories from the hacker community this year are the rapid manufacturing efforts that have gone on in response to COVID-19. But [Mark Rehorst], frequently featured on these pages for his clever takes on 3D printing, shared a couple of really useful prints that are out of the ordinary for what we’ve been seeing: bias tape folders and ear savers.
Tailors around the world have threaded the needle on grass-roots face mask production. One of the more labor intensive parts of sewing a face mask is the fastening mechanism. With elastic straps, the size of the loops needs to be just right, but when you run out of elastic you need to sew straps. Bias tape is a popular material for that, but it’s finicky to fold and hold it for sewing.
[Mark] heard of the need and grabbed a bias tape folder design from Thingiverse. These work kind of like a zipper, pulling in the unfolded tape on one side and feeding it out the other, folded nicely for the needle and thread to take over. But of course he did one better, refining the original design to use less plastic to get more parts, faster, with less material use — win, win, win.
Speaking of those mask straps, it turns out the backs of your ears don’t like being rubbed raw for back-to-back-to-back 12-hour shifts at the hospital. We’ve seen health workers, themselves skilled hackers, recommend sewing buttons onto a headband to hold the mask straps.
Button/Headband earsaver
3D-printed earsaver
Mark’s revised earsaver design
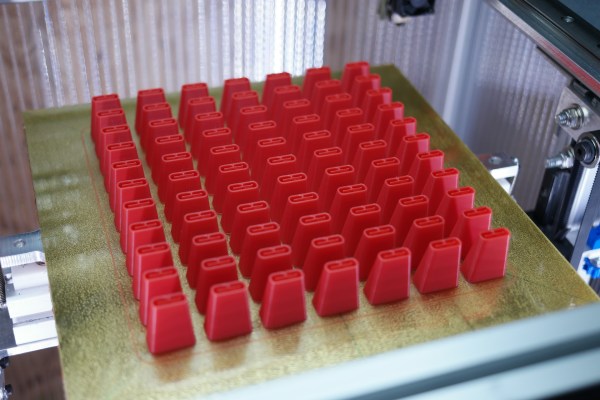
But the 3D-printing world has an “earsaver” that provides a series of hooks on a plastic band that loops behind your head. Once again, [Mark] iterated on the standard design, finding ways to reduce material use while also fitting more units onto a single printer bed.
These functional prints are glamorous in their own ways. We love seeing hard-working 3D-printed items, but we love it even more when we see them getting better and better with each new version. The back story and the design files for the improved versions are available on his project writeup. Go [Mark]!
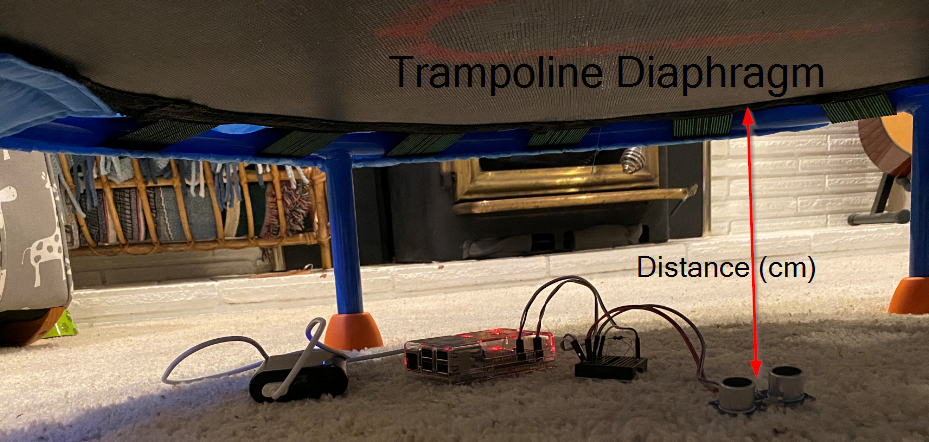
If you have a toddler and a mini-tramp you know the rallying cry of “Mama, Count!”. If you don’t don’t have either of these things, become the hero uncle or aunt by building one for your family members who have been social distancing with a three-year-old monster bundle of joy for the last five weeks. This trampoline bounce counter uses a Raspberry Pi and a distance sensor to stream the bounce count to a nice little web GUI.
The hardware couldn’t be more simple, and there’s a good chance you already have everything on hand. The HC-SR04 ultrasonic distance sensor is a staple in beginner microcontroller kits. It simply lays on the floor pointed up at the bottom of the trampoline, connected to a Raspberry Pi via a resistor divider.
The software is where [Eric Escobar’s] project makes your life easy. He’s included a simple calibration routine that marks the low point of a bounce as you stand still on the tramp. There’s even a systemd service file included to ensure the software is always running, even after reboot. Cumulative bounce count can be seen on a webpage served from the Pi via an AJAX script.
Having a running count is a great first step, and surely a magical new feature of the trampoline that will be loved by the little ones. If that sense of wonder runs out, you could always gamify the system by adding in daily or hourly totals and a high-scores board.
Today marks the beginning of the PSoC IoT design contest. Show us your idea for an interesting Internet-connected thing and we’ll send you a dev kit to actually build it.
With the help of Cypress, Digi-Key, and AWS IoT we’ll be sending out your choice of PSoC 6 WiFi-BT Pioneer kit or Prototyping Kit to up to 50 entries just for publishing a great idea of something to build with them. As you guessed from the name, these provide WiFi and Bluetooth connectivity, but they’re also bristling with seven programmable analog blocks the PSoC is known for, and a hundred GPIO. They have prototyping add-ons like a 2.4″ screen for user interface, audio, IMU, capacitive touch, and a heap of other goodies.
You have until May 26th to post a project page on Hackaday.io outlining your idea — don’t forget to use that “Submit project to” button to enter it in the contest. Tells us all about the IoT project you want to build and which PSoC 6 board you plan to use. If your idea is picked, we’ll send you the dev board and you’ll have until August to actually build your idea. Grand Prize will receive a $500 prepaid Visa card, two runners up will each receive a $250 card.
Full details are available on the contest page. We know you’ve always wanted to give your fish a Twitter account, to have a dashboard that shows up-to-the minute stats on how much Boo Berry Cereal you have left, a beacon to give you push alerts when the laundry needs to make its way into the dryer, or perhaps you plan to build a new wave of Internet-connect pagers. Whatever it is, from a silly idea to a truly life-improving build, if it’s begging to spread its data far and wide, it’s a perfect idea for this contest.
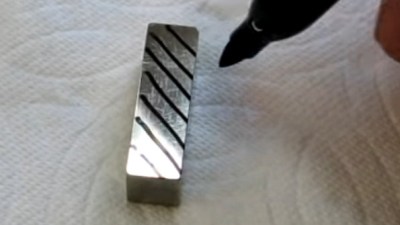
[Tom] from [oxtoolco] got his hands on a tool that measures in 1/10,000,000th (that’s one ten-millionth) increments and was wondering what kind of shenanigans you can do with this Lamborghini of dial indicators. It’s one thing to say you’re going to measure ink, but coming up with the method is the leap. In this case it’s a gauge block — a piece of precision ground metal with precise dimensions and perfectly perpendicular faces. By zeroing the indicator on the block, then adding lines from the Sharpie and measuring again, you can deduce the thickness of the ink markings.
After arraying diagonal lines on the gauge block it is placed lines-down under the dial indicator. This distributes the ink layer across a larger area, as probing the ink line directly would likely result in inaccurate readings. On that topic the gauge block is moved using pliers, as introducing heat from your fingers could result in expansion of the metal upsetting the readings.
The results? Black, blue, and red Sharpie were all tested, alongside blue and black Dykem layout fluid. Ten samples of each were run and the readings were all very close, save a couple of obvious outliers. Clocking in the thinnest is black Sharpie at about 118 millionths of an inch (~30 microns) and blue Dykem was the thickest at 314 millionths (86 microns). [Tom] quips that since we now know the thickness, you could even use ink as a shim.
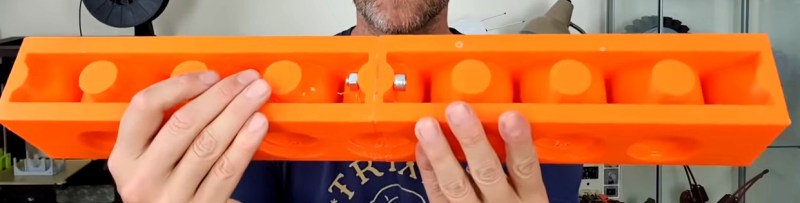
The LEGO Technic line is definitely the hacker’s flavor of LEGO. It brings a treasure trove of engineering uses that make axles, gears, pulleys, and motors a thing. The only problem is that it’s the inanimate minifigures having all of the fun. But not if [Matt Denton] has something to say about it. He’s building a huge 3D-printed go-kart with pieces scaled up 8.43 times the size of their LEGO equivalents. That’s large enough for an adult to fit!
You may remember seeing [Matt’s] previous attempt at something like this about three years back, but that was only around half the size of this one. He printed a blue kart for his nephew, but it didn’t quite scale up enough even for a child to ride. This one is impressively large, but that raises some interesting fabrication issues
The long beams that make up the frame of the vehicle and the axle piece (the black rods with an X-shaped profile) used for the steering column are far too long to print in one go. So the axle was printed in two parts with a square channel down the center that hides a single run of square tubing. But the beams are much more interesting. Printed in two parts, there’s a dovetail-shaped connector piece that holds the top joint together, and a hidden bolt for the bottom. Glue is also used along the joint to bolster the holding power of the mechanical fasteners.
In general, the weight and friction on this scaled up version need many considerations. [Matt] explains where he’s made design decisions — like perpendicular axle connectors that have proper bearings — to include mostly-hidden metal parts and fasteners to ensure the plastic doesn’t fail. The thing looks awesome, but just wait until you see the assembly process. It’s sooooo satisfying to watch the modular parts snap into place. The project’s still in progress and before he’s done he plans to add an electric motor to make the kart go.
Even if you’re not scaling a model up to full size, giant is a guaranteed recipe for fun. Case in point, [Matt’s] enlarged LEGO fork lift is a delight.


 [Tom] from [oxtoolco] got his hands on a tool that measures in 1/10,000,000th (that’s one ten-millionth) increments and was wondering what kind of shenanigans you can do with this Lamborghini of dial indicators. It’s one thing to say you’re going to measure ink, but coming up with the method is the leap. In this case it’s a gauge block — a piece of precision ground metal with precise dimensions and perfectly perpendicular faces. By zeroing the indicator on the block, then adding lines from the Sharpie and measuring again, you can deduce the thickness of the ink markings.