Magnetic Bubble Memory Farewell Tour

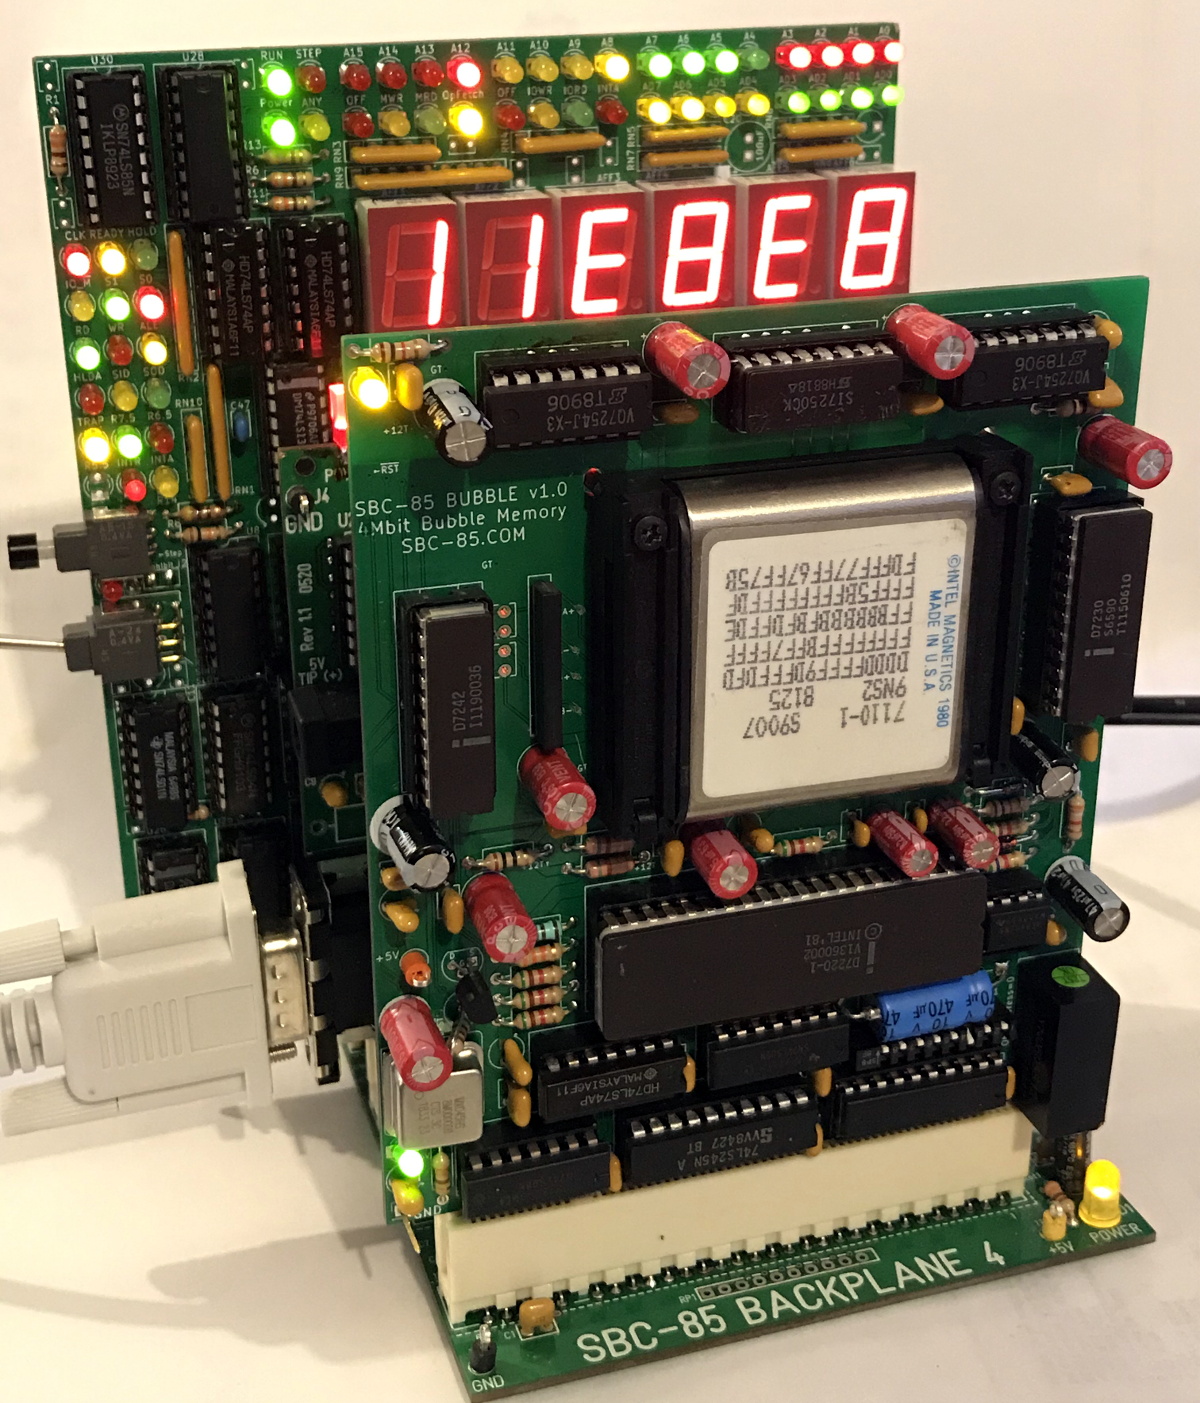
There’s something both satisfying and sad about seeing an aging performer who used to pack a full house now playing at a local bar or casino. That’s kind of how we felt looking at [Craig’s] modern-day bubble memory build. We totally get, however, the desire to finish off that project you thought would be cool four decades ago and [Craig] seems to be well on the way to doing just that.

If you don’t recall, bubble memory was going to totally wipe out the hard drive industry back in the late 1970s and early 1980s. A byproduct of research on twistor memory, the technology relied on tiny magnetic domains or bubbles circulating on a thin film. Bits circulated to the edge of the film where they were read using a magnetic pickup. Then a write head put them back at the other edge to continue their journey. It was very much like the old delay line memories, but with tiny magnetic domains instead of pressure waves through mercury.

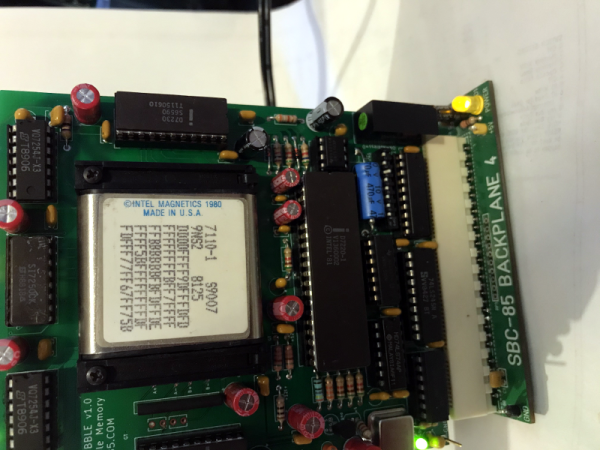
We don’t know where [Craig] got his Intel 7110 but they are very pricey nowadays thanks to their rarity. In some cases, it’s cheaper to buy some equipment that used bubble memory and steal the devices from the board. You can tell that [Craig] was very careful working his way to testing the full board.

Because these were state-of-the-art in their day, the chips have extra loops and would map out the bad loops. Since the bubble memory is nonvolatile, that should be a one time setup at the factory. However, in case you lost the map, the same information appears on the chip’s label. [Craig’s] first test was to read the map and compare it to the chip’s printed label. They matched, so that’s a great sign the chip is in good working order and the circuit is able to read, at least.

We’ve talked about bubble memory before along with many other defunct forms of storage. There were a few military applications that took advantage of the non-mechanical nature of the device and that’s why the Navy’s NEETS program has a section about them.

Gain An Understanding Of Injection Molding’s Design Gotchas

When it comes to manufacturing, sheet metal and injection molding make the world go ’round. As a manufacturing method, injection molding has its own range of unique design issues and gotchas that are better to be aware of than not. To help with this awareness, [studiored] has a series of blog posts describing injection molding design issues, presented from the perspective of how to avoid and address them.

Design of screw bosses demonstrating conflict between molder’s guidelines and vendor’s recommendations. Compromising between both is a science and an art.

Because injection molding involves heat, warp is one issue to be aware of and its principles will probably be familiar to anyone with nitty-gritty experience in 3D printing. Sink marks are also an issue that comes down to differential cooling causing problems, and can ruin a smooth and glossy finish. Both of these play a role in how best to design bosses.

Minimizing and simplifying undercuts (similar to overhangs in 3D printer parlance) is a bit more in-depth, because even a single undercut means much more complex tooling for the mold. Finally, because injection molding depends on reliably molding, cooling, and ejecting parts, designing parts with draft (a slight angle to aid part removal) can be a fact of life.

[studiored] seems to have been working overtime on sharing tips for product design and manufacture on their blog, so it’s worth keeping an eye on it for more additions. We mentioned earlier that much of the manufacturing world revolves around injection molding and sheet metal, so to round out your knowledge we published a primer on everything you need to know about the art and science of bending sheet metal. With a working knowledge of the kinds of design issues that affect these two common manufacturing methods, you’ll have a solid foundation for any forays into either world.

Hackaday Links Column Banner

Hackaday Links: April 19, 2020

While the COVID-19 pandemic at least seems to be on a downward track, the dystopian aspects of the response to the disease appear to be on the rise. As if there weren’t enough busybodies and bluenoses shaming their neighbors for real or imagined quarantine violations on social media, now we have the rise of social-distancing enforcement drones. These have been in use in hot zones around the world, of course, but have only recently arrived in the US. From New Jersey to Florida, drones are buzzing about in search of people not cowering in fear in their homes and blaring messages about how they face fines and arrest for seeking a little fresh air and sunshine. We’re all in favor of minimizing contact with potentially infected people, but it seems like these methods might be taking things a bit too far.

If you somehow find yourself with some spare time and want to increase your knowledge, or at least expand your virtual library, Springer Publishing has some exciting news for you. The journal and textbook publisher has made over 400 ebook titles available for free download. We had a quick scan over the list, and while the books run the gamut from social sciences to astrophysics, there are plenty of titles that are right in the wheelhouse of most Hackaday readers. There are books on power electronics, semiconductor physics, and artificial intelligence, as well as tons more. They all seem to be recent titles, so the information isn’t likely to be too dated. Give the list a once-over and happy downloading.

Out of all the people on this planet, the three with the least chance of being infected with SARS-CoV-2 blasted off from Kazakhstan this week on Soyuz MS-16 to meet up with the ISS. The long-quarantined crew of Anatoly Ivanishin, Ivan Vagner, and Chris Cassidy swapped places with the Expedition 62 crew, who returned to Earth safely in the Soyuz MS-15 vehicle. It’s a strange new world they return to, and we wish them and their ISS colleagues all the best. What struck us most about this mission, though, was some apparently surreptitiously obtained footage of the launch from a remarkably dangerous position. We saw some analysis of the footage, and based on the sound delay the camera was perhaps as close as 150 meters to the launchpad. It’s hard to say if the astronauts or the camera operator was braver.

And finally, because neatness counts, we got this great tip on making your breadboard jumpers perfectly straight. There’s something satisfying about breadboard circuits where the jumpers are straight and exactly the length the need to be, and John Martin’s method is so simple you can’t help but use it. He just rolls the stripped jumpers between his bench and something flat; he uses a Post-it note pad but just about anything will do. The result is satisfyingly straight jumpers, ready to be bent and inserted. We bet this method could be modified to work with the stiffer wire normally used in circuit sculptures like those of Mohit Bhoite; he went into some depth about his methods during his Supercon talk last year, and it’s worth watching if you haven’t seen it yet.

DIY Magsafe Charger Feeds Off 12 V Solar Battery

[Steve Chamberlin] has a spiffy solar-charged 12 V battery that he was eager to use to power his laptop, but ran into a glitch. His MacBook Pro uses Apple’s MagSafe 2 connector for power, but plugging the AC adapter into the battery via a 110 VAC inverter seemed awfully inefficient. It would be much better to plug it into the battery directly, but that also was a problem. While Apple has a number of DC power adapters intended for automotive use, none exist for the MagSafe 2 connector [Steve]’s mid-2014 MacBook Pro uses. His solution was to roll his own MagSafe charger with 12 VDC input.

Since MagSafe connectors are proprietary, his first duty was to salvage one from a broken wall charger. After cleaning up the wires and repairing any frayed bits, it was time to choose a DC-DC converter to go between the MagSafe connector and the battery. The battery is nominally 12 volts, so the input of the DC-DC converter was easy to choose, but the output was a bit uncertain. Figuring out what the MagSafe connector expects took a little educated guesswork.

The original AC adapter attached to the charger claimed an output of 20 volts, another Apple adapter claimed a 14.85 V output, and a third-party adapter said 16.5 volts. [Steve] figured that the MagSafe connectors seemed fine with anything in the 15 to 20 V range, so it would be acceptable to use a 12 V to 19 V DC-DC boost converter which he had available. The result worked just fine, and [Steve] took measurements to verify that it is in fact much more efficient than had he took the easy way out with the inverter.

MagSafe has been displaced by USB-C nowadays, but there are plenty of MagSafe devices still kicking around. In a pinch, keep in mind that a little bit of filing or grinding is all that’s needed to turn MagSafe 1 into MagSafe 2.

Huge 3D-Printed LEGO Go Kart Makes You The Minifig

The LEGO Technic line is definitely the hacker’s flavor of LEGO. It brings a treasure trove of engineering uses that make axles, gears, pulleys, and motors a thing. The only problem is that it’s the inanimate minifigures having all of the fun. But not if [Matt Denton] has something to say about it. He’s building a huge 3D-printed go-kart with pieces scaled up 8.43 times the size of their LEGO equivalents. That’s large enough for an adult to fit!

You may remember seeing [Matt’s] previous attempt at something like this about three years back, but that was only around half the size of this one. He printed a blue kart for his nephew, but it didn’t quite scale up enough even for a child to ride. This one is impressively large, but that raises some interesting fabrication issues

The long beams that make up the frame of the vehicle and the axle piece (the black rods with an X-shaped profile) used for the steering column are far too long to print in one go. So the axle was printed in two parts with a square channel down the center that hides a single run of square tubing. But the beams are much more interesting. Printed in two parts, there’s a dovetail-shaped connector piece that holds the top joint together, and a hidden bolt for the bottom. Glue is also used along the joint to bolster the holding power of the mechanical fasteners.

In general, the weight and friction on this scaled up version need many considerations. [Matt] explains where he’s made design decisions — like perpendicular axle connectors that have proper bearings — to include mostly-hidden metal parts and fasteners to ensure the plastic doesn’t fail. The thing looks awesome, but just wait until you see the assembly process. It’s sooooo satisfying to watch the modular parts snap into place. The project’s still in progress and before he’s done he plans to add an electric motor to make the kart go.

Even if you’re not scaling a model up to full size, giant is a guaranteed recipe for fun. Case in point, [Matt’s] enlarged LEGO fork lift is a delight.

Continue reading “Huge 3D-Printed LEGO Go Kart Makes You The Minifig”

KVM Uses Many Arduinos

The Arduino platform is one of the most versatile microcontroller boards available, coming in a wide variety of shapes and sizes perfect for everything from blinking a few LEDs to robotics to entire home automation systems. One of its more subtle features is the ability to use its serial libraries to handle keyboard and mouse duties. While this can be used for basic HID implementations, [Nathalis] takes it a step further by using a series of Arduinos as a KVM switch; although admittedly without the video and mouse functionality yet.

To start, an Arduino Uno accepts inputs from a keyboard which handles the incoming serial signals from the keyboard. From there, two Arduino Pro Micros are attached in parallel and receive signals from the Uno to send to their respective computers. The scroll lock key, which doesn’t do much of anything in modern times except upset Excel spreadsheeting, is the toggle switch between the two outputs. Everything is standard USB HID, so it should be compatible with pretty much everything out there. All of the source code and schematics are available in the project’s repository for anyone who wants to play along at home.

Using an Arduino to emulate a USB input device doesn’t have to be all work and no play, the same basic concept can also be used to build custom gaming controllers.

A Broken Inductor As A Bike Chain Sensor

If you have ever broken the ferrite core of an inductor, you’ll probably sympathize with [Oliver Mattos]. He accidentally stood on a ferrite-cored component, breaking it and rendering it useless. But utility is in the eye of the beholder, and instead of throwing it away he’s repurposed it as a chain sensor for his electric bicycle.

The broken inductor was positioned on the rear frame of the machine such that the chain passed through the area where the broken half of its core would once have been. As each link passes through the magnetic field it causes the inductance to change, and from this the speed, direction, and tension of the chain can be read.

Adding a 180 nF capacitor in parallel with the inductor creates a tuned circuit, and measuring the inductance is as straightforward as firing a single pulse at it and measuring the time it takes to go negative. Chain speed can be read by sensing the change in inductance as each link passes, tension by sensing the change in inductance as the chain is closer or further away, and direction by whether the chain is slack or not. It’s an ingenious and simple solution to measuring a bicycle chain, and we like it.

A lot of bicycle measurement systems have passed our way over the years, but it’s fair to say they have been more concerned with displays than sensors.