Software-Defined Radio Remotely Using A Linux Wall wart

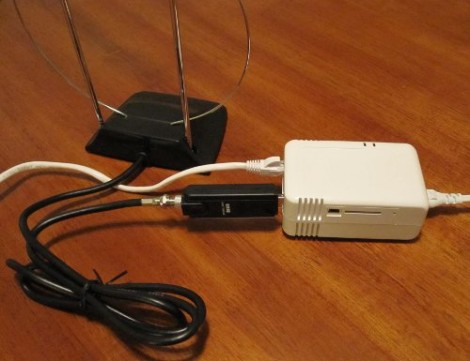
Here’s a interesting idea; if the hardware seen above is dropped at a location, you can monitor radio signals remotely via the Internet. [MS3FGX] has been toying with the idea for a little while now. He wanted to use a DVB dongle with a portable Linux solution to offer Software-Defined Radio (SDR) capability without the need to actually be there.

The white box is a PWN Plug, a branded version of the SheevaPlug. The black dongle that plugs into it is a DVB tuner dongle. It’s meant to receive television signals over the radio, but recently the hardware has been used as a simple way to implement SDR. Combine the two (along with the antenna), stir in a network connection, and you’ve got a remote listening post. What can you listen to? Just about anything that’s within the dongle’s bandwidth range. [MS3FGX] mentions walkie-talkie traffic and pager signals, to name just two.

He even wrote an installation script that gets you up and running in no time.

[Jeri Ellsworth] On Making Her C64 Bass Keytar

[Jeri Ellsworth] finally set aside some time to talk about the build process for her Commodore 64 bass keytar. We think what started by taking a band saw to the guitar body ended up as a fantastic new instrument.

When she was showing off the project at Maker Faire we really only got a cursory look at what it could do. Her most recent video covers all that went into pulling off the project. Once the bulk of the guitar body was gone she tore the guts out of a dead c64 in order to mate the case with the guitar neck. Always the craftsman, she altered the computer’s badge to preserve the iconic look, then went to work adding pickups to each string using piezo sensors. This was done with Maker Faire in mind because magnetic pickups would have been unreliable around all of the tesla coils one might find at the event. These were amplified and filtered before being processed via an FPGA which connects to the original c64 SID 6581 chip.

Continue reading “[Jeri Ellsworth] On Making Her C64 Bass Keytar”

Pedal-powered 32-core ARM Linux Server

Sure, it’s probably a gimmick to [Jon Masters], but we absolutely love the pedal-powered server he built using a group of ARM chips. [Jon] is an engineer at Red Hat and put together  the project in order to show off the potential of the low-power ARM offerings.

The platform is a quad-core Calxeda EnergyCore ARM SoC. Each chip draws only 5 Watts at full load, with eight chips weighing in at just 40 Watts. The circuit to power the server started as a solar charger, which was easy to convert just by transitioning from panels to a generator that works just like a bicycle trainer (the rear wheel presses against a spin wheel which drives the generator shaft).

So, the bicycle generator powers the solar charger, which is connected to an inverter that feeds a UPS. After reading the article and watching the video after the break we’re a bit confused on the actual setup. We would think that the inverter would feed the charger but that doesn’t seem to be the case here. If you can provide some clarity on how the system is connected please feel free to do so in the comments.

Continue reading “Pedal-powered 32-core ARM Linux Server”

Tearing Through Floppy Drives To Build A Small-format Dot Matrix Printer

The accuracy which [Mario] achieved in his pen plotter dot matrix printer is very remarkable. He tore through a pile of floppy drives to get the parts he wanted, and chose to go with a fine-point Sharpie marker as a print head. In the video after the break he flatters us with a printout of the Hackaday logo, but you also get a look at one problem with the build. The ink doesn’t always flow from the felt tip and he has to coax it (almost like priming a pump) with a piece of scrap paper.

He was inspired by the pen printer we featured back in June. This rendition features a printing area of 1.5×1.5 inches that can accommodate 120×120 black and white pixels. He’s not a microcontroller type of guy and is driving the printer from the parallel port of his computer.

The best printing technique puts the pen down and moves it around just a bit (helps prevent the ink flow problem we mentioned earlier) and produces images like one in the lower right. We love the 8-bit nature of the result and would use this all the time to make our own greeting cards.

Continue reading “Tearing Through Floppy Drives To Build A Small-format Dot Matrix Printer”

Logic Analyzer Add-on For The MSP430 Launchpad

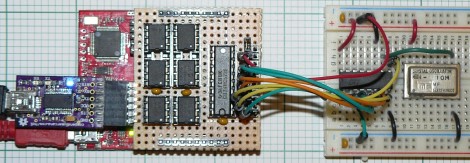
Here’s a 6-channel logic analyzer shield for the MSP430 Launchpad. It manages an eyebrow-raising 16 million samples per second. The prototype seen above is made on a hunk of protoboard with point-to-point soldering. [oPossum] did lay out a PCB — which is just 50mmx50mm — but has not had any produced quite yet.

He calls it the LogicBoost, and based it on the the LogicShrimp design. The sextuplet of 8-pin chips are all SPI RAM. These are responsible for storing the samples, with a 74HC573 latch routing the traffic. The MSP430 chip provides the SPI clock, and the Launchpad’s virtual com port can be used to push the data to a computer for graphing. That’s a bit slow so [oPossum] also included an optional header for an FTDI board that will do a faster job. The sample rate can be adjusted by tweaking the internal oscillator setting of the chip; there’s plenty to choose from so it will work for just about any purpose (as long as you don’t surpass the 16 Msps speed limit).

[via Dangerous Prototypes]

Proximity Switch For Your Mains Devices

[Ivan’s] friend built a proximity sensor to switch his LED bench lighting off every time he walked away. The idea is pretty neat, so [Ivan] decided to implement it for mains devices by making this proximity switched outlet box.

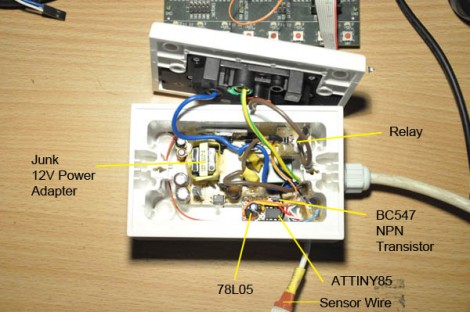
A Sharp GP2D12 infrared distance sensor is the key to the system. It has an emitter and receiver that combine to give distance feedback base on how much of the light is reflected back to the detector. This is presented as a voltage curve which is monitored by an ATtiny85 (running the Arduino bootloader). It is small enough to fit inside the outlet box along with a tiny transformer and linear regulator to power to logic circuitry. The mains are switched with a relay using an NPN transistor to protect the chip’s I/O pins.

Check out the video after the break to see this in action. It should be a snap to add a count-down timer that gives you a bit more freedom to move around the workshop. With that in place this is a fantastic alternative to some other auto-shutoff techniques for your bench outlets.

Continue reading “Proximity Switch For Your Mains Devices”

Tug Of War… With Your Mind, Man!

Challenge your friends to a little mental Tug of War thanks to the Omaha Maker Group’s Red Bull Creation contest entry. The power struggle is all in your mind, and can only be won if you’re able to concentrate deeply and quickly. The headsets worn by each competitor monitor brain waves over a ten second window. If you concentrate more deeply than your opponent they’ll get a squirt of water in the face. If no one is concentrating well the contest is a draw the measurements start again. The screenshot above was taken from the test footage found after the break.

Hardware details are scant on this one. Obviously the Bullduino is the centerpiece of the build, taking readings from the headsets. A motor moves the water nozzle along a slit cut in the top of the sphere.  Progress during the 10-second window is displayed by that nozzle, which starts in the center yellow ‘safe’ zone and moves to one side or another to enter the green ‘kill’ zone.

Continue reading “Tug Of War… With Your Mind, Man!”