Counting Bees

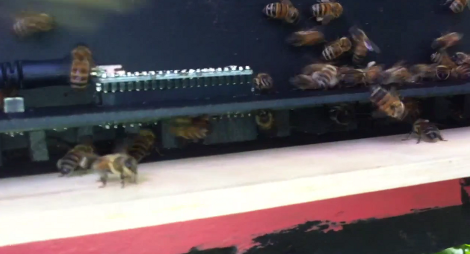
This is the bee counter which [Hydronics] designed. It’s made to attach to the opening for a hive, and will count the number of bees entering and exiting. We’re not experienced bee keepers ourselves (in fact we’re more of the mind of getting rid of stinging beasties) but we understand their important role in agriculture and ecosystem so we’re glad someone’s making a nice home for them.

Most of the apparatus is a circuit board lined with reflective sensors. There is a double-row of pin sockets on the top of the board which accepts the Teensy+ which monitors those sensors. The bees must pass below this PCB every time they enter or leave the hive, thereby tripping a sensor. In the video after the break [Hydronics] shows off the system with a netbook used to monitor the output. But it sounds like he has plans for an integrated display system in future versions of the bee counter.

Continue reading “Counting Bees”

[Ladyada’s] Thoughts On Quick-turn And Small-run PCB Houses

So you’ve mastered your PCB layout software, and it’s time to make the board. But if you don’t want to etch your own you’ve got to decided where to have it fabricated. There’s a slew of services out there, most of which you cannot afford, but the short list of those you can is still pretty long. We think this set of PCB fabrication house reviews will help you make your choice.

[Ladyada] — aka [Limor Fried] — knows what she’s talking about. She owns Adafruit Industries and has done the lion’s share of designing the many kits and items they sell. If you’re going to charge money for something it better work right, and that involves lots of prototypes. But even if you don’t need a quick turn-around or numerous testing boards the post is helpful as she also covers some of the batch producers we’re already familiar with. These include DorkBot PDX and BatchPCB to name a couple.

[via Reddit]

Keep An Eye On Your Palatial Estate With This Solar Powered WiFi Cam

If you’re expecting the serfs to hop the fence with pitch forks and torches you may want to employ a surveillance system. WiFi cameras are a cheap way of doing this, but you’ll need power. [CheapGuitar] decided not to run extension cords, and instead added solar power to his wireless camera. The solar panels are easy to spot in this image, but you’ll have to look close to see the camera.

He already had everything on hand, and this included a cheap WiFi camera which runs on 5V. To weatherproof it he used a plastic sandwich meat container. This is actually one of our favorite project enclosures, we used it for our door-bell button garage door lock. [CheapGuitar] painted it black to help keep it hidden after cutting a hole in the lid for the camera lens. Under the solar panels you’ll find a 12V car battery which uses a USB car charger to regulate voltage for the camera. Each of the panels is a 5W trickle charger and they’re designed to top off deep cycle batteries. The entire thing is cleverly hidden behind his existing landscaping.

[via Reddit]

Traffic Signal Controller Pulls Data Over WiFi

[Travis Brown] just published a post about the traffic light controller he built. His number one goal was to make the device wireless (except for AC power) and he achieved this by using a WiFi shield for his Arduino. But there is also a separate board that provides a way for the chip to switch the AC lights.

He works for a web hosting company, and the boss wanted a fun way to display the status of the servers among other things. He chose to use the WiServer library which controls the CoperHead WiFi Shield and gives him the ability to serve simple web pages from the Arduino. When power is applied the sketch automatically connects to the AP and starts polling the company’s API for status data. If you’re not within eyesight of the traffic lights you can log into the web server and check that way.

We think [Travis] did a great job of explaining his code, and we applaud him for making proper use of the watchdog timer (something we don’t see in very many projects). This joins the pile of traffic-light display devices we’ve seen around here. We still don’t know where people are getting their hands on the things.

Continue reading “Traffic Signal Controller Pulls Data Over WiFi”

Mantis9 PCB Mill

This is the Mantis9 PCB mill. It’s the first time we’ve featured the project, but it’s already well known by some as it keeps popping up in the comments for other CNC mill projects. Yes, it’s made out of wood — which some frown upon — but we’re happy with the build instructions and the especially the price tag (parts as low as $85).

We did feature an earlier revision of the hardware back in 2010. Subsequent versions changed the frame to use an open-front design, but it’s the build techniques that saw the biggest evolution. The problem was getting the holes for the parallel rods to align accurately. In the end it’s a simple operation that solves the problem; clamp both boards together and drill the holes at the same time. A drill press is used for all of the fabrication, ensuring that the holes are perpendicular to the surface of the boards. From there the rods are given some bronze bushings and pressed into place. Only then are the platforms secured to the bushings using epoxy. This is to ensure that the bushings don’t bind from poor alignment. We think it should end up having less play in it than other builds that use drawer slides.

Check out a PCB milling run in the clip after the break.

Continue reading “Mantis9 PCB Mill”

MyHDL Python Programming Option For FPGA

MyHDL is a Python module that brings FPGA programming into the Python environment. [Christopher Felton] tipped us off about a simple tutorial he just finished that gives an overview of how the module is used.

You may remember hearing about PyCPU a couple days ago which can run very simple Python code on a FPGA. There was a healthy discussion in the comments section comparing PyCPU and MyHDL. Although they may seem similar at first, the two are quite different. PyCPU creates a processor on the FPGA chip which can execute a small range of Python code. MyHDL actually implements Hardware Description Language in the Python environment. Once you’re used HDL to model your hardware choices in a Python script, it is converted to VHDL then fed to the toolchain and pushed to the chip like normal.

This is not an absolute beginner’s experience. But if you’re well-versed in Python it makes the jump to HDL a lot easier because you’ll be working with syntax that is already familiar to you.

Pocketwatch Retrofit Takes Input From Accelerometer

A friend of [CNLohr’s] used the mechanism from an old pocket watch in an art piece, but left him with the enclosure. It’s an interesting looking object that feels great in your hand so he decided to fill it with his own electronics, thereby giving it a new life. He’s showing off an early version of the hardware in the video, but plans to send off another version of the board soon to add a few features.

You can see that the round PCB is small enough to fit in the space vacated by the original hardware. The ribbon cable is used to connect to the programmer and we think it’s also the power source for this demonstration. There’s a small Densitron display that’s reading out hex values from the accelerometer. Many of these mems chip (you can learn how they work from this post) include a hardware tap detector. This meant you can tap your finger on the device and the chip will signal an input to whatever chip is attached to it. That’s a great option for user input, and it’s what [CNLohr] chose as the select button here. He tilts the watch to one side, then taps to turn on the LED. That’s all for now, but we like the promise it shows and can’t wait for updates!

Continue reading “Pocketwatch Retrofit Takes Input From Accelerometer”