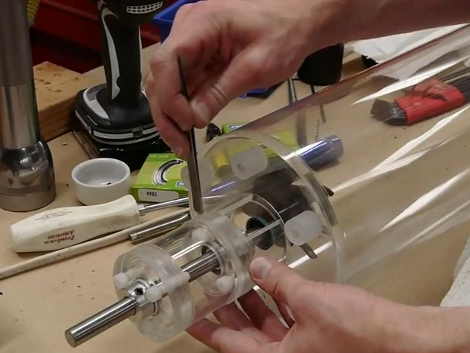
Water Vortex Exhibit Repair Gives A Look At The Bearing And Gasket Design

[Ben Krasnow’s] water vortex machine has been an exhibit in the lobby of the San Jose City Hall for quite some time now. Unfortuantely he recently had to perform some repair work on it due to the parts inside the water chamber rusting.

This is the same water vortex that we saw about a year ago. It uses a power drill to drive an impeller at the bottom of a water column to produce the vortex. That impeller was made from painted steel and after being submerged for eight months it began rusting, which discolored the water. [Ben’s] repair process, which you can watch after the break, replaces the shaft and the impeller. He reused a plastic PC cooling fan as the new impeller. The replacement shaft is stainless steel, as is all of the mounting hardware that will be in contact with water. But for us, the most interesting part of the repair is his explanation of the shaft gasket and bearings. Two thrust bearings and two radial bearings ensure that the shaft cannot move axially, which would cause a problem with the gasket. He had intended to swap out the oil seal for an all Teflon seal but the machined acrylic wasn’t conducive to the part swap. Instead, he replaced it with the same type of gasket, but bolstered the new one with some silicone to stave off corrosion.

Continue reading “Water Vortex Exhibit Repair Gives A Look At The Bearing And Gasket Design”

Speaker-mounted WAV Player For Street Performances

This naked speaker is the basis for [MaoMakMaa’s] newest project called the Wavedrone. He plans on using the autonomous and cable-less device during street performances. You can hear the effect of some stretched jazz cords being played on it in the video clip after the break. The sound is kind of an ethereal background noise that observers might not immediately realize is there.

You can see the 9V battery which serves as the power source clinging to the frame of the speaker. A 7805 linear regulator tames that battery and feeds the two IC’s on the circuit board seen to the right. The ATtiny85 is reading music from an SD card and playing it back in mono (obviously) with the help of an LM386 audio amplifier chip. The trimpots that go into the high pass and low pass filters in between the microcontroller and amplifier allow for a bit of sound manipulation, but we’re more impressed with the quality of the sound this is getting when properly trimmed.

Continue reading “Speaker-mounted WAV Player For Street Performances”

Chumby Controlled Mechanum Wheel Robot

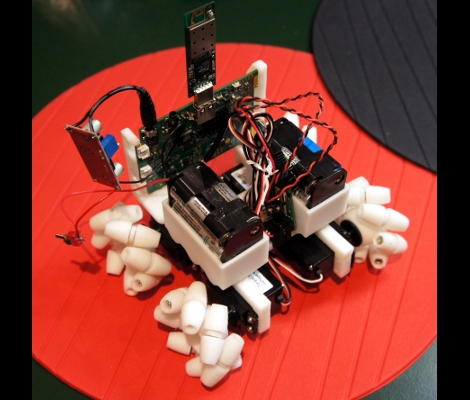
[Madox] gutted an Insignia Infocast to use with this robot. Insignia is Best Buy’s house brand and they partnered with Chumby to make their Infocast line. If you can find a used or clearance model it’s a great way to get yourself and embedded Linux board for a project like this one.

The body and wheels are 3D printed, with design files available at [Madox’s] Thingiverse page. The mechanum wheels work amazingly well, using seven bearings each for smooth operation. The body itself includes a holder for two groups of batteries. One of those battery packs powers the Chumby board while the other is used to power the four servo motors responsible for locomotion. To simplify the electronics [Madox] chose to use a USB servo drive which only set him back about $20.

We’re not sure what the USB dongle on top of the robot is used for. We’d guess it’s a WiFi adapter, since the machine sets up its own access point to act as a controller. But we thought Chumby boards had WiFi built-in. At any rate, check out the video after the break where you can see an Android phone driving the little bugger. There’s a flaw in the code that prevents side-to-side movement, it gets fixed after a video break at about 2:15 and everything is peachy after that.

Continue reading “Chumby Controlled Mechanum Wheel Robot”

[Easton’s] Animatronic Hand Gets 3D Printed Upgrade

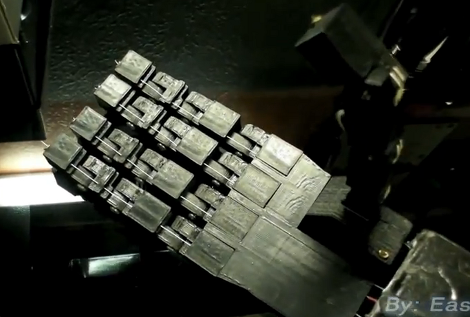
[Easton] as been working with [Jeremy Blum] to come up with the newest version of his animatronic hand. You may remember seeing [Easton’s] first animatronic hand, with which he won his regional science fair and made a trip to nations. Since then he’s been working on improvements, and with access to [Jeremy’s] Makerbot he harnessed the power of open source design to make his own printed hand, extending a different Thingiverse project.

He’s still using the original sensor glove as a controller. It sends commands to the Arduino controlling the arm via an Xbee module. From there, five servos inside a fiberglass forearm move each finger and the thumb. The video clip after the break gives [Easton] a chance to show off all of the new design features, and finishes with a demonstration of the hand grasping different objects. We had a chance to chat with him briefly. He’s got big goals for himself, aiming to design a prosthetic arm for under $1000. That’s not a career goal… he’d like to get it done this year.

Continue reading “[Easton’s] Animatronic Hand Gets 3D Printed Upgrade”

Build A Clock Using Dials Instead Of Hands

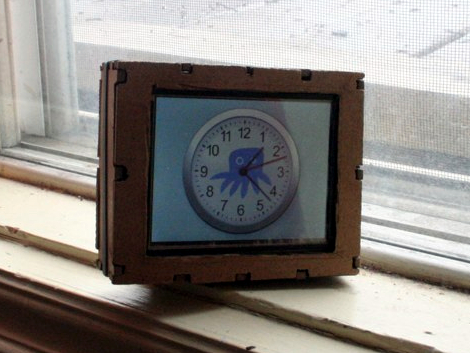
[Doug Paradis] found a simple way to use dials instead of hands on a clock. Actually, that’s pretty much the entire hack… use dials instead of hands. He grabbed a battery-operated clock movement from the hobby store, then printed out one dial for hours, another for minutes, robert’s your mother’s brother, and you’ve got a new clock. The case seen above is laser cut, with a window and index line that helps you read the time precisely.

But instead of building a case, we’d like to try this with some retro equipment. The first thing that pops to mind is to replace the disks on a broken strobotuner, like the big-dialed model that Conn used to make. If you’re not down with the bulky music hardware-turned-clock perhaps there’s an old multi-meter, or a panel gauge that can be repurposed for this. We know [Doug] already has some needle meters sitting around that would be perfect for this.

DIY Segway: Fast, Silent, And Open

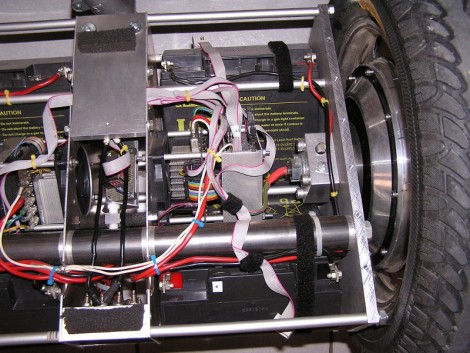
This is a picture of the guts of a diy Segway project (translated). Everything fits into a tiny space under the platform upon which the rider stands. It’s tight, but makes for a sleek look when the diamond plate is covering up all of the internals.

An ATmega644 controls the vehicle. It does so by using a PID control scheme to monitor a gyroscope, driving the wheels to maintain the center of balance. Electronically, the most complicated part of the build is the motor controller. It seems to be an original design, using an ATmega48 and several other integrated circuits. It was hard for us to figure out how this was implemented, but with some intensive study of the three schematics that go into the module we’d bet you can get to the bottom of things. We certainly like the outcome, as this personal transport is whisper quiet. Take a look at the clip after the break to hear for yourself.

Note: Be careful if you’re reusing the code from the translated link at the top. Google translator also translates the variable names in the code and might break how it works due to inconsistencies in the translation.

Continue reading “DIY Segway: Fast, Silent, And Open”

Chumby Transplant And Hardware Upgrade Used With DSLR And WFT

The Chumby One comes in a nice little case and features an ARM powered board with a touchscreen interface. [Bobby] thought is was a good starting point, but wanted a more portable version to use as a wireless file transfer device for photography. WFT is a connectivity enhancement for digital cameras that allows pictures to be pushed to other devices over a wireless network.

In order to improve the portability of the hardware [Bobby] ditched the power-hungry WiFi adapter that comes with the device. The newer and more efficient USB dongle that he’s using as a replacement makes switching to a rechargeable camera battery a viable option. With the battery and dongle soldered to the board he ditched the rest of the hardware (save the touchscreen) and began work on his own enclosure. You can see the version above is just a little rough around the edges, he cut it by hand from the Google Sketchup design. But since he plans to make a few more copies of this hardware for friends he will probably use a service to laser cut those cases for him.

The new hardware needs drivers, and [Bobby] has lots of instructions on how to compile your own. This includes setting up the toolchain, compiling the kernel, as well as building the drivers themselves.