‘Tis The Season To Decorate Bags With EL Wire

We hope you’ve already got parts on hand for your holiday projects because shipping might be a little slow at this time of year. But if you’ve got a bag and some unused EL wire here’s a one-day project you should try. Make yourself a Tron-inspired shoulder bag, or backpack.

On the right, [PT] is doing fantastic job of modeling with his electroluminescent offering. This is another Adafruit offering that holds your hand each step of the way from designing, to sewing, to wiring it up. This will go great with that glowing unitard he’s been working on.

[Alan Yates] has also done a spectacular job with his Tron backpack seen on the left. He picked up his EL wire on clearance at a place called “big-W” after Christmas last year. They were selling 3 meter segments (each with their own inverter) for just $3. We’re happy he got a deal and even more pleased that he found a use for it.

[Thanks Drone]

Gaming On An IBM XT Using An NES Controller

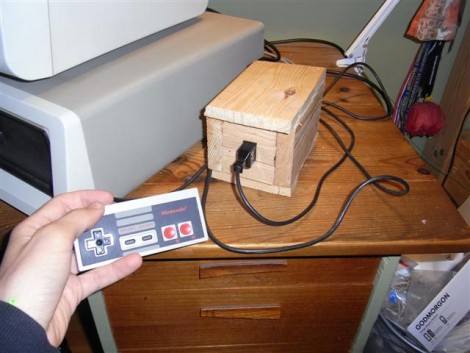
[Frode] felt that using the keyboard for gaming on his old IBM XT computer was simply too noisy. He came up with a much quieter way to game by building an XT adapter for an original NES controller. If you haven’t explored the communication protocol used by the NES peripherals this is a great way to learn. Inside you’ll find a CMOS shift register that captures button states when it receives a latch signal. With that in mind [Frode] came up with a circuit to gather the bits from the controller, and generate input commands using the XT keyboard protocol without using a microcontroller. All of this is explained in the demo after the break.

Most of the NES controller hacks we see permanently alter the hardware. It’s nice to see one used without cracking it open.

Continue reading “Gaming On An IBM XT Using An NES Controller”

Repairing A Broken RC Ceiling Fan

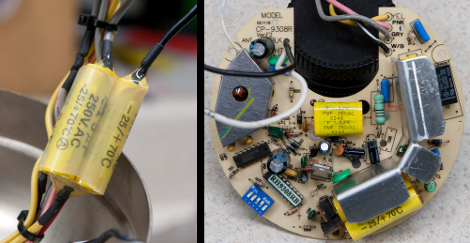
The ceiling fan in [Steve Vigneau’s] bedroom started giving him trouble. It is normally operated using a remote control but that functionality had become pretty spotty. He cleaned the contacts on the remote but still had troubles that could only be fixed by power-cycling the fan itself. When it finally died he set out to repair the unit himself. Above you can see the controller board from the fan. It was a bit too complicated for [Steve] to troubleshoot so he figured why not just stop using the remote control and make it work with a couple of switches? A bit of research led him to some basic fan schematics that he used for a reference. He need to remove a couple of capacitors and wire them up with one switch for the fan and another for the light. Sure, there’s no settings for speed or direction, but [Steve] thinks he doesn’t need to change them and always has the option to add them in the future.

Cobbling Together A CNC Mill

[Howard Matthews] never throws anything away, and because of it he was able to build this CNC mill using parts that he already had on hand. He pulled stepper motors out of broken stage light, precision rod and bearings from old dot matrix printers, and other various bits from his junk bin. We’ve seen [Howie’s] handi-work before, and this project is just as fun as his Land Rover’s replacement speedometer. Some highlights include manufacturing the nuts for the precision rod, and building a rail system for the bed of the machine. The latter looks a bit suspect, as any milling debris on the rails will cause you Z-axis problems, but now that he has bootstrapped a working mill perhaps he’ll machine an upgrade.

Update: Fixed the link, added video after the break.

Continue reading “Cobbling Together A CNC Mill”

Teensy Can School You At Guitar Hero

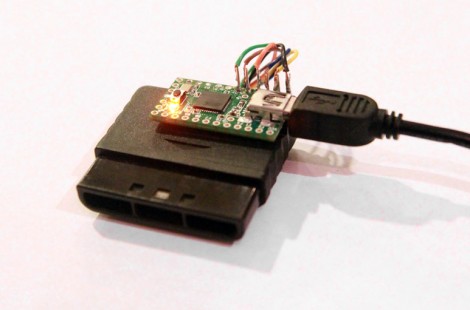
[Johnny Chung Lee] put together a system that is perfect at playing Guitar Hero. He’s using the PlayStation 2 version and, as you can see above he’s combined a controller connector and a Teensy microcontroller board to communicate with the console using its native SPI protocol. This custom guitar controller receives its signals via USB from a computer that is monitoring the video from the console and calculating the controller signals necessary for perfect gameplay. [Johnny] wrote an OpenCV program that monitors the video, removes the perspective from the virtual fretboard, and analyzes color and speed of the notes coming down the screen.

As you can see after the break it works like a charm. It’s fun from a programming standpoint, but if you want a hack you can actually play maybe you should build your own Banjo Hero.

Continue reading “Teensy Can School You At Guitar Hero”

Guerilla Guide To CNC Machining


[Ian] wrote in to tell us about the Guerilla Guide to CNC Machining and Resin Casting. He came across it in the reference links to another project and says he wish he knew about it a long time ago. We took a look and there’s a mountain of useful information in the guide, which is written by [Michal Zalewski]. We won’t pretend that we’ve read the whole thing, there’s days worth of information here. But we will. The range of topics includes types of milling machines, milling materials, software options and use, safety, and the list goes on. Bookmark this (don’t forget the second volume), it might be just the thing to get you through the holiday with your family.

Bi-color LED Matrix Clock Uses Point-to-point Construction

[Daniel] wanted his child to stay in bed until a semi-decent time each morning. The problem is the kid doesn’t know how to read a clock, so [Daniel] built him a clock. Yeah, doesn’t make much sense to us either, but we’ve used our own shaky premises for projects so who are we do judge?

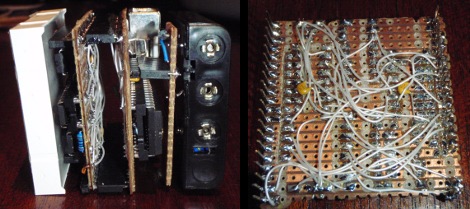
He used a bi-color 8×8 LED matrix as the clock display. What caught our eye is the point-to-point soldering he used for the three strip boards that make up the device. Note the use of a drill-bit to break the traces when needed. Each board has its own purpose; the matrix drive, the logic board, and the power board. A PIC 18F4550 lets [Daniel] control the clock via USB, and takes care of lighting up the hour as a red number when it’s time to sleep, and a green one when it’s okay to arise. There’s a flashing pixel for seconds, and a binary readout of minutes along the bottom.

We’ve asked [Daniel] to post a schematic and an image of the clock face when displaying the time. No word yet but we’ll keep our eye on it. In the mean-time, check out this clock that uses an RGB 8×8 LED matrix.