DOOM ATM

Playing DOOM On An ATM

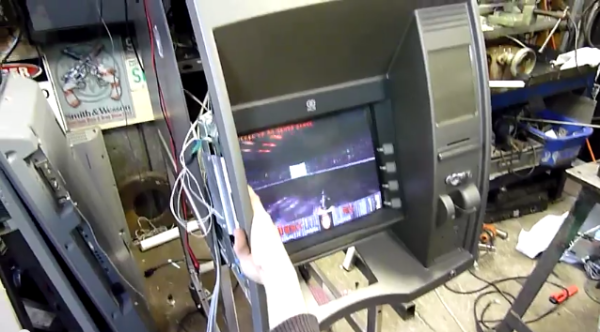
There aren’t too many details available about this hack, but we still thought it was interesting enough to share. YouTube user [Aussie50] seems to have figured out a way to install DOOM on an automated teller machine (ATM). Not only is the system running the software, it also appears that they are using the ATM’s built-in buttons to control the action in-game.

Many ATM’s today are simply computers that run a version of Windows, so one would assume it shouldn’t be too difficult to get an older game like DOOM running on the hardware. Towards the beginning of the video, you can quickly get a glimpse of what appears to be a default Windows XP background screen. You can see later in the video that [Aussie50] drops to what appears to be an MS-DOS command line. It stands to reason then that this particular model of ATM does run on Windows XP, but that [Aussie50] may have had to install MS-DOS emulation software such as DOSBOX as well.

At one point in the video, the camera man mentions they are using an I-PAC2. Some research will show you that this little PCB is designed to do USB keyboard emulation for arcade games. It looks like you can just hook up some simple momentary switches and the I-PAC2 will translate that into USB keyboard commands. It is therefore likely that [Aussie50] has hooked up the ATM’s buttons directly to this I-PAC2 board and bypassed the original button controller circuit altogether.

It is also mentioned in the video that [Aussie50] was able to get the receipt printer working. It would be interesting to somehow incorporate this into the DOOM game. Imagine receiving a receipt with your high score printed on it. This also gets us thinking about other possibilities of gaming on ATM hardware. Can you configure the game to require a deposit before being able to play? Can you configure it to dispense cash if you beat the high score? What if you modified the multiplayer deathmatch mode so all players must pay an entry fee and the winner takes all? What creative ideas can you come up with for gaming on ATM hardware? Continue reading “Playing DOOM On An ATM”

Kenyan Teen’s Invention Protects Cattle And Lions

Lion Scarecrow

[Richard’s] community in Kenya had a problem. The people depended on local livestock for survival, but the local lion population had started consuming that very same food source. The result was that people suffered from loss of the livestock, but the lions also suffered when the people killed them to protect their source of food. [Richard] knew he could do something to help both his community, and the lion population. He ended up building a lion attack prevention system.

He first tried a sort of scarecrow, to keep the lions away from the cattle. Unfortunately the lions proved to be too “tricky” and quickly realized that the scarecrows were no threat. Then one day, [Richard] was working with a flashlight. This led him to realize that the lions seemed to be afraid of moving light. That gave him the idea for his invention.

He had previously taken apart his mothers new radio, much to her dismay. He learned a lot about electronics in the process. He combined his electronics knowledge with this new knowledge about lions, to create his lion attack prevention system. The core component is the turn signal circuit from a motorbike. The circuit is hooked up to a rechargeable battery and a solar cell. This all runs through a switch so [Richard] can turn it on only when needed. The circuit is switched on at night to keep the lions away. [Richard] claims that they have experienced no lion attacks since the system was put in place two years ago!

This protects both the local cattle as well as the lions themselves. The whole thing is powered from the sun, so it’s likely to last a very long time. This kind of project may seem simple to many readers, but it’s a great example of the good ideas and ingenuity that can grow out of necessity. Oh, did we mention that [Richard] is only 13 years old? His invention is now reportedly being used all over Kenya and has led [Richard] to receive a scholarship to what he calls “one of the best schools in Kenya”.

While this hack has clearly changed the lives of many people in [Richard’s] region. You don’t have to make something overly complicated to change the world.

Continue reading “Kenyan Teen’s Invention Protects Cattle And Lions”

Print Tasty Treats With MIT’s Ice Cream Printer

Ice Cream Printer

Three MIT students decided that 3D printers just aren’t interesting enough on their own any more. They wanted to design a new type of printer that would really get young kids engaged. What’s more engaging to children than sugary treats? The team got together to develop a new 3d printer that prints ice cream.

The machine is built around a Solidoodle. The Solidoodle is a manufacturer of “accessible” 3d printers. The printer is enclosed inside of a small freezer to keep things cold during the printing process. On top of the machine is a hacked Cuisinart ice cream maker. The machine also contains a canister of liquid nitrogen. The nitrogen is used to blast the cream as it leaves the print head, keeping it frozen for the 15 minute duration of the print.

It sounds like the team ran into trouble with the ice cream melting, even with the liquid nitrogen added. For a single semester project, this isn’t a bad start. Be sure to watch the clip of the machine running below.

Continue reading “Print Tasty Treats With MIT’s Ice Cream Printer”

Solar Powered DIY Plant Watering System

Solar Powered Watering System

It’s great having fresh vegetables just a few steps away from the kitchen, but it takes work to keep those plants healthy. [Pierre] found this out the hard way after returning from vacation to find his tomato plant withering away. He decided to put an end to this problem by building his own solar-powered plant watering system (page in French, Google translation).

An Arduino serves as the brain of the system. It’s programmed to check a photo resistor every ten minutes. At 8:30PM, the Arduino will decide how much to water the plants based on the amount of sunlight it detected throughout the day. This allows the system to water the plants just the right amount. The watering is performed by triggering a 5V relay, which switches on a swimming pool pump.

[Pierre] obviously wanted a “green” green house, so he is powering the system using sunlight. A 55 watt solar panel recharges a 12V lead acid battery. The power from the battery is stepped down to the appropriate 5V required for the Arduino. Now [Pierre] can power his watering system from the very same energy source that his plants use to grow.

Add A Bluetooth Interface To Your Kitchen Scale

Kitchen scale

When [Adam] found himself in need of a force meter, he didn’t want to shell out the cash for a high-end model. Instead, he realized he should be able to modify a simple and inexpensive kitchen scale to achieve the results he desired.

The kitchen scale [Adam] owned was using all through hole components on a double-sided PCB. He was able to easily identify all of the IC’s and find their datasheets online. After doing some research and probing around with a frequency counter, he realized that one of the IC’s was outputting a frequency who’s pulse width was directly proportional to the amount of weight placed on the scale. He knew he should be able to tap into that signal for his own purposes.

[Adam] created his own custom surface mount PCB, and used an ATMega8 to detect the change in pulse width. He then hooked up a Bluetooth module to transmit the data wirelessly. These components required no more than 5V, but the scale runs from two 3V batteries. Using what he had on hand, [Adam] was able to lower the voltage with just a couple of diodes.

[Adam] managed to cram everything into the original case with little modification. He is now considering writing an Android application to interface with his upgraded kitchen scale.

Commodore 64 And Nintendo Make Beautiful Music Together With SYNCART

Cyncart

[Dan] has been hard at work developing CYNCART to get his Commodore 64 and original NES to play together. We’ve seen [Dan’s] handiwork before, and it’s pretty clear that he is serious about his chip tunes.

This project starts with something called a Cynthcart. The Cynthcart is a Commodore 64 cartridge that allows you to control the computer’s SID chip directly. In effect, it turns your Commodore 64 into a synthesizer. [Dan] realized that the Commodore’s user port sends out simple eight bit values, which happens to match perfectly with the NES’ controller ports. In theory, he should be able to get these two systems communicating with each other.

[Dan] first modified the Cynthcart to send data out of the user port on the Commodore. This data gets sent directly to the NES’ 4021 shift register chip in the second player controller port. The NES runs a program to turn this data into sound on the NES’ audio chip. The first player controller can then be used to modify some other sound settings on the NES. Musical notes are played on the Commodore’s keyboard. This setup can also be used to play music on both systems at the same time. Be sure to watch the video of the system in action below.

Continue reading “Commodore 64 And Nintendo Make Beautiful Music Together With SYNCART”

The Rabbit H1 Is A Stationary Mouse Replacement

rabbit h1

[Dave] has some big plans to build himself a 1980’s style computer. Most of the time, large-scale projects can be made easier by breaking them down into their smaller components. [Dave] decided to start his project by designing and constructing a custom controller for his future computer. He calls it the Rabbit H1.

[Dave] was inspired by the HOTAS throttle control system, which is commonly used in aviation. The basic idea behind HOTAS is that the pilot has a bunch of controls built right into the throttle stick. This way, the pilot doesn’t ever have to remove his hand from the throttle. [Dave] took this basic concept and ran with it.

He first designed a simple controller shape in OpenSCAD and printed it out on his 3D printer. He tested it out in his hand and realized that it didn’t feel quite right. The second try was more narrow at the top, resulting in a triangular shape. [Dave] then found the most comfortable position for his fingers and marked the piece with a marker. Finally, he measured out all of the markings and transferred them into OpenSCAD to perfect his design.

[Dave] had some fun with OpenSCAD, designing various hinges and plywood inlays for all of the buttons. Lucky for [Dave], both the 3D printer software as well as the CNC router software accept STL files. This meant that he was able to design both parts together in one program and use the output for both machines.

With the physical controller out of the way, it was time to work on the electronics. [Dave] bought a couple of joysticks from Adafruit, as well as a couple of push buttons. One of the joysticks controls the mouse cursor. The other joystick controls scrolling vertically and horizontally, and includes a push button for left-click. The two buttons are used for middle and right-click. All of these inputs are read by a Teensy Arduino. The Teensy is compact and easily capable of emulating a USB mouse, which makes it perfect for this job.

[Dave] has published his designs on Thingiverse if you would like to try to build one of these yourself.