A Google Pixel 3a with a filter wheel attached to its camera

Hackaday Prize 2022: Multispectral Smartphone Camera Reveals Paintings’ Inner Secrets

Multispectral imaging, or photography using wavelengths other than those in ordinary visible light, has various applications ranging from earth observation to forgery detection in art. For example, titanium white and lead white, two pigments used in different historical eras, look identical in visible light but have distinct signatures in the UV range. Similarly, IR imaging can reveal a painting’s inner layers if the pigments used are transparent to IR.

Equipment for such a niche use is naturally quite pricey, so [Sean Billups] decided to transform an older model smartphone into a handheld multispectral camera, which can help him analyze works of art without breaking the bank. It uses the smartphone’s camera together with a filter wheel attachment that enables it to capture different spectral ranges. [Sean] chose to use a Google Pixel 3a, mainly because it’s cheaply available, but also because it has a good image sensor and camera software. Modifying the camera to enable IR and UV imaging turned out to be a bit of a challenge, however.

Image sensors are naturally sensitive to IR and UV, so cameras typically include a filter to block anything but visible light. To remove this filter from the Pixel’s camera [Sean] had to heat the camera module to soften the adhesive, carefully remove the lens, then glue a piece of plastic to the filter and pull it out once the glue had set. Perfecting this process took a bit of trial and error, but once he managed to effect a clear separation between camera and filter it was simply a matter of reattaching the lens, assembling the phone and mounting the filter wheel on its back.

The 3D-printed filter wheel has slots for four different filters, which can enable a variety of IR, UV and polarized-light imaging modes. In the video embedded below [Sean] shows how the IR reflectography mode can help to reveal the underdrawing in an oil painting. The system is designed to be extendable, and [Sean] has already been looking at adding features like IR and UV LEDs, magnifying lenses and even additional sensors like spectrometers.

We’ve seen a handful of multispectral imaging projects before; this drone-mounted system was a contestant for the 2015 Hackaday Prize, while this project contains an excellent primer on UV imaging.

Continue reading “Hackaday Prize 2022: Multispectral Smartphone Camera Reveals Paintings’ Inner Secrets”

Working With BGAs: Design And Layout

The Ball Grid Array, or BGA package is no longer the exclusive preserve of large, complex chips on computer motherboards: today even simple microcontrollers are available with those little solder balls. Still, many hobbyists prefer to stay with QFP and QFN packages because they’re easier to solder. While that is a fair point, BGA packages can offer significant space savings, and are sometimes the only choice: with the ongoing chip shortage, some other package versions might simply be unavailable. Even soldering doesn’t have to be complicated: if you’re already comfortable with solder paste and reflow profiles, adding a BGA or two into the mix is pretty easy.

In this article we’ll show that working with BGA chips is not as difficult as it may seem. The focus will be on printed circuit board design: how to draw proper footprints, how to route lots of signals and what capabilities your PCB manufacturer should have. We’ll cover soldering and rework techniques in a future article, but first let’s take a look at why BGAs are used at all.

Continue reading “Working With BGAs: Design And Layout”

The Little 3D-Printed Tugboat That Could

If you’ve ever spent time watching the goings-on at a seaport, you must have seen tugboats at work: those little boats that push, pull and nudge enormous cargo ships through tight corners in the harbor. They manage to do that thanks to hugely powerful engines sitting inside their relatively small hulls; their power-to-tonnage ratio can be ten times that of most commercial ships.

One hardware hacker who enjoys building similarly-overpowered machinery is [Luis Marx], and it might not come as a surprise that his latest project is an actual tugboat. Living on the shores of Lake Constance in southern Germany, [Luis] likes to spend time on the water, but got fed up with the chore of paddling. Local regulations restrict the use of outboard motors but allow the use of R/C model boats; therefore, building an R/C tugboat to move yourself around the lake should be perfectly legal.

While we’re not sure if the Lake Constance Police will follow the same reasoning, [Luis]’s model tugboat is a wonderful piece of engineering. With a design inspired by 3DBenchy, the standard 3D printer benchmark that probably anyone with a 3D printer has printed at some point, it took about 30 hours to create the parts plus a generous helping of epoxy resin to make it all waterproof. A beefy lithium-ion battery pack drives two brush-less DC motors designed for racing drones, which together can put out nearly one kilowatt of power.

That, unfortunately, turned out to be way more than the little boat could handle: any attempt at using it simply caused it to leap out of the water and land on its back. Setting the motor controller to around 50% made it much more controllable, yet still strong enough to move [Luis] around on his standup paddle board. The boat is controlled through a custom-made handheld R/C controller that communicates with the ESP8266 inside the boat through WiFi. With no rudder, left-right control is effected by simply reducing the power of one motor by half.

A fully-charged battery pack provides enough juice for about 40 minutes of tugging, so it’s probably a good idea to bring along paddles in any case. Unless, of course, you’ve also got a solar-powered autonomous tugboat ready to come to your rescue.

Continue reading “The Little 3D-Printed Tugboat That Could”

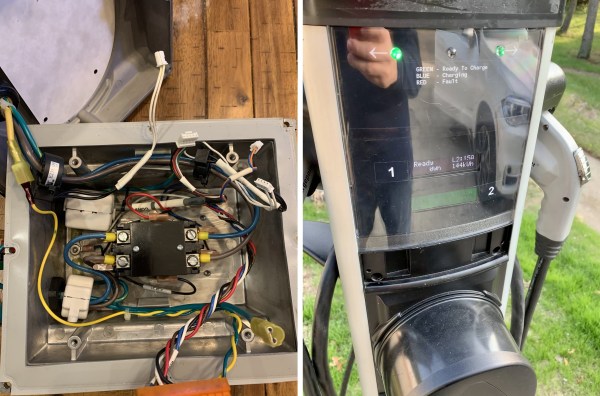
A disassembled EV charging station, and a working one

Modernizing An Outdated Electric Vehicle Charging Station

One of the drawbacks of being an early adopter is that you might end up investing in equipment that becomes obsolete rather quickly. Although it’s clear that electric vehicles are here to stay, those who bought a charging station for their EV a few years ago may find it slow and incompatible with modern cars or billing networks, necessitating an upgrade to one of the latest models.

If you don’t mind tinkering, these older chargers can provide an excellent base to construct your own state-of-the-art charging station, as [James] over at Diary-of-a-Geek did. He bought a Chargepoint CT2000 series charger and installed a brand-new charging unit inside based on OpenEVSE components. The CT2000 is an older model that’s no longer manufactured, and although it can still connect to Chargepoint’s network, a subscription renewal would cost several thousand dollars. [James] was not willing to make that investment for a unit that he was going to install at home anyway, so he decided to buy replacement parts from OpenEVSE, a supplier of open-source EV charging stations and components.

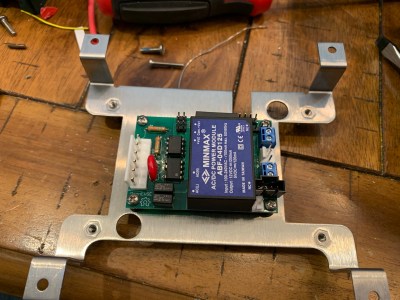
An OpenEVSE controller mounted on a bracket
The OpenEVSE charging controller sitting on the ChargePoint bracket

The insides of a charging station are actually pretty simple, since the real battery charger is inside the car: the station just contains a beefy contactor to switch the AC current on or off, along with some circuitry to measure the current flowing and an interface to connect to a payment network of some sort. The first step therefore was to hook up the contactor and current transformer to the OpenEVSE controller. This was easy since the new part was way smaller than the original and could simply be mounted onto an existing bracket.

The second step was to provide the user interface and network connections. [James] removed the displays and wireless systems from the head unit and cut a large hole into the front to provide space for new LCD displays. A set of status LEDs plus WiFi connections completed the system, which now looks just as professional as the original. Tests showed that the LCDs were hard to read in bright sunlight, so [James] replaced them with OLED displays, but otherwise the renovated charging station worked perfectly.

Of course, working with high voltages and large currents requires the proper skills and tools, which [James] clearly has available; he also stresses the importance of including a ground-fault circuit interruptor in any equipment placed outdoors. He isn’t the only one to make his own charging station either. If you’re confused by the many types of EV charging connectors, have a look at our recent article describing all those different plugs and sockets. Thanks for the tip, [Kevin]!

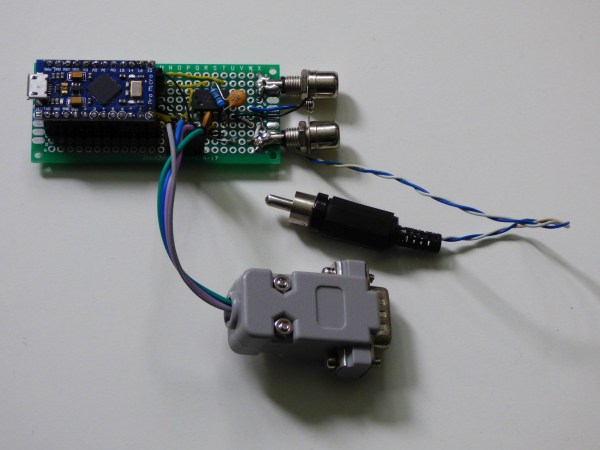
A PCB with an Arduino Micro Pro, RCA connectors and a sub-D connector

Odd Inputs And Peculiar Peripherals: Using A Commodore Light Pen On A Modern(ish) Computer

If you worked with computers back in the 1970s, there’s a good chance you used a light pen at some point: a simple input device that you’d point at the CRT screen to highlight text, choose menu options or manipulate graphic objects. Although ubiquitous in those days, the light pen lost the battle for ergonomics to the humble mouse and was all but extinct by the late 1980s. Touchscreen styluses implement a similar function today, but touching the screen somehow doesn’t feel the same as simply pointing at it.

We therefore applaud [Maciej Witkowiak]’s efforts to bring the light pen into the 21st century by building a USB interface for a Commodore 64/128 light pen. At its heart is an Arduino Micro Pro that implements the USB HID protocol to communicate with any modern computer. It connects to the classic light pen as well as to the computer’s analog display signal and uses those to calculate the delay between the video synchronization pulses and the light pen’s output. The sync pulses are extracted from the video signal by an LM1881, a sync separator chip that will be familiar to anyone who’s worked with analog video signals.

The Arduino calculates the light pen’s position based on the measured timing intervals and reports it to the computer, using the absolute positioning mode that’s also used by things like drawing pads. [Maciej] demonstrates his system in the video embedded below, in which he uses it to operate the menus on an X window system. A great success then, although there’s one catch: light pens only work on CRT displays, so you’ll need to drag one of those big glass beasts out of storage if you want to try this yourself.

We’ve featured the Commodore light pen before in this odd gaming input device. A similar device built with a discrete LED matrix is a good illustration of the light pen’s working principle.

Continue reading “Odd Inputs And Peculiar Peripherals: Using A Commodore Light Pen On A Modern(ish) Computer”

A fridge magnet with a display showing recycling reminders

Hackaday Prize 2022: BinPal Is A Convenient Recycling Reminder

While curbside pickup of recyclables is convenient, it does require you to keep track of which type of waste is picked up when: miss the biweekly paper pickup and you’ll soon find yourself stockpiling four weeks’ worth of boxes and newspapers. When [Dominic Buchstaller]’s stack of cardboard began to reach his ceiling, he decided to take action by building himself BinPal: a fridge magnet that helps you remember when to take out which bin.

At heart of the simple but effective BinPal is an ESP32 board that connects to Google Apps Script and retrieves the pickup schedule from Google Calendar. If one of four categories of waste is due for pickup, its icon is highlighted on an LCD screen. The user can press a touch-sensitive button to confirm the bin has been brought out for pickup; if that hasn’t been done by 8 pm, the display’s backlight starts flashing as an additional reminder.

The outer shell of the device is made from laser-cut plywood, with a few strong magnets glued inside to ensure the BinPal stays firmly attached to the fridge. In the true spirit of recycling, [Dominic] used only components that he had in his parts bin to make the BinPal. However, these parts are all easily available online, and with the full schematics and code available on the project’s Hackaday.io page it should be easy to adapt the design to different hardware platforms as well.

[Dominic]’s design was inspired by a flashing LED chore reminder we featured a few years ago. You can also make household task reminders by reusing a Kindle for its ePaper display.

A laptop with a mahogany case

The Compu-tor Is A Raspberry Pi Laptop In A Mahogany Case

The Compu-tor, designed by [Henry Edwards], is one of those things that doesn’t neatly fit into any categories. It is a clamshell-type portable computer, although unlike most laptops, it doesn’t come with a built-in battery. It has a sleek custom-designed case, but lacks the futuristic sci-fi looks typical of a cyberdeck. The keyboard can act as an input device, but can also turn into a musical instrument.

In short, it’s a bit of all of those things, but the most striking part is the beautifully-machined mahogany case. The two halves are connected through two beefy friction hinges and a silicone ribbon cable: the bottom half contains the keyboard, speakers, USB ports and power connections, while the top half holds a Raspberry Pi and a 10″ touchscreen. The display bezel has that curved shape typical of CRT monitors, fitting nicely with the 1970s vibe given off by the dark wood.

Another retro touch is in the connections between the various circuit boards and the front panel switches: [Henry] used wire-wrapping, something we haven’t seen for a while. The keyboard is a simple grid of identical keys with handwritten labels. Other labels, like that of the power connector, are made from traditional embossing tape.

The Compu-tor runs Debian, and seems to be quite usable as a compact laptop. It even comes with USB ports to hook up external devices, and with a simple 12 V input it should be no problem to find an external power source for it. Wood seems to be a popular material to build Raspberry Pi-based laptops from: we’ve seen them housed in anything ranging from wooden cigar-boxes to laser-cut plywood, and even incredibly tiny boxes.

Continue reading “The Compu-tor Is A Raspberry Pi Laptop In A Mahogany Case”