A laptop with a mahogany case

The Compu-tor Is A Raspberry Pi Laptop In A Mahogany Case

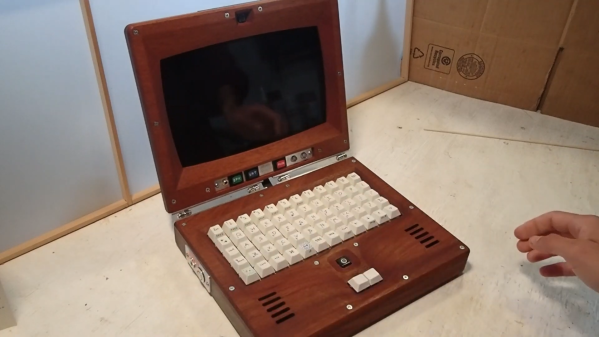
The Compu-tor, designed by [Henry Edwards], is one of those things that doesn’t neatly fit into any categories. It is a clamshell-type portable computer, although unlike most laptops, it doesn’t come with a built-in battery. It has a sleek custom-designed case, but lacks the futuristic sci-fi looks typical of a cyberdeck. The keyboard can act as an input device, but can also turn into a musical instrument.

In short, it’s a bit of all of those things, but the most striking part is the beautifully-machined mahogany case. The two halves are connected through two beefy friction hinges and a silicone ribbon cable: the bottom half contains the keyboard, speakers, USB ports and power connections, while the top half holds a Raspberry Pi and a 10″ touchscreen. The display bezel has that curved shape typical of CRT monitors, fitting nicely with the 1970s vibe given off by the dark wood.

Another retro touch is in the connections between the various circuit boards and the front panel switches: [Henry] used wire-wrapping, something we haven’t seen for a while. The keyboard is a simple grid of identical keys with handwritten labels. Other labels, like that of the power connector, are made from traditional embossing tape.

The Compu-tor runs Debian, and seems to be quite usable as a compact laptop. It even comes with USB ports to hook up external devices, and with a simple 12 V input it should be no problem to find an external power source for it. Wood seems to be a popular material to build Raspberry Pi-based laptops from: we’ve seen them housed in anything ranging from wooden cigar-boxes to laser-cut plywood, and even incredibly tiny boxes.

Continue reading “The Compu-tor Is A Raspberry Pi Laptop In A Mahogany Case”

Robert Dunn holds a button in his hand for controlling a spot welder

Gorgeous Battery Welder Hits The Spot

Raise you’re hand if you’ve ever soldered directly to a battery even though you know better. We’ve all been there. Sometimes we get away with it when we have a small pack and don’t care about longevity. But when [Robert Dunn] needed to build a battery pack out of about 120 Lithium Ion cells, he knew that he had to do it The Right Way and use a battery spot welder. Of course, buying one is too simple for a hacker like [Robert]. And so it was that he decided to Build a Spot Welder from an old Microwave Oven and way too much mahogany, which you can view below the break.

A Battery Cell with a spot welding tab attached
Spot Welding leaves two familiar divots in the attached tab, which can be soldered or welded as need.

For the unfamiliar, a battery spot welder is the magical device that attaches tabs to rechargeable batteries. You’ll notice that all battery packs with cylindrical cells have a tab with two small dimples. These dimples are where high amperage electricity quickly heats the battery terminal and the tab until they’re red hot, welding them together. The operation is done and over in less than a second, well before any heat damage can be done. The tab can then be soldered to or spot welded to another cell.

One of the most critical parts of spot welding batteries is timing. While [Robert Dunn] admits that a 555 timer or even just a manual switch and relay could have done the job, he opted for an Arduino Uno with a 4 character 7 segment LED display that shows the welding time in milliseconds. A 3d printed trigger and welder handle wrap up the hardware nicely.

The build is topped off by a custom mahogany enclosure that is quite a bit overdone. But if one has the wood, the time, the tools and skills (and a YouTube channel perhaps?) there’s no reason not to put in the extra effort! [Robert]’s resulting build is almost too nice, but it’ll certainly get the job done.

Of course, spot welders are almost standard fare here at Hackaday, and we’ve covered The Good, The Bad, and The Solar. Do you have a battery welder project that deserves a spot in Hackaday’s rotation? By all means, send it over to the Tip Line!

Continue reading “Gorgeous Battery Welder Hits The Spot”

A Massive Adjustable Standing Desk From Scratch

Standing at your desk all day is healthier by far than sitting, but the commercial options tend to be expensive. [drivenbyentropy] had to contend with a heater right where the desk would go, but building an adjustable office desk to accommodate it turned out — well — gorgeous.

Two 18″ heavy duty 12 V DC actuators raise and lower the desk with a 600 lbs static load capacity and 200 lbs of  lifting load each. One actuator is actually slightly faster than the other, so instead of working out something fancy, [drivenbyentropy] simply extended the cable length on the faster actuator to disguise the difference.

Framed with some standard 2×4’s and sheathed with plywood, the massive four by eight foot desk has twelve ball-bearing drawer slides in the legs to add stability and smooth out height adjustments. Because of its size and having to build around the heating unit, the desk is stuck in the room since it does not easily come apart. There is, however, easy access to the two electronics compartments for troubleshooting!

Continue reading “A Massive Adjustable Standing Desk From Scratch”

Copper, Brass, Mahogany, And Glass Combine In Clock With A Vintage Look

No two words can turn off the average Hackaday reader faster than “Nixie” and “Steampunk.” But you’re not the average Hackaday reader, so if you’re interested in a lovely, handcrafted timepiece that melds modern electronics with vintage materials, read on. But just don’t think of it as a Nixie Steampunk clock.

No matter what you think of the Steampunk style, you have to admire the work that went into [Aeon Junophor]’s clock, as well as his sticktoitiveness –he started the timepiece in 2014 and only just finished it. We’d wager that a lot of that time was spent finding just the right materials. The body and legs are copper tube and some brass lamp parts, the dongles for the IN-12A Nixies are copper toilet tank parts and brass Edison bulb bases, and the base is a fine piece of mahogany. The whole thing has a nice George Pal’s Time Machine vibe to it, and the Instructables write-up is done in a pseudo-Victorian style that we find charming.

If you haven’t had enough of the Nixie Steampunk convergence yet, check out this Nixie solar power monitor, or this brass and Nixie clock. And don’t be bashful about sending us tips to builds in this genre — we don’t judge.

Continue reading “Copper, Brass, Mahogany, And Glass Combine In Clock With A Vintage Look”

Clock Knock Block Full Of Puns

clock_knock_block

This Clock Knock Block has a bit of everything; milling, Arduino, sensing, solenoids, and plenty of dirty puns. Just knock on the box or on the table right next to it and the time of day will be played back to you in a series of crisp, clean knocks. A big part of the fun here is that the box is a musical instrument.

If you take a look inside you’ll find an Arduino, a piezo sensor, a solenoid, and a nine-volt battery. The piezo sensor detects your knocking as an input. It can even listen to and repeat back a series of your knocks. The Arduino actuates the solenoid, which strikes the wooden enclosure, producing the knocking sound.

We’ve embedded a video of this useless machine after the break (that’s where all the puns are). One note for your own build; this box is made out of mahogany and because it is used as a resonance chamber, this may not work as well if it isn’t milled from a piece of quality lumber. Continue reading “Clock Knock Block Full Of Puns”