Making a 3D camel using a scroll saw

Making 3D Objects The Scroll Saw Way

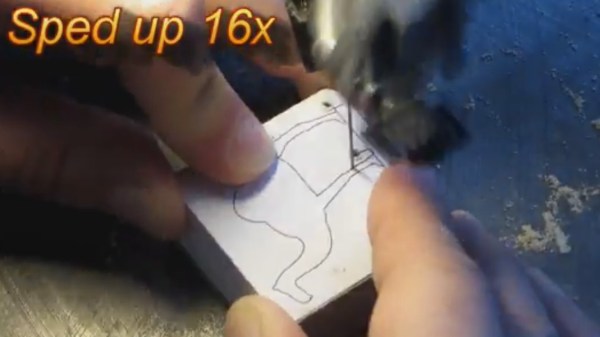
These days most have come to think that if you want to make a complex 3D object with all curved surfaces then a 3D printer is the only way to go. Many have even forgotten that once such things could be hand carved. [JEPLANS], on the other hand, is a master at making these objects using only a scroll saw as he’s done with his latest, a miniature camel cut from a single block of maple.

His process has a lot of similarities to 3D printing. He starts with a computer drawn design, in this case for the camel’s front and side. After cutting it out, he peels off the unwanted pieces and the camel emerges like magic from the block. But he didn’t like the amount of manual work he’d need in order to improve it further so he modifies the design by adding a top view, iterating just as you would with 3D printing. But after cutting that out, he finds he’d damaged one of the legs. And so he cuts out a new one but only after making one more design change, this time adjusting the camel’s head position. And with that result he’s satisfied. Check out his painstaking and somehow familiar process in the video below.

Continue reading “Making 3D Objects The Scroll Saw Way”

8-track player turn into a Walkman

Turning 8-Track Player Into A Walkman

Following time backward, for portable music we’ve had iPods, CDs, and cassette tapes which we played using small Walkmans around the size of a cigarette box. And for a brief time before that, in the 1960s and 1970s, we had 8-track tapes. These were magnetic tapes housed in cases around the size of a large slice of bread. Car dashboards housed players, and they also came in a carry-around format like the one [Todd Harrison] recently bought at a Hamfest for $5 and made more portable by machining clips for a strap and adding a headphone jack.

But before hacking it, he wanted to try it out. Luckily his sister had hung onto her old tapes and after plugging it in and sliding in a tape, it worked! Opening it up he found that the contacts for the batteries were rusted but the mechanical components and electronics inside were very clean. Though he did add glue to a crack in the plastic read-head support, cleaned out some grease, did some lubricating, and cleaned the contacts in the volume control’s potentiometer. Check out his teardown video below for those details or if you just want to see how it all works.

Then came making it portable so that he could embarrass his kids by carrying it around the mall. The shoulder strap didn’t come with it, so he machined some clips out of steel and snapped on a strap. It didn’t have a headphone jack and he didn’t want to embarrass his kids too much, so he added one.  You can see that hack in the second video below, including how his repurposed jack automatically disconnects the speaker when the headphone plug is inserted. Personally, we think he looks pretty spiffy carrying it around wearing his Hackaday T-shirt.

Continue reading “Turning 8-Track Player Into A Walkman”

Neon lamp ion motor

Neon Lamps Light Up Dim Ion Motor

Small pinwheel type ion motors fall into the category of a fun science experiment or something neat to do with high voltage, but Hackaday’s own [Manuel Rodriguez-Achach] added a neat twist that incorporates neon lamps.

Normally you’d take a straight wire and make 90 degree bends at either end but pointing in opposite directions, balance it on a pole, and apply a high voltage with a moderate amount of current. The wire starts spinning around at the top of the pole, provided the ends of the wire are sharp enough or the wire has a small enough diameter. If your power supply has ample current available then in the dark you’ll even see a purplish glow, called a corona, at the tips of the wire.

[Manuel] made just such an ion motor but his power supply didn’t have the necessary current to produce a strong enough corona to be visible to his camera. So he very cleverly soldered neon lamps on the two ends of the wires. One leg of each lamp goes to the wire and the other end of the lamp acts as the sharp point left out in the air for emitting the ions.

The voltage needed across each lamp in order to ignite it is that between the high voltage power supply’s output and the potential of the surrounding air. That air may be initially at ground potential but he also bends the other output terminal of the power supply such that its tip is also up in the air. This way it sprays ions of the opposite polarity into the surrounding air.

Either way, the neon lamps light up and the wire spins around on the pole. Now, even without a visible corona, his ion motor makes an awesome display. Check it out in the video below.

For more about these ion motors, sometimes called electric whirls, check our article about all sorts of interesting non-electromagnetic motors.

Continue reading “Neon Lamps Light Up Dim Ion Motor”

Moiré marine navigation light

Using Moiré Patterns To Guide Ships

Moiré screens for arrows

[Tom Scott] ran across an interesting visual effect created with Moiré patterns and used for guiding ships but we’re sure it can be adapted for hacks somewhere. Without the aid of any motors or LED animation, the image changes as the user views it from different angles. When viewed straight on, the user sees vertical lines, but from the left they see a right-pointing arrow and from the right, they see a left-pointing arrow. It’s used with shipping to guide ships. For example, one use would be to guide them to the center point of a bridge. When the pilots see straight, vertical lines then they know where to steer the ship.

US patent 4,629,325, Leading mark indicator, explains how it works and how to make one. Two screens are separated from each other. The one in front is vertical but the one behind is split in two and angled. It’s this angle which creates the slants of the arrows when viewed from the left or right. We had to convince ourselves that we understood it correctly and a quick test with two combs showed that we did. See below for the test in action as well as for [Tom’s] video of the real-world shipping one.

Continue reading “Using Moiré Patterns To Guide Ships”

Waterjet plasma production

[Ben Krasnow] Tests Novel Plasma

When [Ben Krasnow] sees an interesting phenomenon he pursues it with a true scientist’s mentality, though it doesn’t hurt that he also has the skills and the workshop. This time he’s produced a glowing plasma by impacting fused quartz and other materials with a high-speed water jet.

The jet of pure water emerges from a 0.004″, or 100 micron, diameter sapphire orifice with a flow rate of around 2 milliliters per second giving a speed of 240 meters per second. It collides at 90° with a dielectric material where the plasma is produced as a toroid surrounding the collision point.

How a waterjet plasma works

There’s been very little research into the phenomena but a proposal from one research paper which [Ben] found is that the plasma is a result of charging due to the triboelectric effect. This is the same effect which charges a balloon when you rub it against your hair, except that here there are water molecules running across a clear dielectric such as fused quartz. This effect results in a positively charged anode downstream of the collision while the water near the point of highest shear becomes conductive and conducts negative charge to the point of smallest curvature, producing a cathode. The electric field at the small-radius cathode acts like a short point with a high voltage on it, ionizing the air and forming the plasma. If this form of ionization sounds familiar, that’s because we’ve talked it occurring between the sharp wire and rounded foil skirt of a flying lifter.

[Ben] found support for the triboelectric theory when he substituted oil for the water. This didn’t produce any plasma, which is be expected since unlike water, oil is a non-polar molecule. However, while the researchers tried just a few dielectric materials, [Ben] had success with every transparent dielectric which he tried, including fused quartz, lithium niobate, glass, polycarbonate, and acrylic, some of which are very triboelectrically different from each other. So there’s room here for more theorizing. But check out his full video showing his equipment for producing the waterjet as well as his demonstrations and explanation.

Continue reading “[Ben Krasnow] Tests Novel Plasma”

It’s Raining Chinese Space Stations: Tiangong-1

China’s first space station, Tiangong-1, is expected to do an uncontrolled re-entry on April 1st, +/- 4 days, though the error bars vary depending on the source. And no, it’s not the grandest of all April fools jokes. Tiangong means “heavenly palace”, and this portion of the palace is just one step of a larger, permanent installation.

But before detailing just who’ll have to duck when the time comes, as well as how to find it in the night sky while you still can, let’s catch up on China’s space station program and Tiangong-1 in particular.

Continue reading “It’s Raining Chinese Space Stations: Tiangong-1”

Improved camera slider controls

Improving Controls For A Camera Slider Kit

We’ve all gone through it. You buy a kit or even an assembled consumer item, and it’s either not quite right or it’s only a part of what you need. Either you do a fix, or you add to it. In [Jeremy S. Cook’s] case, he’d been working for a while with a camera slider kit which came with just the slider. He’d added a motor and limit switches but turning it on/off and reversing direction were still done by manipulating alligator clips. Now he’s put together some far better, and more professional-looking controls.

He started by replacing the DC motor with a servo motor modified for continuous rotation. Then he built a circuit around an Arduino Nano for controlling the motor and put it all in a carefully made box which he bolted to the side of the slider. A switch built into the box turns it on and off, and a potentiometer sets the direction of the slider. While not necessarily new, we do like when we see different approaches being taken, and in this case, he’s using magnets to not only hold the case’s cover on for easy access, but also a couple of them to hold the 9-volt battery in place. Check out his construction process and the new slider in action in the video below.

Continue reading “Improving Controls For A Camera Slider Kit”