Internet-connected Advent calendar

Advent Calendar Tracks The Days Until Christmas

Internet-connected Advent calendarWhat’s a hacker to do when Halloween’s over and a new source of ideas is needed for more hacks? Make something for Christmas of course. That’s what [Dario Breitenstein] did when he made his Advent calendar both as a decoration and to help instill some Christmas spirit.

Designed in SketchUp, it’s a WS2812 LED strip mounted in a clean looking walnut enclosure. The light diffuses through 3D-printed PETG lids with vinyl over them to outline the days. Naturally, it had to be Internet-connected and so an ESP8266 based WEMOS D1 mini board fetches the date and time from an NTP server. Sundays light up in red and Christmas Eve in purple.

This appears to be just the thing hackers like [vk2zay] could use for inspiration during their sort-of-annual Advent Calendar of Circuits wherein a different circuit is made each day leading up to Christmas.

Wind turbine pumping air to an underwater scuba helmet

Breathing Underwater Using Wind Power

As hackers, our goal is to reuse something in a way in which it was not intended and [Rulof Maker] is a master at this. From his idyllic seaside location in Italy, he frequently comes up with brilliant underwater hacks made of, well, junk. This time he’s come up with a wind-powered pump to move air through a hose to a modified scuba mask.

The wind turbine’s blades look professional but you’ll be surprised to see that they’re simply cut from a PVC pipe. And they work great. The air compressor is taken from a car and the base of the wind turbine’s tower started life as a bed frame. As you’ll see in the video below, the whole setup is quite effective. It would have been nice to see him using his leg mounted, beer bottle propulsion system at the same time, but the air hose may not have been long enough to make good use of them.

Continue reading “Breathing Underwater Using Wind Power”

Google's Piano Genie

Piano Genie Trained A Neural Net To Play 88-Key Piano With 8 Arcade Buttons

Want to sound great on a Piano using only your coding skills? Enter Piano Genie, the result of a research project from Google AI and DeepMind. You press any of eight buttons while a neural network makes sure the piano plays something cool — compensating in real time for what’s already been played.

Almost anyone new to playing music who sits down at a piano will produce a sound similar to that of a cat chasing a mouse through a tangle of kitchen pots. Who can blame them, given the sea of 88 inexplicable keys sitting before them? But they’ll quickly realize that playing keys in succession in one direction will produce sounds with consistently increasing or decreasing pitch. They’ll also learn that pressing keys for different lengths of times can improve the melody. But there’s still 88 of them and plenty more to learn, such as which keys will sound harmonious when played together.

Piano Genie training architecture
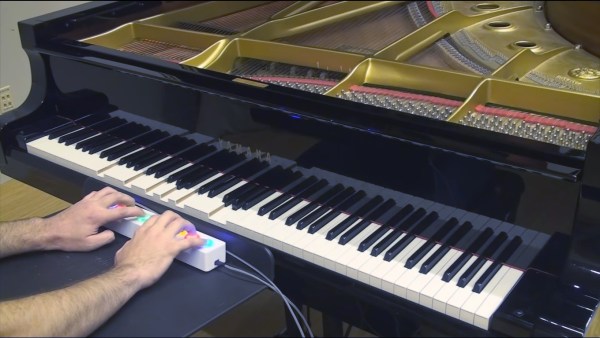
With Pinao Genie, gone are the daunting 88 keys, replaced with a 3D-printed box of eight arcade-style buttons which they made by following this Adafruit tutorial. A neural network maps those eight buttons to something meaningful on the 88-key piano keyboard. Being a neural network, the mapping isn’t a fixed one-to-one or even one-to-many. Instead, it’s trained to play something which should sound good taking into account what was play previously and won`t necessarily be the same each time.

To train it they use data from the approximately 1400 performances of the International Piano e-Competition. The result can be quite good as you can see and hear in the video below. The buttons feed into a computer but the computer plays the result on an actual piano.

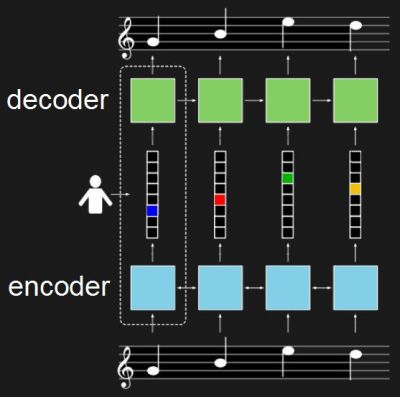
For training, the neural network really consists of two networks. One is an encoder, in this case a recurrent neural network (RNN) which takes piano sequences and learns to output a vector. In the diagram, the vector is in the middle and has one element for each of the eight buttons. The second network is the decoder, also an RNN. It’s trained to turn that eight-element vector back into the same music which was fed into the encoder.

Once trained, only the decoder is used. The eight-button keyboard feeds into the vector, and the decoder outputs suitable notes. The fact that they’re RNNs means that rather than learning a fixed one-to-many mapping, the network takes into account what was previously played in order to come up with something which hopefully sounds pleasing. To give the user a little more creative control, they also trained it to realize when the user is playing a rising or falling melody and to output the same. See their paper for how the turned polyphonic sound into monophonic and back again.

If you prefer a different style of music you can train it on a MIDI collection of your own choosing using their open-sourced model. Or you can try it out as is right now through their web interface. I’ll admit, I started out just banging on it, producing the same noise I would get if I just hammered away randomly on a piano. Then I switched to thinking of making melodies and the result started sounding better. So some music background and practice still helps. For the video below, the researcher admits to having already played for a few hours.

This isn’t the first project we’ve covered by these Google researchers. Another was this music synthesizer again using neural networks but this time with a Raspberry Pi. And if our discussion of recurrent neural networks went a bit over your head, check out our overview of neural networks.

Continue reading “Piano Genie Trained A Neural Net To Play 88-Key Piano With 8 Arcade Buttons”

Performing A Chip Transplant To Resurrect A Dead Board

[Uri Shaked] accidentally touched a GPIO pin on his 3.3 V board with a 12 V alligator clip, frying the board. Sound familiar? A replacement would have cost $60, which for him wasn’t cheap. Also, he needed it for an upcoming conference so time was of the essence. His only option was to try to fix it, which in the end involved a delicate chip transplant.

Removing the shield on the Bluetooth LE board
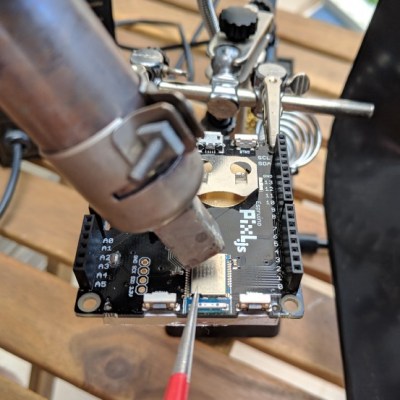
The board was the Pixl.js, an LCD board with the nRF52832 SoC with its ARM Cortex M4, RAM, flash, and Bluetooth LE. It also has a pre-installed Espruino JavaScript interpreter and of course the GPIO pins through which the damage was done.

Fortunately, he had the good instinct to feel the metal shield over the nRF52832 immediately after the event. It was hot. Applying 3.3 V to the board now also heated up the chip, confirming for him that the chip was short-circuiting. All he had to do was replace it.

Digging around, he found another nRF52832 on a different board. To our surprise, transplanting it and getting the board up and running again took only an hour, including the time to document it. If that sounds simple, it was only in the way that a skilled person makes something seem simple. It included plenty of delicate heat gun work, some soldering iron microsurgery, and persistence with a JLink debugger. But we’ll leave the details of the operation and its complications to his blog. You can see one of the steps in the video below.

It’s no surprise that [Uri] was able to dig up another board with the same nRF52832 chip. It’s a popular SoC, being used in tiny, pocket-sized robots, conference badges, and the Primo Core board along with a variety of other sensors.

Continue reading “Performing A Chip Transplant To Resurrect A Dead Board”

DIY degaussing coil

Degaussing Coil To Restore Gameplay Like It’s 1985

You may think that cathode ray tube (CRT) TVs and monitors have gone the way of the dinosaur, but you’d be wrong. Many still have them for playing video games at home or in arcades, for vintage computing, and yes, even for watching television programs. [Nesmaniac] uses his TV for playing Super Mario Bros but for several years it had a red area in the top right corner due to a nearby lightning strike. Sadly, it stood out particularly well against the game’s blue background. His solution was to make a degaussing coil.

Homemade degaussing coilWe have an article explaining degaussing in detail but in brief, the red was caused by that area of the metal shadow mask at the front of the display becoming magnetized by the lightning strike. One way to get rid of the red area is to bring a coil near it and gradually move the coil away. The coil has AC from a wall socket running through it, producing an oscillating magnetic field which randomizes the magnetic field on the shadow mask, restoring the colors to their former glory.

You’ll find [Nesmaniac’s] video explaining how he made it below. It’s a little cartoonish but the details are all there, along with the necessary safety warnings. His degaussing coil definitely qualifies as a hack. The coil itself came from a 15″ CRT monitor and his on/off switch came from a jigsaw. A 100 watt light bulb serves as a resistance to minimize current and if more or less current is needed then the bulb can be swapped for one with a different wattage.

To demonstrate it in action and give a few more construction details, we’ve included a second video below by [Arcade Jason] who made his for degaussing arcade game screens.

Continue reading “Degaussing Coil To Restore Gameplay Like It’s 1985”

Arduino 3D wire bending machine

DIY Wire Bender Gets Wires All Bent Into Shape

It’s been a while since we’ve shown a DIY wire bending machine, and [How To Mechatronics] has come up with an elegant design with easy construction through the use of 3D-printed parts which handle most of the inherent complexity. This one also has a Z-axis so that you can produce 3D wire shapes. And as with all wire bending machines, it’s fun to watch it in action, which you can do in the video below along with seeing the step-by-step construction.

One nice feature is that he’s included a limit switch for automatically positioning the Z-axis when you first turn it on. It also uses a single 12 volt supply for all the motors, and the Arduino that acts as the brains. The 5 volts for the one servo motor is converted from 12 using an LM7805 voltage regulator. He’s also done a nice job packaging the Arduino, stepper motor driver boards, and the discrete components all onto a single custom surface mount PCB.

Wire straightener and feeder

The bender isn’t without some issues though, such as that there’s no automatic method for giving it bending instructions. You can write code for the steps into an Arduino sketch, which is really just a lot of copy and paste, and he’s also provided a manual mode. In manual mode, you give it simple commands from a serial terminal. However, it would be only one step more to get those same commands from a file, or perhaps even convert from G-code or some other format.

Another issue is that the wire straightener puts too much tension on the wire, preventing the feeder from being able to pull the wire along. One solution is to feed it pre-straightened wire, not too much to ask for since it’s really the bending we’re after. But fixing this problem outright could be as simple as changing two parts. For the feeder, the wire is pulled between copper pipe and a flat steel bearing, and we can’t help wondering whether perhaps replacing them with a knurled cylinder and a grooved one would work as the people at [PENSA] did with their DIWire which we wrote about back in 2012. Sadly, the blog entries we linked to no longer work but a search shows that their instructable is still up if you want to check out their feeder parts.

As for the applications, we can think of sculpting, fractal antennas, tracks for marble machines, and really anything which could use a wireframe for its structure. Ideas anyone?

Continue reading “DIY Wire Bender Gets Wires All Bent Into Shape”

Synthesizing nightime soundscape

Synthesizing Mother Nature’s Sounds Like You’ve Never Seen Before

We’ve all heard the range of sounds to be made electronically from mostly discrete components, but what [Kelly Heaton] has achieved with her many experiments is a whole other world, the world of nature to be exact. Her seemingly chaotic circuits create a nighttime symphony of frogs, crickets, and katydids, and a pleasant stroll through her Hackaday.io logs makes how she does it crystal clear and is surely as delightful as taking a nocturnal stroll through her Virginia countryside.

Homemade piezo buzzer with amplifierThe visual and aural sensations of the video below will surely tempt you further, but in case it doesn’t, here’s a taste. When Radio Shack went out of business, she lost her source of very specific piezo buzzers and so had to reverse engineers theirs to build her own, right down to making her own amplifiers on circular circuit boards and vacuum forming and laser cutting the housings. For the sounds, she starts out with a simple astable multivibrator circuit, demonstrating how to create asymmetry by changing capacitors, and then combining two of the circuits to get something which sounds just like a cricket. She then shows how to add katydids which enhance the nighttime symphony with percussive sounds much like a snare drum or hi-hat. It’s all tied together with her Mother Nature Board built up from a white noise generator, Schmitt trigger, and shift registers to turn on and off the different sound circuits, providing a more unpredictable and realistic nighttime soundscape. The video below shows the combined result, though she admits she’ll never really be finished. And be sure to check out even more photos and videos of her amazing work in the gallery on her Hackaday.io page.

For the more familiar range of sounds, though no less varied, check out our own [Elliot William’s] series, Logic Noise, where he takes us through an extensive exploration of a less Mother Naturely soundscape.

Continue reading “Synthesizing Mother Nature’s Sounds Like You’ve Never Seen Before”