Sniffing CAN To Add New Features To A Modern Car

It used to be that there wasn’t a problem on the average car that couldn’t be solved with a nice set of wrenches, a case of beer, and a long weekend. But the modern automobile has more in common with a spaceship than those vintage rides of yesteryear. Bristling with sensors and electronics, we’re at the point that some high-end cars need to go back to the dealer for even minor repairs. It’s a dark time for the neighborhood grease monkey.

But for those of us who are more likely to spend their free time working with a compiler than a carburetor, a modern car can be an absolute wonderland. That’s what [TJ Bruno] found when he recently started experimenting with the CAN bus on his 2017 Chevy Cruze. Not only was he able to decode how the different switches and buttons on the dashboard communicated with the vehicle’s onboard systems, he was able to hack in a forward-looking camera that’s so well integrated you’d swear it was a factory option.

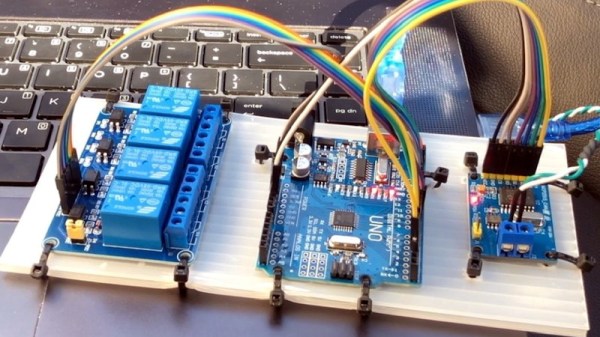
The idea started simple enough: using some relays, [TJ] planned on physically switching the video feed going to the Chevy’s dashboard between the stock rear camera and his aftermarket front camera. That’s all well and good, but the car would still only bring up the video feed when the gear selector was put in reverse; not exactly helpful when he’s trying to inch his way into a tight spot. He needed to find a way to bring up the video display when the car was moving forward.

With a PCAN-USB adapter connected to the car’s OBD-II port, he shifted into and out of reverse a few times and noted which messages got transmitted on the network. It wasn’t long before he isolated the proper message, and when he injected it with his laptop, the dashboard display switched over to the backup camera regardless of what gear the car was in. Building on this success, he eventually figured out how to read the status of all the buttons on the car’s dashboard, and programmed an Arduino to listen for the appropriate signals.

The final piece of the puzzle was combing bringing both of these capabilities, so that went the appropriate button was pressed on the dashboard the Arduino would not only send the signal to turn on the video display, but kick the relays over to switch the camera source. Now [TJ] has a front-facing camera that can be called up without having to kludge together some button or switch that would never match the modern styling of the vehicle’s interior.

A couple years back we saw a similar project to add a backup camera to a Peugeot 207 that was too old to have one from the factory, and more recently we saw how CAN hacking can allow you to fight back when your car’s touch screen interface robs you of simple pleasures like pushing buttons and turning knobs.

Continue reading “Sniffing CAN To Add New Features To A Modern Car”

Jumbo LEDs Make For A Handy ATtiny Beacon

Inspiration can come from anywhere. Sometimes it’s just a matter of seeing an interesting part that you want to fiddle around with badly enough that you end up developing a whole idea, and potentially product, around it. That’s how [Bobricius] found himself creating this very slick little warning beacon, and looking at the end result, we think he made the right decision.

The Kingbright DLC-6SRD “jumbo” LED is actually six individual emitters built into a plastic diffuser. Interfacing with the device is simple enough; each LED has its normal anode and cathode leg, all you need to do is power them up. What [Bobricius] has created is a simple PCB design that the DLC-6SRD can plug right into, complete with a 2032 coin cell holder on the opposite side.

Of course, just lighting up all six elements at the same time wouldn’t be very interesting. [Bobricius] is controlling them individually right off of the digital pins of an ATtiny10 with the help of some Charlieplexing. This makes all kinds of interesting patterns possible, and as demonstrated in the video after the break, the current iteration of the project uses some very simple code to “rotate” the LED as if it was the flasher on an emergency vehicle.

The addition of a few blinking LEDs can make a world of difference in terms of nighttime visibility, so a cheap stick-on module that adds such a distinctive light pattern could be a very important safety device. It could also be useful for UAVs, following the FAA’s new rules which would mandate anti-collision lights for night flying.

Continue reading “Jumbo LEDs Make For A Handy ATtiny Beacon”

A Stylish Low Part Count Non-Contact Thermometer

A non-contact thermometer is a pretty common tool these days, and one that most of us probably have kicking around the lab. You can grab them online for as little as $10 USD, and while they’re nowhere near as capable as a thermal camera, they certainly have their uses. But even with their increased availability, there are at least two safe assumptions we can make about owners of said gadgets: they didn’t make it themselves, and they are probably pretty ambivalent about its aesthetics.

Which makes this project by [Ijon Tichy] particularly interesting. Not only is this a non-contact infrared thermometer that’s extremely easy to build should you be so inclined, but it’s actually quite attractive. In fact, if it wasn’t for the video of it in operation after the break, we would have assumed it was some kind of faux-retro cosplay prop. Even if you don’t have any use for an IR thermometer, you might just want to add one of these to your toolbox on principle.

The main components of the thermometer are a MLX90614 sensor, a gorgeous HP QDSP-6040 bubble display, and a ATtiny2313 microcontroller to tie it all together. The rest are passive components, with the exception of the TP4056 charging module that got tacked on to handle the 200 mAh lithium-ion battery. All of the components are arranged neatly in a line down the length of the thermometer, which is assembled on a piece of perfboard. Rather than go with a 3D printed enclosure that would cover it all up, [Ijon] decided to encapsulate everything in a clear epoxy resin. It looks fantastic, though you’re going to want to triple check all those solder joints before pouring on your “enclosure”.

[Ijon] has provided the diagrams and source code you need to build your own version of this artisanal thermometer, but we think with a custom PCB and perhaps a less liquid enclosure that still shows off the goods, this could be a very popular gadget for the discerning hacker. As we’ve seen, even the most basic of tools can benefit from a stylish makeover.

Continue reading “A Stylish Low Part Count Non-Contact Thermometer”

Teardown: Refuel Propane Tank Monitor

Regular Hackaday readers will know that the clearance section of your local big box retailer is a great place to pick up oddball gadgets and gizmos for dirt cheap. In an era where manufacturers are rushing to make their products “smart” whether they need to be or not, the occasional ideas which fail to gain traction are just the cost of doing business. If you keep an eye out, you’re almost guaranteed to see one of these Internet of Things rejects collecting dust on a back aisle, often selling for pennies on the dollar.

Case in point, the “Refuel” propane tank monitor from Wink. Though there’s also logos for Quirky and GE on the package as well, and even a picture of the guy who came up with the idea. Essentially what we have here is a digital scale that reports the current weight of your grill’s propane tank to your phone via the Internet. A trick we might consider a fairly simple hack with a load cell and an ESP8266 under normal circumstances, but as this is a commercial product with an MSRP of $49.99 USD, its naturally been over-complicated to the point of absurdity.

Of course, one could simply lift the propane tank and get a decent estimate of its contents; a trick mastered by weekend grill masters since time immemorial. But then you wouldn’t have to make an account with Wink, or go through the very strange process of attempting to configure the device by using the flashing light of your smartphone’s screen (seriously). All so you can check how much propane is left in your grill while you’re away from home. You know, as one does.

Frankly, it’s hard for me to imagine who would actually have purchased such a thing at full retail. But of course, that’s likely why I was able to pick it up for the princely sum of $5. At that price, we can’t afford not to take a peek into this gizmo from Wink, Quirky, GE, and Anthony from Boston.

Continue reading “Teardown: Refuel Propane Tank Monitor”

ESP32 Adds Bluetooth To GameCube Controllers

While it might not be the most traditional design, there’s no debating that Nintendo created something truly special when they unleashed the GameCube controller on an unsuspecting world back in 2001. Hardcore fans are still using the controller to this day with current-generation Nintendo consoles, and there’s considerable interest in adding modern conveniences like USB support to the nearly 20-year-old design.

One particularly promising project is the BlueCubeMod created by [Nathan Reeves]. He’s developed a small custom PCB that can be installed into an official GameCube controller to turn it into a Bluetooth device. You do have to sacrifice the original cord and force feedback for this mod, but we think many will see the ability to use this iconic controller with their computer or phone as a pretty fair trade.

The PCB holds an ESP32-PICO-D4 which is operating as a standard Bluetooth HID controller for maximum compatibility with modern systems. Control signals are pulled directly from the controller’s original PCB with just two wires, making the installation very simple. Wondering where the power comes from? As the rumble motor isn’t supported anyway, that gets tossed and in its places goes a 700 mAh battery which powers the controller for up to six hours. Overall it’s a very clean modification that [Nathan] believes even beginners will be capable of, and he ultimately plans to turn this design into a commercial kit.

Currently you still need a receiver if you want to use the BlueCubeMod with the Nintendo Switch, but [Nathan] says he’s working on a way to get around that requirement by potentially switching out the ESP32 for a STM32 with a CC256x radio. He says this will give him more direct control over the Bluetooth communications, which should allow him to take into tackle the intricacies of talking to the Switch directly.

Of course, the GameCube did have an official wireless controller back in the day. We’ve seen modifications to get the WaveBird to get it talking to modern systems as well, but there’s something to be said for slimmer form factor of the original edition.

Continue reading “ESP32 Adds Bluetooth To GameCube Controllers”

Bike Computer Exploration Uncovers A Hidden Android

As a happy side-effect of the smartphone revolution, the world is now awash with tiny computers that are incredibly cheap thanks to the nearly unfathomable volumes in which their components are manufactured. There wouldn’t be a $10 Raspberry Pi Zero if the billions of smartphones that were pumped out before it hadn’t dropped the cost of the individual components to literal pennies. That also means that smartphone hardware, or at least systems that are very close to it, have started to pop up in some unexpected places.

When [Joshua Wise] recently took ownership of a Wahoo ELEMNT BOLT bike computer, he wondered how it worked. With impressive list of features such as Internet connectivity, GPS mapping, and Bluetooth Low Energy support, he reasoned the pocket-sized device must have some pretty decent hardware under the hood. With some poking and prodding he found the device was powered by a MediaTek SoC and incredibly had a full-blown install of Android running in the background.

So how does one find out that their lowly bike computer is essentially a cleverly disguised smartphone? If you’re [Joshua], you listen to who it’s trying to talk do when doing a firmware update over the Internet. He used mitmproxy running between his Internet connection and a WiFi access point setup specifically for the BOLT, from there, he was able to see all of the servers it was connecting to. Seeing the device pull some data down from MediaTek’s servers was a pretty good indication of whose hardware was actually inside the thing, and when it ultimately downloaded some Android .apk files from the Wahoo website, it became pretty clear what operating system it was running underneath the customized user interface.

Further examination of the Bolt’s software brought to light a few troubling issues. It turned out that the firmware made extensive use of Apache-licensed code, for which no attribution was given. [Joshua] contacted the company and was eventually referred to the Wahoo’s CEO, Chip Hawkins. Refreshingly, Chip was not only very interested in getting the licensing issues sorted out, but even had some tips on hacking and modifying the device, including how to enable ADB.

Before the publication of this article, we reached out to Chip Hawkins (yes, he really does respond to emails) for a comment, and he told us that not only has he made sure that all of the open source packages used have now been properly attributed to their original authors, but that his team has been providing source code and information to those who request it. He says that he’s been proud to see owners of his products modifying them for their specific needs, and he’s happy to facilitate that in any way that he can.

Open source license compliance is a big deal in the hacking community, and we’ve seen how being on the wrong side of the GPL can lead to lost sales. It’s good to see Wahoo taking steps to make sure they comply with all applicable licences, but we’re even more impressed with their positive stance on customers exploring and modifying their products. If more companies took such an enlightened approach to hacking, we’d all be a lot better off.

[Thanks to Roman for the tip.]