Would you believe the multi-tiered toolbox pictured here started its life as a piece of bog standard PVC pipe? It certainly wouldn’t be our first choice of building material, but as shown in the video after the break, it only takes a heat source and something suitably flat to convert a piece of PVC pipe into a versatile sheet material.
Flattening the heated PVC.
Unrolling the PVC pipe and getting it flat is covered in the first minute of the video, while the rest of the run time is dedicated to building the tool box. Each and every piece you see here, except for the screws and lid hinges, is carefully cut from the PVC sheet. Though we suspect a few more chunks of pipe went into this build than the video would have you believe.
Would we build such an elaborate box if we had to cut each piece of the thing out by hand? Probably not. But then, we can’t deny the final results here are pretty impressive. Incidentally, if you thought those hinges on the top looked a lot like links removed from a watch band…you’d be correct.
Admittedly we’re a bit late covering this one, and under normal circumstances we might have let it slip by given the several million views it’s amassed over the last year. But the central theme of reusing a common material to build something unexpected is solid Hackaday territory, and aligns closely with this year’s Hackaday Prize challenges.
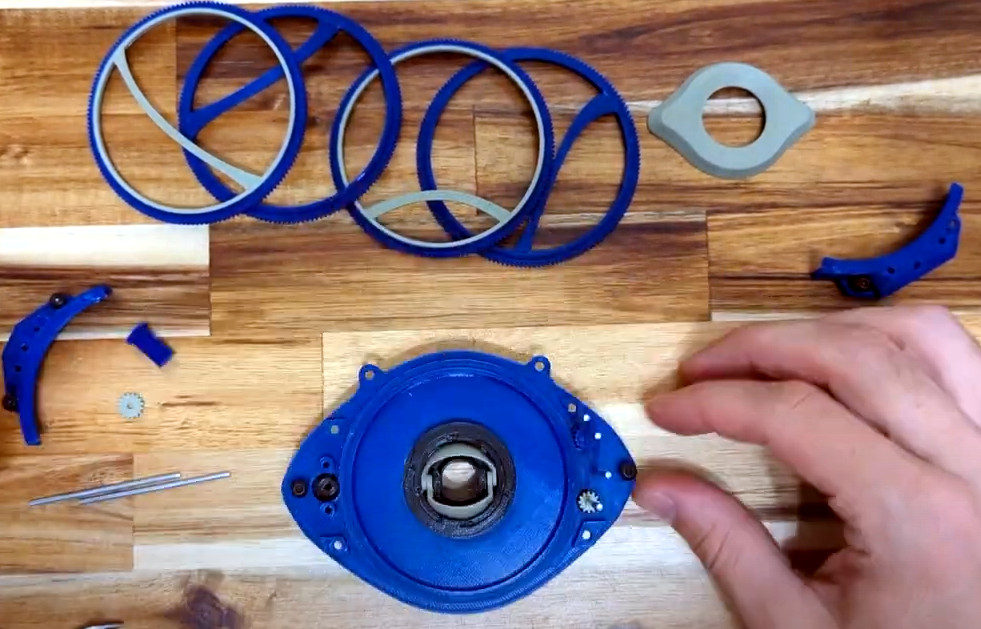
Three years ago, [Enza3D] put together a 3D printed version of the Eye of Agamotto as seen in Marvel’s Doctor Strange. It was a good looking prop, but there was definitely some room for improvement in terms of screen accuracy and scale. With a new Strange film now in theaters, it seemed a good a time as any to revisit the design and tighten up some loose ends.
As you might expect for something that’s supposed to be magic, the internal mechanism required to get all of the moving parts going is quite complex. Not only does the iris need to open and close, but the rings need to spin at different speeds to recreate the effect seen in the film. Impressively, there’s not a single line of code or a microcontroller to be seen here — everything is done with a carefully designed set of a gears and a single N20 motor.
Magical relic, some assembly required.
[Enza3D] tried to simplify the construction of the clockwork-like mechanism as much as possible compared to the earlier version, and made some nice improvements like unifying the size of the screws and shafts used in the assembly so there’s no danger of using the wrong part. Despite their size and fine pitch, all of the gears can be printed on a standard FDM desktop printer, in this case a Prusa Mini.
That said, [Enza3D] did switch over to resin prints for the outside of the prop. Incidentally, in another clever design decision, the outer ornamental case is completely separate from the internal powered mechanism. That lets you easily take the unit apart for maintenance or repairs without risking damage to your finish work. Check out the video after the break for a breakdown of how the device is assembled, as well as some tips on how to make shiny pieces of plastic look like aged metal.
If you follow the exploits of [Aaron Christophel] (and trust us, you should), you’ll know that for some time now he’s been rather obsessed with electronic price tags, specifically those with e-paper displays. It’s certainly not hard to see why — these low-power devices are perfect for ambient displays, and their integrated wireless capabilities mean you can put one in every room and update them from a central transmitter.
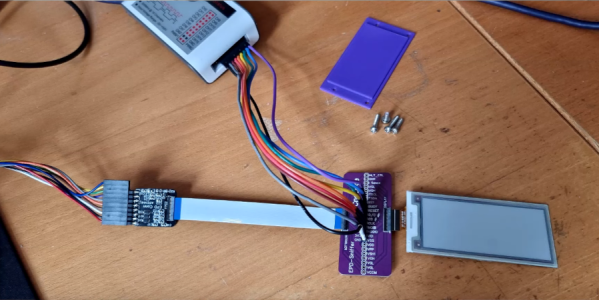
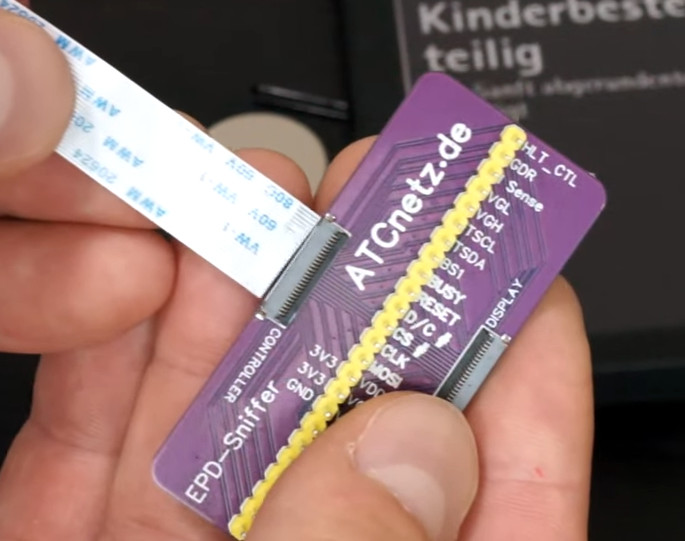
But with such a wide array of products on the market, [Aaron] has found himself doing a lot of e-paper reverse engineering. This involves sticking a logic analyzer between the display and the tag’s microcontroller, which he found to be a rather finicky task. That’s why he created the Universal E-Paper Sniffer: a breakout PCB that lets you snoop on display communication without having to resort to unpleasant methods like scratching off the solder mask to tap into the traces by hand.
It’s a pretty simple gadget: on either side, you’ve got a connector for 24 pin 0.5 mm pitch flat flex cable, which [Aaron] has identified as the most common interface for these displays, and in the middle you’ve got a standard 2.54 mm pitch header. There are no other components on the board, and all the traces go right through to the other side.
Add a few jumpers and a cheap logic analyzer, and you’re ready to sniff some SPI commands. Check out the video after the break for a general walk-through of what it looks like to start sniffing around a new display.
The Gerber files for the breakout are available for free, or you can chose to buy a fabricated board through PCBWay to kick [Aaron] a portion of the sale price. However you get one, we think this will be a handy little tool to have around if you find yourself bitten by the price tag hacking bug.
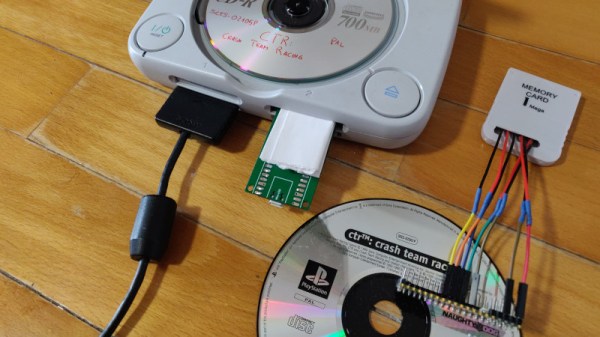
It’s almost hard to believe these days, what with modern game consoles packing terabytes of internal storage, but there was a time when the totality of your gaming career would be stored on an external memory card that held just a few megabytes of save data. Of course, before that you had to write down a sequence of random letters and numbers to pick up where you left off, but that’s a story for another day.
While the memory card concept might be quaint to the modern gamer, its modular nature does provide the hacker with some interesting avenues to explore. For example, take a look at the very impressive PicoMemcard project from [Daniele Giuliani]. Hardware wise, it doesn’t get much simpler than this. You just take the PCB from a cheap (or dead) PlayStation memory card, and solder seven jumpers to the edge connector contacts so you can plug them into the Pico. Then you’ve just got to upload the firmware to the Pico, and you’re done. Continue reading “Raspberry Pi Pico Replaces PlayStation Memory Card”→
The 2022 Hackaday Prize continues to hurtle along, with two of the five Challenges already in the rear-view mirror. While we’re naturally excited about every phase of this year’s contest, we’ve got particularly high hopes for what the community can do with this third Challenge: Hack it Back.
It’s a simple formula: find some outdated and disused piece of gear, spruce it up, and keep it out of the landfill. But extending the lifetime of consumer hardware is only one side of the coin, by upgrading and modifying something instead of buying an off-the-shelf replacement, you also turn the mundane into something unique and personal. But of course, we hardly have to explain the benefits to you fine folk — this is the sort of bespoke engineering we see on a nearly daily basis here at Hackaday. The difference now is that there’s cash prizes on the line.
What’s that you say? You aren’t the type to be seduced by shiny new features? Happy to keep things local while others ship it all off to the cloud? You’ll get no complaints from us, and that’s why the Hack it Back Challenge also recognizes repairs that simply put a piece of gear back into service. But don’t be fooled, as fixing something can often be harder than rebuilding it from scratch.
Ready to put your hardware-reviving skills on display? Just head over to Hackaday.io, make a new project page, and get hacking. But don’t wait too long, you’ve only got until July 24th to enter the Hack it Back Challenge and stake your claim on one of the ten $500 awards up for grabs.
When we think of robotics, the first thing that usually comes to mind for many of us is some sort of industrial arm that’s bolted to the floor, or perhaps a semi-autonomous rover trudging its way across the dusty Martian landscape. While these two environments are about as different as can be, the basic “rules” are pretty much the same. Being on firm ground ground gives the robot a clear understanding of its position and orientation, which greatly simplifies tasks such as avoiding collisions or interacting with nearby objects.
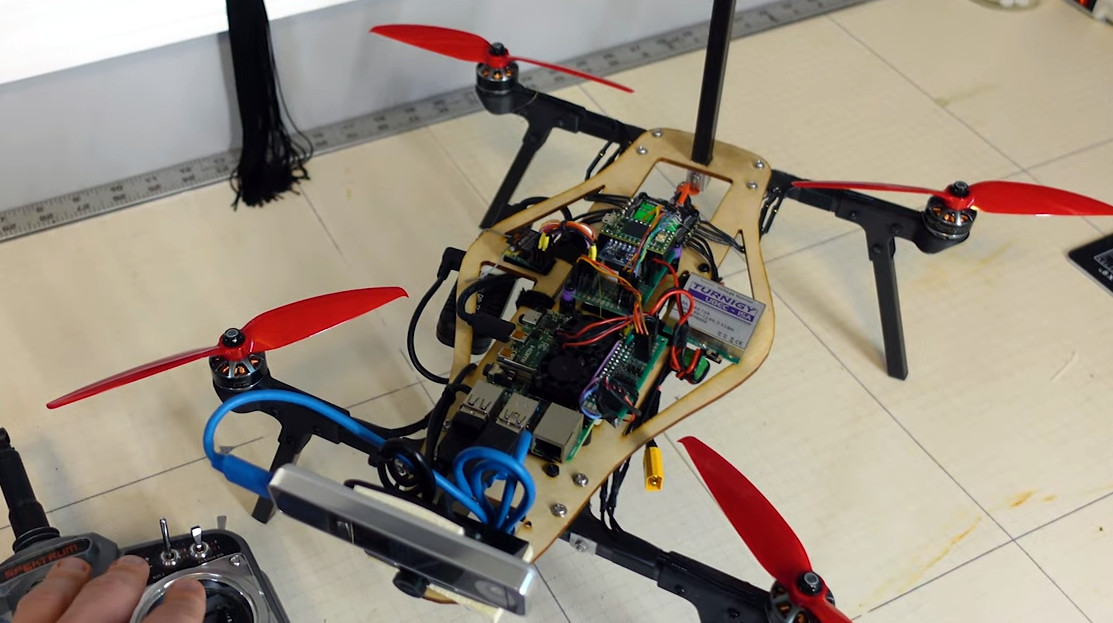
But what happens when that reference point goes away? How does a robot navigate when it’s flying through open space or hovering in mid-air? That’s just one of the problems that fascinates Nick Rehm, who stopped by to host this week’s Aerial Robotics Hack Chat to talk about his passion for flying robots. He’s currently an aerospace engineer at Johns Hopkins Applied Physics Laboratory, where he works on the unique challenges faced by autonomous flying vehicles such as the detection and avoidance of mid-air collisions, as well as the development of vertical take-off and landing (VTOL) systems. But before he had his Master’s in Aerospace Engineering and Rotorcraft, he got started the same way many of us did, by playing around with DIY projects.
In fact, regular Hackaday readers will likely recall seeing some of his impressive builds. His autonomous ekranoplan designed to follow a target using computer vision graced the front page in April. Back in 2020, we took a look at his recreation of SpaceX’s Starship prototype, which used a realistic arrangement of control surfaces and vectored thrust to perform the spacecraft’s signature “Belly Flop” maneuver — albeit with RC motors and propellers instead of rocket engines. But even before that, Nick recalls asking his mother for permission to pull apart a Wii controller so he could use its inertial measurement unit (IMU) in a wooden-framed tricopter he was working on.
Discussing some of these hobby builds leads the Chat towards Nick’s dRehmFlight project, a GPLv3 licensed flight control package that can run on relatively low-cost hardware, namely a Teensy 4.0 microcontroller paired with the GY-521 MPU6050 IMU. The project is designed to let hobbyists easily experiment with VTOL craft, specifically those that transition between vertical and horizontal flight profiles, and has powered the bulk of Nick’s own flying craft.
Moving onto more technical questions, Nick says one of the most difficult aspects when designing an autonomous flying vehicle is getting your constraints nailed down. What he means by that is having a clear goal of what the craft needs to do, and critically, how long it needs to do it. How far does the craft need to be able to fly? How fast? Does it need to loiter at the target location, and if so, for how long? The answers to these questions will largely dictate the form of the final vehicle, and are key to determining if it’s worth implementing the complexity of transitioning from VTOL to fixed-wing horizontal flight.
But according to Nick, the biggest challenge in aerial robotics is onboard state estimation. That is, the ability for the craft to know its position and orientation relative to the ground. While high-performance computers have gotten lighter and sensors have improved, he says there’s still no substitute for having a ground-based tracking system. He mentions that those fancy demonstrations you’ve seen with drones flying in formation and working collaboratively towards a task will almost certainly have an array of motion capture cameras tucked off to the side. This makes for an impressive show, but greatly limits the practical application of these drone swarms.
Nick’s custom Raspberry Pi 4-powered quadcopter lets him test autonomous flight techniques.
So what does the future of aerial robotics look like? Nick says open source projects like ArduPilot and PX4 are still great choices for hobbyists, but sees promise in newer platforms which pair the traditional autopilot with more onboard computing power, such as Auterion’s Skynode. More powerful flight controllers can enable techniques such as simultaneous localization and mapping (SLAM), which uses 3D scans of the environment to help the robot orient itself. He’s also very interested in technologies that enable autonomous flight in GPS-denied environments, which is critical for robotic craft that need to operate indoors or in situations where satellite navigation is unavailable or unreliable. In light of the incredible success of NASA’s Ingenuity helicopter, we imagine these techniques will also play an invaluable role in the future airborne exploration of Mars.
We want to thank Nick for hosting this week’s Aerial Robotics Hack Chat, which turned out to be one of the fastest hours in recent memory. His experience as both an avid hobbyist and a professional in the field provided exactly the sort of insight the Hackaday community looks for, and his gracious offer to keep in touch with several of those who attended the Chat to further discuss their projects speaks to how passionate he is about this topic. We expect to see great things from Nick going forward, and would love to have him join us again in the future to see what he’s been up to.
The Hack Chat is a weekly online chat session hosted by leading experts from all corners of the hardware hacking universe. It’s a great way for hackers connect in a fun and informal way, but if you can’t make it live, these overview posts as well as the transcripts posted to Hackaday.io make sure you don’t miss out.
Buying broken gear for cheap is time honored hacker tradition, and while we might not always be successful in reviving it, rarely do we come away empty handed. There’s always parts to salvage, and you can’t put a price on the knowledge to be gained when poking around inside an interesting piece of hardware. So we’re not surprised at all to hear that [Tomas Pavlovic] jumped at the chance to grab this faulty HP-48S calculator for a couple bucks.
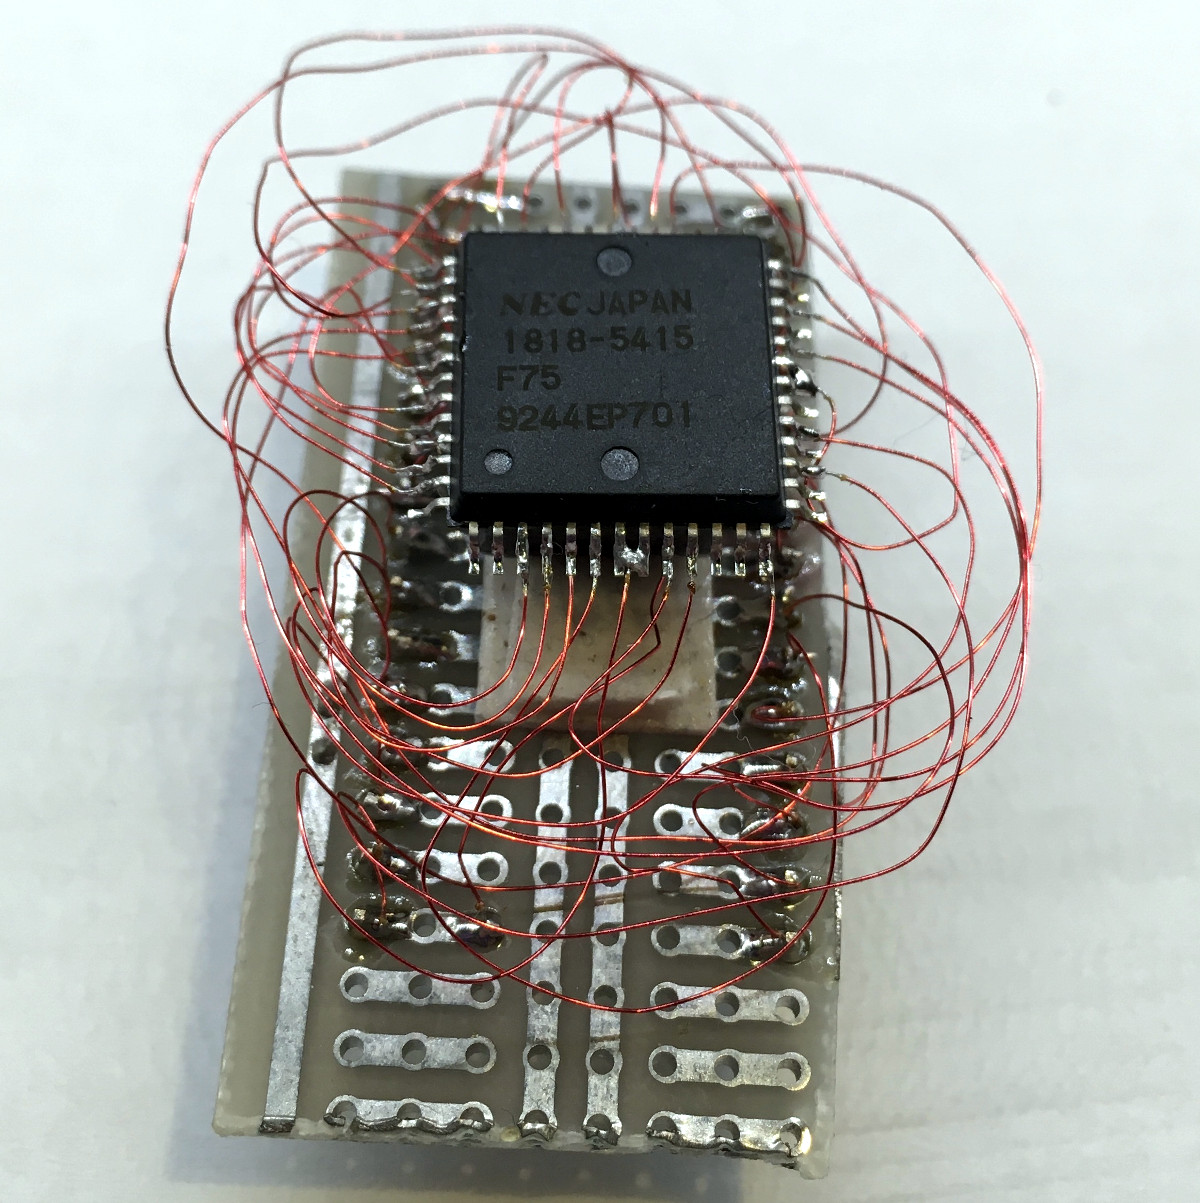
Luckily for us, the story doesn’t end at the bottom of his parts bin. When he got the HP-48S back home, he immediately set out to see if it could be repaired. After changing out a few choice components and not seeing any result in the device’s behavior, he became suspicious that the problem may be with the firmware; specifically, the soldered-on chip that holds it.
Dumping the original ROM.
After carefully lifting the NEC uPD23C2000GC from its resting place for the last 30 years or so, he wired up an adapter that let him connect the chip to his programmer so its contents could be dumped. Rather than trying to find another ROM chip, he decided to wire in a socket and found a re-writable SST39SF040 that could stand in as a replacement. Flashing a fresh copy of the firmware to the new socketed chip got the calculator up and running again, with the added bonus of allowing [Tomas] to pull the chip and flash a different firmware version should he care to experiment a bit.
Now, we know what you’re thinking. Where was the fix? What exactly brought this piece of 1990s gear back to life? That part, unfortunately, isn’t very clear. You’d think if the original ROM chip was somehow faulty, [Tomas] wouldn’t have been able to so easily pull a valid firmware image from it. That leaves us with some pretty mundane possibilities, such as a bad solder joint on the chip’s pins. If that was indeed the case, this fix could have been as simple as running a hot iron over the pins…but of course, where’s the fun in that?
Update: We heard back from [Tomas], and it turns out that when compared to a known good copy, the dumped firmware did have a few swapped bits. His theory is that the NEC chip is in some weird failure mode where the calculator wouldn’t run, but it was still functional enough to get most of the content off of it. What do you think? Let us know in the comments.