While most of the world’s venture capital is off chasing anything with “AI” in the name in what many think looks increasingly like an inflated spherical film of soap molecules, in aviation all the hot money is betting on eVTOL: electric vertical take off and landing.
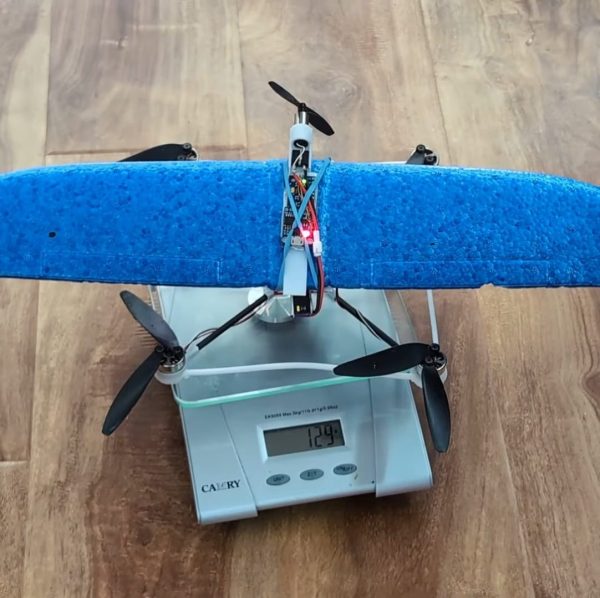
What if you want to get in on the eVTOL game but don’t have (or want) billionaire backing? Long-time contributor [spiritplumber] demonstrates how to do it on the cheap, with a low-cost quadcopter and a foam wing called Lift5.
Most eVTOL isn’t just quadcopters, after all — multirotors are great for playing with in the back yard, but their thrust-based lift makes for short range, and the engine-out options are all bad. Add a wing, and you can get that sweet, sweet dynamic lift. Add an extra, forward facing motor, and you can get thrust in the direction you need it most. That’s what [spiritplumber] is doing here: strapping a foam wing to a cheap quadcopter. Specifically, his custom frame for an Eiele F120 drone kit.You can see it in action in the demo video embedded below.
The wing and its forward thrust motor are equipped with its own speed controller, so the concept should be adaptable to just about any little drone. Quadcopter flight computers are mostly going to be able to compensate for the added lift and thrust automatically, which is neat, considering that these forces would require some bizarre headwind/updraft very unlikely to be found in nature.
Now the wing does add a lot of drag during the lift phase, to be sure, so [spiritplumber] is working on folding or tilting it out of the way, but that version is apparently inordinately fond of trees. Once the control issues are worked out you’ll likely see it on his site and YouTube channel Robots Everywhere.
[spiritplumber] has been contributing hacks here at least since 2009, when he showed us how to make a Macbook right click.