The ZX Spectrum Next Arrives

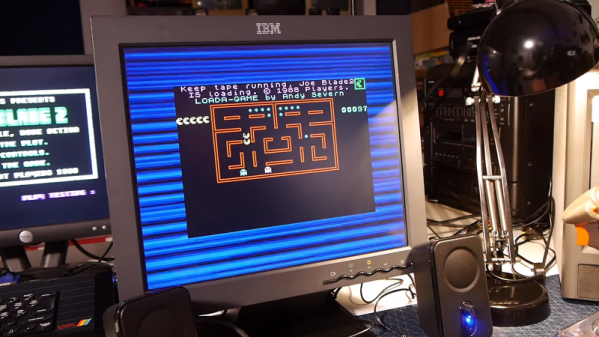
Sinclair Research was best known in the United States for the tiny ZX80, and the ZX81, under its Timex branding. However, they also made the ZX Spectrum which had many features that were — at the time — unusual. A few years ago there was a Kickstarter to recreate a modern version of the Spectrum, and [Nostalgia Nerd’s] new ZX Spectrum Next has finally arrived. As you can see in the first part of the hour-long video he was very excited about it. Almost too excited for YouTube.

The new incarnation of the Spectrum claims to be fully compatible with the original but also offers improved graphics modes, SD cards instead of tape, and an optional 7 MHz clock speed. The 512K of RAM would have been sinfully luxurious back in the day when the original model came with 16K, although the most iconic Spectrums would be the 48K models. The new version even has the option of taking a Raspberry Pi Zero to act as an accelerator.

Continue reading “The ZX Spectrum Next Arrives”

Writing Arduino Libraries, An Expert View

The Arduino IDE has a bit of a split personality. On the one hand, it is a simple environment where you can just pick and choose a few libraries, write a few lines of code, and make lots of interesting things. On the other hand, it is also an ecosystem in which many different boards and libraries can be supported. Writing a great library that everyone can easily use takes a little forethought. There is an official style guide, but a recent post by [Nate] from Sparkfun points out lessons learned from writing more libraries than most people.

Of course, as you might expect, some of this is a matter of opinion, and [Nate] admits that. For example, they always use the serial port at 115,200 baud, but they do note that 9,600 baud is also popular. They also suggest making code as readable as possible, which is usually good advice. In the old days, writing terse code might lead to higher efficiency, but with modern compilers, you ought to get a tight final result even when doing things in a pretty verbose fashion.

Continue reading “Writing Arduino Libraries, An Expert View”

Hands-On: Smarty Cat Is Junior’s First Slide Rule

You may remember that I collect slide rules. If you don’t, it probably doesn’t surprise you. I have a large number of what I think of as normal slide rules. I also have the less common circular and cylindrical slide rules. But I recently picked up a real oddity that I had to share: the Smarty Cat. It isn’t exactly a slide rule but it sort of is if you stretch the definition a bit.

Real Slide Rules

A regular slide rule takes advantage of the fact that you can multiply and divide by adding logarithms. Imagine having two rulers marked in inches or centimeters — it doesn’t matter (see the adjoining image). Suppose you want to add 5 and 3. You count off 5 marks on one ruler and line it with up the zero inch mark on the other ruler. Now you count off 3 marks on the second ruler and that position on the first ruler will indicate the result. Here it lines up with the 8 mark, which is, of course, the correct answer.

That’s a simple addition. But if you can convert your numbers into logarithms, add the logarithms, and then back out to a regular number, you can multiply.

Continue reading “Hands-On: Smarty Cat Is Junior’s First Slide Rule”

OpenChronograph Lets You Roll Your Own Smart Watch

At first, smartwatches were like little tiny tablets or phones that you wore on your wrist. More recently though we have noticed more “hybrid” smartwatches, that look like a regular watch, but that use their hands to communicate data. For example you might hear a text message come in and then see the hand swing to 1, indicating it is your significant other. Want to roll your own? The OpenChronograph project should be your first stop.

The watches are drop in replacements for several Fossil and Skagen watch boards (keep in mind Fossil and Skagen are really the same company). There’s an Arduino-compatible Atmega328p, an ultra low power real time clock, a magnetometer, pressure sensor, temperature sensor, and support for a total of three hands. You can even create PCB artwork that will act as the watch face using Python.

Continue reading “OpenChronograph Lets You Roll Your Own Smart Watch”

$80 Dual Extrusion Kit Might Work With Your 3D Printer

[Teaching Tech] sprung about $80 or a kit to add dual extrusion to his 3D printer, plus another $20 for an accessory kit. He did get it to work well, but it wasn’t without problems which he covers in the video below.

The design of the head uses a servo to swing two hot ends to — in theory — the same point. Each hot end has an ooze shield, so you don’t need to deal with that in your G-code by building a priming tower. However, there are some requirements for your printer.

Continue reading “$80 Dual Extrusion Kit Might Work With Your 3D Printer”

OpenAstroTracker Turns Your DSLR Into An Astronomy Instrument

If you want to take beautiful night sky pictures with your DSLR and you live between 15 degrees and 55 degrees north latitude you might want to check out OpenAstroTracker. If you have a 3D printer it will probably take about 60 hours of printing, but you’ll wind up with a pretty impressive setup for your camera. There’s an Arduino managing the tracking and also providing a “go to” capability.

The design is over on Thingiverse and you can find code on GitHub. There’s also a Reddit dedicated to the project. The tracker touts its ability to handle long or heavy lenses and to target 180 degrees in every direction.

Continue reading “OpenAstroTracker Turns Your DSLR Into An Astronomy Instrument”

3D Printed Breadboard Helper Makes Wiring Neater And Easier

Breadboards make it simple to prototype and test circuits. If you use flexible wires with pins to make connections, it usually results in a rat’s nest. For many of us, using solid wire makes a rat’s nest, too. However, the very neat among us will cut solid wire to just the right length and strip just the right amount of wire and lay the wires very flat and neat along the board. [Moononournation] did a 3D print that makes the latter method much easier. You can find his Breadboard Wire Helper on Thingiverse and see a video, below.

The idea is simple: start with a piece of wire stripped on one side, then count out the number of holes it needs to traverse and push the stripped end through the hole. Trim the wire to fit. To complete the other side, lay the wire flat along the tool to the edge. Now you can see where to strip that side of the wire. After you remove the insulation, you can bend the wire down and cut the wire to fit. Now you have a perfect size and shape wire to place in the actual breadboard.

Granted, this isn’t that hard to do with the existing breadboard if it isn’t too packed. You could even use a spare breadboard. But it is a little easier to trim the wire to the right size with this jig. If you don’t want to 3D print it, you could probably pull the tape off the back of a cheap board and remove the springs to get a similar effect.

So while this little tool probably won’t change your life, it might make it a little easier. What other tools do you use when breadboarding? Let everyone know in the comments.

Continue reading “3D Printed Breadboard Helper Makes Wiring Neater And Easier”