Raspberry Pi Halloween Voice Changer

[Dave Shevett] has spent a lot of time (more than a year) expanding his Technomancer costume along with the companion (Arduino-driven) magic staff. He found, however, he needed a way to get his voice out from behind the mask. If you are going to go through that much trouble, you might as well augment your voice at the same time, right?

[Dave’s] voice changer uses a Raspberry Pi which isn’t all that complicated. The Pi uses Linux, and Unix–the predecessor to Linux–has a long history of having little tools you can string together to do big jobs. So once you have a Pi and a sound card, the rest is just some Linux command line wizardry.

There’s a battery and a small portable amplifier to get that booming voice. Since you don’t want to lug a keyboard and monitor around to handle every reboot, [Dave] set the Pi up to run his voice-changing scripts on each reboot.

This is a great example of why old Unix programmers make small tools and use the shell to join them together. [Dave’s] voice changer is pretty much just some off the shelf parts and a  script so simple it hardly qualifies as programming in any real sense. In fact, it is essentially one line of “code”:

play "|rec --buffer 2048 -d pitch -300 echos 0.8 0.88 100 0.6 150 .5 band 1.2k 1.5k"

Sure, there is some street cred in embedded development to doing everything the hard way, but with the advent of cheap embedded Linux systems, why not take advantage of the tools where you can?

If you want a more roll-your-own approach, you can pick up your Arduino or break out an audio mixer (but good luck getting it in your costume).

Secret Radio Stations By The Numbers

One thing has stayed with the James Bond movie franchise through the decades: Mr. Bond always has the most wonderful of gadgets. Be it handheld, car-based, or otherwise, there’s always something to thrill that is mostly believable.

The biggest problem with all of those gadgets is that they mark Commander Bond as an obvious spy. “So Mr. Bond, I see you have a book with many random five character groups. Nothing suspicious about that at all!” And we all know that import/export specialists often carry exploding cufflinks or briefcases full of unknown electronics in hidden compartments.

Just as steganography hides data in plain sight, the best spy gadgets are the ones that don’t seem to be a spy gadget. It is no wonder some old weapons are little more than sticks or farm implements. You can tell a peasant he can’t have a sword, but it is hard to ban sticks.

Imagine you were a cold war era spy living in a hostile country with a cover job with Universal Exports. Would you rather get caught with a sophisticated encryption machine or an ordinary consumer radio? I’m guessing you went with the radio. You aren’t the only one. That was one of the presumed purposes to the mysterious shortwave broadcasts known as number stations. These were very common during the cold war, but there are still a few of them operating.
Continue reading “Secret Radio Stations By The Numbers”

400 Transistors And 1800 Resistors Form This 1967 Personal Computer

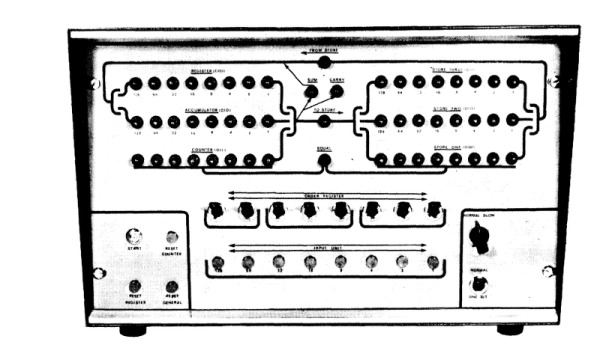
What kind of computer could you build in 1967? Well, if you were reading Wireless World (a UK magazine) and had a good bit of spare cash, you could build [Brian Crank’s] Wireless World Computer. You only needed 400 germanium transistors, 1800 resistors, and an odd number of capacitors, switches, diodes, and neon bulbs. You also needed a good bit of patience, we suspect.

In 1967, the computer cost about 50 pounds to build (perhaps $125 at 1967 exchange rates which would now be about $900 in today’s money). To save parts (and thus money and build complexity), the computer used a trick: it processed data one bit at a time. Many older computers did this, including another UK computer named EDSAC.

Continue reading “400 Transistors And 1800 Resistors Form This 1967 Personal Computer”

Printing Soft Body Tissue

If you are like us, you tend to do your 3D printing with plastic or maybe–if you are lucky enough to have access to an expensive printer–metal. [Adam Feinberg] and his team at Carnegie Mellon print with flesh. Well, sort of. Printing biomaterials is a burgeoning research area. However, printing material that is like soft tissue has been challenging. In a recent paper, [Feinberg] and company outline a method called FRESH. FRESH uses a modified MakerBot or Printrbot Jr. printer to deposit hydrogel into a gelatin slurry support bath. The gelatin holds the shape of the object until printing is complete, at which point it can be removed with heat. If you don’t want to wade through the jargon in the actual paper, the journal Science has a good overview (and see their video below).

The gelatin is mixed with calcium chloride and gelled for 12 hours at low temperature. It was then turned into a slurry using an off-the-shelf consumer-grade blender. A centrifuge was used to remove most of the soluble gelatin. Printing inks were made with materials like collagen and fibrin. The FRESH process actually uses liquid  ink that gels in the gelatin.

The printer uses an open source syringe extruder found on the NIH 3D print exchange (they never say exactly  which one, though and we had trouble matching it from the pictures). In true hacker fashion, the printer prints its own syringe extruder using the stock one from ABS and PLA plastic. Then you simply replace the standard extruder with the newly printed one (reusing the stock stepper motor).

The paper describes printing items including a model of a 5-day-old embryonic chick heart, an artery, and a miniature human brain model. Another team of researchers in Florida have a similar system, as well.

We’ve talked about bioprinting before and even mentioned how to make your own inkjet-based bioprinter. The FRESH method looks like it is in reach of the hacker’s 3D printing workshop. We cringe to think what you will print when you can finally print body parts.

Continue reading “Printing Soft Body Tissue”

Listen To The Rain, Raspberry Pi Style

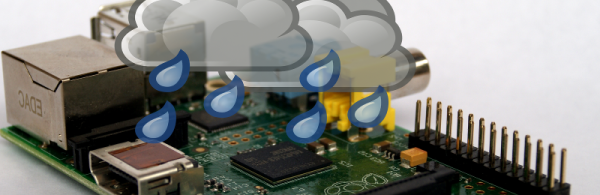
There’s an old proverb algebra teachers often recite: You have to use what you know to find out what you don’t know. The same could be said about sensors. For example, analog to digital converters use something computers are good at finding (like time) and use it to determine something they aren’t good at finding (like voltage). So how do you detect rainfall? If you are [lowflyerUK], you use the microphone in your web camera and a Raspberry Pi.

The idea was to reduce irrigation usage based on rainfall, so an exact measurement isn’t necessary. The Python code that analyzes the audio input is calibrated with three configuration parameters and attempts to remove wind noise. Even so, it needs to be in a room that gets a lot of noise from rainfall and ambient noise can throw the reading off.

The weather service is never going to adopt this system. Still, it is a great example of taking something you know and using it to get something you don’t know. If you want a more complete weather station, we have a few options for you.

Better Capacitors Through Nanotechnology

Traditionally, capacitors are like really bad rechargeable batteries. Supercapacitors changed that, making it practical to use a fast-charging capacitor in place of rechargeable batteries. However, supercapacitors work in a different way than conventional (dielectric) capacitors. They use either an electrostatic scheme to achieve very close separation of charge (as little as 0.3 nanometers) or electrochemical pseudocapacitance (or sometime a combination of those methods).

In a conventional capacitor the two electrodes are as close together as practical and as large as practical because the capacitance goes up with surface area and down with distance between the plates. Unfortunately, for high-performance energy storage, capacitors (of the conventional kind) have a problem: you can get high capacitance or high breakdown voltage, but not both. That’s intuitive since getting the plates closer makes for higher capacitance but also makes the dielectric more likely to break down as the electric field inside the capacitor becomes higher with both voltage and closer plate spacing (the electric field, E, is equal to the voltage divided by the plate spacing).

[Guowen Meng] and others from several Chinese and US universities recently published a paper in the journal Science Advances that offers a way around this problem. By using a 3D carbon nanotube electrode, they can improve a dielectric capacitor to perform nearly as well as a supercapacitor (they are claiming 2Wh/kg energy density in their device).

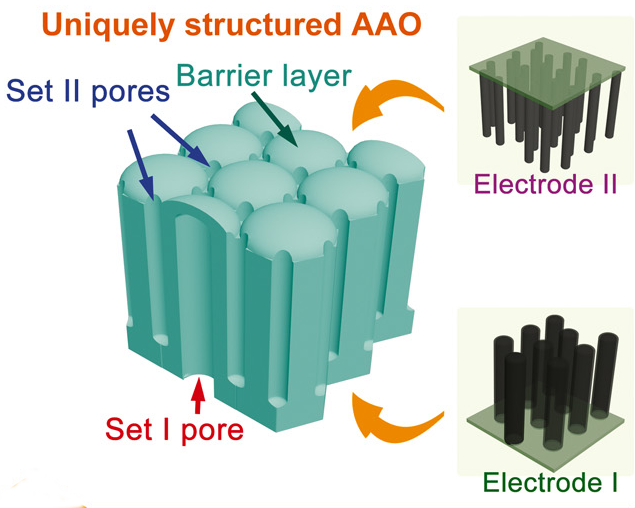
cap1The capacitor forms in a nanoporous membrane of anodic aluminum oxide. The pores do not go all the way through, but stop short, forming a barrier layer at the bottom of each pore. Some of the pores go through the material in one direction, and the rest go through in the other direction. The researchers deposited nanotubes in the pores and these tubes form the plates of the capacitor (see picture, right). The result is a capacitor with a high-capacity (due to the large surface area) but with an enhanced breakdown voltage thanks to the uniform pore walls.

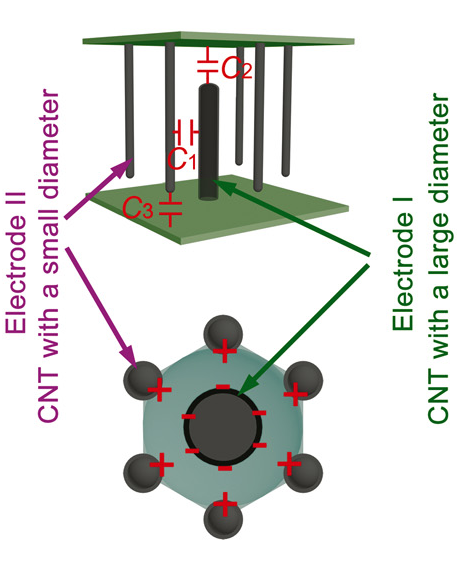
cap2To improve performance, the pores in the aluminum oxide are formed so that one large pore pointing in one direction is surrounded by six smaller pores going in the other direction (see picture to left). In this configuration, the capacitance in a 1 micron thick membrane could be as high as 9.8 microfarads per square centimeter.

For comparison, most high-value conventional capacitors are electrolytic and use two different plates: a plate of metallic foil and a semi-liquid electrolyte.  You can even make one of these at home, if you are so inclined (see video below).

We’ve talked about supercapacitors before (even homebrew ones), and this technology could make high capacitance devices even better. We’ve also talked about graphene supercaps you can build yourself with a DVD burner.

It is amazing to think how a new technology like carbon nanotubes can make something as old and simple as a capacitor better. You have to wonder what other improvements will come as we understand these new materials even better.

Continue reading “Better Capacitors Through Nanotechnology”

Raspberry Pi Sense HAT Super Weather Dashboard

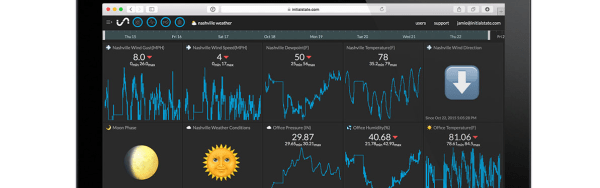
[InitialState] posted a great multipart tutorial about building what he calls a “Hyper-local Weather Dashboard.” In plain language, he created a Raspberry Pi-based web page that fuses weather data from Wunderground along with locally sensed weather data.

The tutorial has thee parts. The first part covers reading data from Wunderground using their developer’s API (you’ll need an API key; a free one is good for 500 queries a day). The second part covers using the Pi Sense HAT to measure local temperature, humidity, and pressure. The final part ties it all together using producing the hyper-local weather dashboard (whatever that really means).

We talked about the Sensor HAT earlier (and there’s more info in the video, below). Seems like those lights could do something, although that wouldn’t do you any good over a web interface. This is a good-looking project (and tutorial) and easy enough that it would be a good place to start
experimenting with the Raspberry Pi.

Continue reading “Raspberry Pi Sense HAT Super Weather Dashboard”