Pump It Up Gets Homebrew GBA Port That Rocks

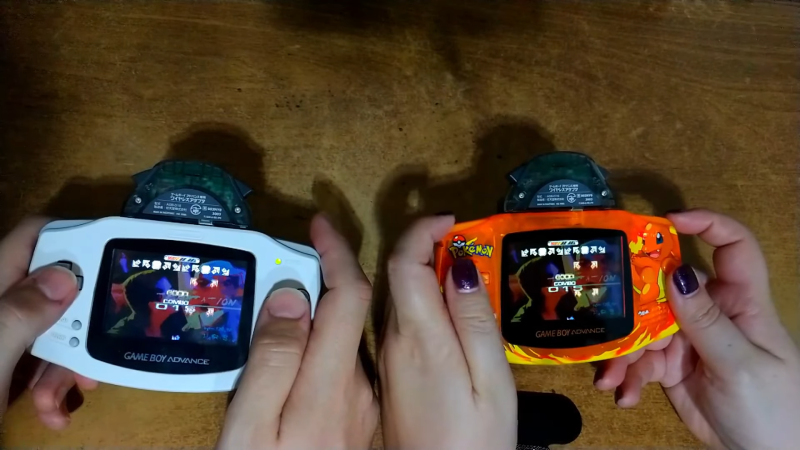
Pump It Up is a popular music video game that hails from South Korea. It’s similar in vibe to Dance Dance Revolution and In The Groove, but it has an extra arrow panel to make life harder. [Rodrigo Alfonso] loved it so much, he ported it to the Game Boy Advance.

The port looks fantastic, with all the fast-moving arrows and lovely sprite-based graphics you could dream of. But more than that, [Rodrigo’s] port is very fully featured. It doesn’t rely on tracked or sampled music, instead using actual GSM audio files for the songs.

It can also accept input from a PS/2 keyboard, and you can even do multiplayer over the GBA’s Wireless Adapter. What’s even cooler is that some of the game’s neat features have been broken out into separate libraries so other developers can use them. If you need a Serial Port library for the GBA, or a way to read the SD card on flash carts, [Rodrigo] has put the code on GitHub.

As you might have guessed, this isn’t the first time [Rodrigo] has pushed the limits on what Nintendo’s 32-bit handheld can do.

Continue reading “Pump It Up Gets Homebrew GBA Port That Rocks” →

You Can Now Jailbreak A PS4 With An LG TV

You might think that jailbreaking a PS4 to run unsigned code is a complicated process that takes fancy tools and lots of work. While developing said jailbreaks was naturally no mean feat, thankfully they’re far easier for the end user to perform. These days, all you need is an LG TV.

Of course, you can’t just use any LG TV. You’ll need a modern LG webOS smart TV, and you’ll need to jailbreak it before it can in turn be used to modify your PS4. Once that’s done, though, you can install the PPLGPwn tool for jailbreaking PS4s. It’s based on the PPPwn exploit released by [TheFlow], which was then optimized by [xfangxfang] and implemented for LG Smart TVs by [zauceee]. Once installed, you just need to hook up your PS4 to the TV via the Ethernet port. Then, with the exploit running on the TV, telling the PS4 to set up the LAN via PPPoE will be enough to complete the jailbreak.

There are other ways to jailbreak a PS4 that don’t involve the use of a specific television. Nonetheless, it’s neat to see the hack done in such an amusing way.

Continue reading “You Can Now Jailbreak A PS4 With An LG TV” →

Generative AI Hits The Commodore 64

Image-generating AIs are typically trained on huge arrays of GPUs and require great wads of processing power to run. Meanwhile, [Nick Bild] has managed to get something similar running on a Commodore 64. (via Tom’s Hardware).

A figure generated by [Nick]’s C64. We shall name him… “Sword Guy”!
As you might imagine, [Nick’s] AI image generator isn’t churning out 4K cyberpunk stills dripping in neon. Instead, he aimed at a smaller target, more befitting the Commodore 64 itself. His image generator creates 8×8 game sprites instead.

[Nick’s] model was trained on 100 retro-inspired sprites that he created himself. He did the training phase on a modern computer, so that the Commodore 64 didn’t have to sweat this difficult task on its feeble 6502 CPU. However, it’s more than capable of generating sprites using the model, thanks to some BASIC code that runs off of the training data. Right now, it takes the C64 about 20 minutes to run through 94 iterations to generate a decent sprite.

8×8 sprites are generally simple enough that you don’t need to be an artist to create them. Nonetheless, [Nick] has shown that modern machine learning techniques can be run on slow archaic hardware, even if there is limited utility in doing so. Video after the break.

Continue reading “Generative AI Hits The Commodore 64” →

Designing A Quality Camera Slider Can Be Remarkably Satisfying

Camera sliders are great creative tools, letting you get smooth controlled shots that can class up any production. [Anthony Kouttron] decided to build one for an engineering class, and he ended up mighty satisfied with what he and his team accomplished.

As an engineering class project, this wasn’t a build done on a whim. Instead, [Anthony] and his fellow students spent plenty of time hashing out what they needed this thing to do, and how it should be built. An Arduino was selected as the brains of the operation, as a capable and accessible microcontroller platform. Stepper motors and a toothed belt drive were used to move the slider in a controllable fashion. The slider’s control interface was an HD44780-based character LCD, along with a thumbstick and two pushbuttons. The slider relied on steel tubes for a frame, which was heavy, but cost-effective and easy to fabricate. Much of the parts were salvaged from legendary e-waste bins on the university grounds.

The final product was stout and practical. It may not have been light, but the steel frame and strong stepper motor meant the slider could easily handle even heavy DSLR cameras. That’s something that lighter builds can struggle with.

Ultimately, it was an excellent learning experience for [Anthony] and his team. As a bonus, he got some great timelapses out of it, too. Video after the break.

Continue reading “Designing A Quality Camera Slider Can Be Remarkably Satisfying” →

Here’s The Norwegian Tape Deck Teardown You’ve Been Waiting For

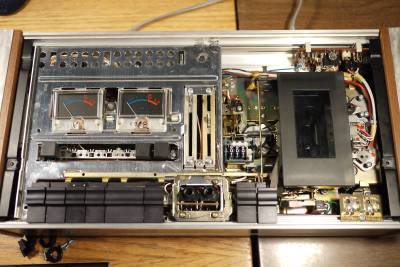
“They just don’t build ’em like they used to” is a truer statement every year. Whether your vice is CRTs, film cameras, or tape decks, you’ll know that the very best gear simply isn’t manufactured anymore. Even the day-to-day stuff from 60 years ago is often a cut above a lot of today’s equipment. [Anthony Kouttron] shows us this with his teardown of a Tandberg TCD301 from many decades ago.

The Tandberg unit is beautifully finished in wood and metal, a style of construction that’s fairly rare these days. It’s got big, chunky controls, and a certain level of heft that is out of vogue in modern electronics. Heavy used to mean good — these days, it means old. That’s not to say it’s indestructible, though. It’s full of lots of old plastic pulleys and fasteners that have aged over the decades, so it’s a little fragile inside.
Still, [Anthony] gives us a great look at the aluminium chassis and buttons and the electromechanical parts inside. It’s a rats-nest design with lots of discrete components and wires flying between boards. You couldn’t economically produce this and sell it to anyone today, but this is how it was done so many years ago.

This non-functional unit ended up being little more than a salvage job, but we’re still glad that [Anthony] gave us a look inside. Still, if you long for more cassette-themed teardowns, we’ve got the goodness you’re looking for!

Custom Polyurethane Belts Made Easy

If you need to make polyurethane belts in custom lengths, it’s not too hard. You just need to take lengths of flexible polyurethane filament, heat the ends, and join them together. In practice, it’s difficult to get it right by hand. That’s why [JBVCreative] built a 3D printed jig to make it easy. 

The jig consists of two printed sliders that mount on a pair of steel rods. Each slider has a screw-down clamp on top. The clamps are used to hold down each end of the polyurethane filament to be joined. Once installed in the jig, the ends of the filament can be heated with a soldering iron or other element. and then gently pushed together. The steel rods simply enable the filament to be constrained linearly so the ends don’t shift during the joining process.

The jig doesn’t produce perfect belts. There’s still a small seam at the join that is larger than the filament’s base diameter. A second jig for trimming the belt to size could be helpful in this regard. Still, it’s a super useful technique for making custom belts. This could be super useful to anyone needing to restore old cassette decks or similar mechanical hardware.

Continue reading “Custom Polyurethane Belts Made Easy” →

BreadboardOS, A Command Line Interface For The Pico

Operating systems! They’re everywhere these days, from your smart TV to your smartphone. And even in your microcontrollers! Enter BreadboardOS for the Raspberry Pi Pico.

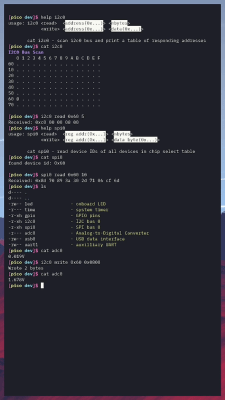
BreadboardOS is built on top of FreeRTOS. It’s aim is to enable quick prototyping with the Pi Pico. Don’t confuse operating system with a graphical environment — BreadboardOS is command-line based. You’d typically interface with it via a serial terminal emulator, but joy of joys, it does support color!



Using BreadboardOS is a little different than typical microcontroller development. Creating an application involves adding a “service” which is basically a task in FreeRTOS parlance. The OS handles running your service for you. Via the text interface, you can query running services, and start or kill them at will.

Meanwhile, running df will happily give you stats on the flash usage of the Pi Pico, and free will tell you how full the memory is doing. If you really want to get raw, you can make calls to control GPIO pins, the SPI hardware, or other peripherals, and do it right on the command line.

BreadboardOS isn’t for everyone, but it could prove a useful tool if you like that way of doing things. It’s not the only OS out there for the Pi Pico, either!

Continue reading “BreadboardOS, A Command Line Interface For The Pico” →