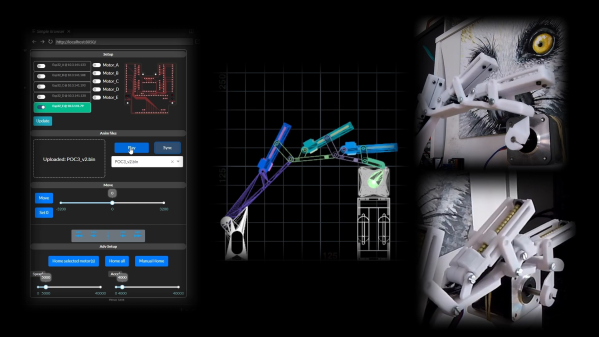
Robotic arms and actuators are compelling things to watch, and as popular among the maker set as they are crucial to modern industry. [kthod2000] built a design of their own, which relies on parts salvaged from old CD-ROM drives.
The arm itself is constructed of many components which appear to be 3D printed, with three main motors visible along its length. These look to be the eject motors harvested from several optical drives, which usefully come with a threaded screw on the output shaft that makes them perfect for a linear-drive application. Run by a TMC2208 driver via a microcontroller, the eject motors control the motion of several stages of the robot arm as it moves up and down.
The intention seems to be that one of these three-tiered assemblies could act as a single finger. Ganged up multiple times, this could allow the creation of something akin to a full five-digit robot hand. [kthod2000] has also done plenty of work on the software side of things that handles controlling the arm. The kinematics can all be simulated on screen in concert with the real motion of the arm.
We’ve seen similar builds before, too, like this plotter built out of scrap DVD drives. They’re a great source of quality electromechanical components for small projects, so it’s no surprise to see them put to work here. Video after the break.
You might have heard of the cochlear implant. It’s an electronic device also referred to as a neuroprosthesis, serving as a bionic replacement for the human ear. These implants have brought an improved sense of hearing to hundreds of thousands around the world.
However, the cochlear implant isn’t the only game in town. The auditory brain stem implant is another device that promises to bring a sense of sound to those without it, albeit by a different route.
The Oculus brand VR headset and other similar devices allow you to view 3D worlds, but they can be blurry and unsatisfying if you’re a glasses wearer. Alternatively, you might be able to see fine, but find your glasses get in the way of a comfortable experience. Either way, you might want to integrate prescription lenses into your headset, and thankfully, there’s a straightforward way to do so thanks to [tanvach].
The way to do so is by using these 3D-printed lens adaptors. They take standard single vision lenses as designed for the Zenni #550021 round glasses frames, and let them fit nicely inside a Oculus Quest, Quest 2, or Rift S headset. [tanvach] supplies instructions on how to order the lenses for your own prescription, and notes that the key is to get the antireflective coating to reduce glare. And, if you don’t want to print your own adapters, you can source some pre-printed instead!
The adapters are a great way to improve your VR experience if you’re someone that typically relies on corrective lenses. Of course, it’s getting more popular to simply DIY your own headset these days, too. If you’ve got your own neat VR project in the works, don’t hesitate to let us know!
The design isn’t particularly fancy or pretty, but just simply focuses on doing a simple job well. There’s a basic DC motor, sitting on a linear rail so that it has minimal deflection in the X and Y axes as it moves up and down. Special care was taken to ensure the linear rail was mounted perfectly perpendicular to the base to ensure the drill doesn’t wander or splay off target.
A collet chuck is used to center the bit as well as possible for a good price. The build also includes a bright LED in order to give you the best possible view of your work. Power is via a variable bench supply which allows for variable speed as necessary. There’s a foot pedal to activate the drill which allows both hands to be used for positioning the work for added ease of use.
Golf is a sport that has always enjoyed a good gadget or eight. Whether it’s something to measure the wind, or the latest putter guaranteed to save your game, golf enthusiasts have always flocked to such toys. [Nick O’Hara] has something that might just be a little too exciting for the golf set, though, in the form of his golf club launcher.
The golf club launcher essentially takes the role of a normal golf bag, with a rotating magazine containing all the necessary clubs for a day out on the green. The magazine is rotated into position on request, and the required club is launched out towards the player thanks to a pneumatic cylinder fired at 120 psi. A compressor in the base keeps the system charged with air for repeated launches.
The launcher even has a voice assistant built in. Telling the caddy the distance to the hole, and variables like wind and elevation, allows the device to select the right club for the conditions before blasting it towards the player.
The rise of streaming services on the Internet was a revolutionary shift when it came to the world of media. No more would content be pumped in to homes in a one-way fashion, broadcast by major conglomerates and government-run organizations. Instead, individuals would be free to hunt for content suiting their own desires on an all-you-can-watch basis.
It’s led to a paradigm shift in the way we consume media. However, it’s also led to immense frustration thanks to the overwhelming amount of content on offer. Let’s take a look at why that is, and some creative ways you can get around the problem.
The Paradox of Choice
Many find the masses of content on streaming services to be overwhelming to choose from. Credit: author screenshot
Traditionally, when it came to media, there were two major arms of delivery: broadcast, and home media. One might listen to the radio, or flick on the TV, or alternatively, spin up a record, or select a movie to watch on tape. If none of those options sufficed, one might take a walk down to the local video store to rent something more appealing.
Fundamentally, it was an era in which choices were limited. There were a handful of TV stations to choose from, and if nothing good was on, you could go as far as finding something watchable on tape or going without. Many will remember afternoons and evenings spent watching reruns or a Friday night movie that had been on a million times before. Some shows went as far as becoming legends for their seemingly endless replay, from The Simpsons to M*A*S*H.
As the Internet grew, though, the game started to change. Torrent websites and streaming services came along, offering up the sum total of the world’s cultural output for free, or for a nominal cost for those averse to piracy. Suddenly when it came to choosing a movie to watch, one wasn’t limited to the five or so films on at the local cinema, nor what was left on the shelves at the local video rental. Instead, virtually any movie, from the invention of the format, could be yours to watch at a moment’s notice.
With so many options on the table, many of us find it harder to choose. It’s an idea popularly known as the Paradox of Choice, a term popularized by US psychologist Barry Schwartz in 2004. When our options are limited to a select few, choice is easy. They can quickly be compared and ranked and an ideal option chosen.
Add thousands of choices to the pile, and the job escalates in complexity to the point of becoming overwhelming. With so many different choices to contrast and compare, finding the mythical right choice becomes practically impossible. Continue reading “The Joy Of Broadcast Media Vs. The Paradox Of Choice”→
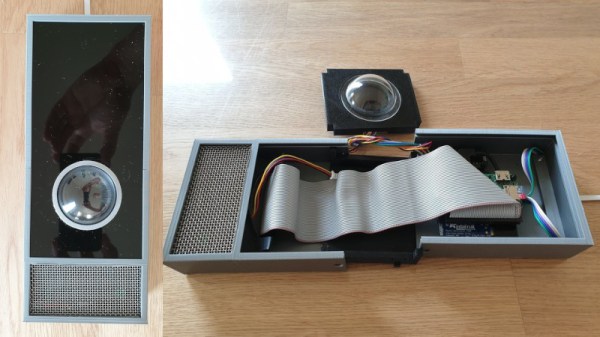
There have been many robots and AIs in science fiction over the years, from Astro Boy to Cortana, or even Virgil for fans of the long-forgotten Crash Zone. However, all these pale into insignificance in front of the cold, uncaring persona of the HAL 9000. Thus, [Jürgen Pabel] thought the imposing AI would make the perfect home assistant.
The build is based on a Raspberry Pi Zero 2, which boasts more grunt than the original Pi Zero while still retaining good battery life and a compact form factor. It’s hooked up with a 1.28″ round TFT display which acts as the creepy glowing eye through which HAL is supposed to perceive the world. There’s naturally a speaker on board to deliver HAL’s haunting monotone, and it’s all wrapped up in an tidy case that really looks the part. It runs on the open-source voice assistant Kalliope to help out with tasks around the home.