One Coder Is Porting Portal To The Nintendo 64

When Portal came out in 2007, developers Valve chose not to release the groundbreaking title on an obsolete Nintendo console long out of production. Nobody cared at the time, of course, but [James Lambert] is here to right that wrong. Yes, he’s porting Portal to the N64.

The port, or “demake,” as [James] calls it, has been under construction for some time. The project has posed some challenges: Portal was developed for PCs that were vastly more powerful than the Nintendo 64 of 1996. Thus, initial concerns were that the console wouldn’t be able to handle the physics of the game or render the recursive portal graphics.

However, hard work has paid off. [James] has chipped away, bit by bit, making improvements to his engine all the while. The latest work has the portals rendering nicely, and the companion cube works just the way you’d expect. There’s also a visible portal gun, and the engine can even render 15 recursive layers when looking through mirrored portals. Sixteen was too much.

Of course, there’s still lots to do. There’s no player model yet, and basic animations and sound are lacking. However, the core concept is there, and watching [James] flit through the not-quite-round portals is an absolute delight. Even better, it runs smoothly even on original Nintendo hardware. It’s a feat worthy of commendation.

We had no idea what [James] had in store back when we featured his work creating real-time shadows on N64 hardware. Now we know! Video after the break.

Continue reading “One Coder Is Porting Portal To The Nintendo 64″ →
3D Printed Linear Actuator Is Cheap And Strong

Motors are all well and good for moving things, but they’re all about the round-and-round. Sometimes, you need to move something back and forth, and for that a linear actuator will do the trick. While they can be readily sourced for under $50 online, [Michael Rechtin] genuinely felt like reinventing the wheel, and managed to whip up a 3D-printed design that costs under 20 bucks.

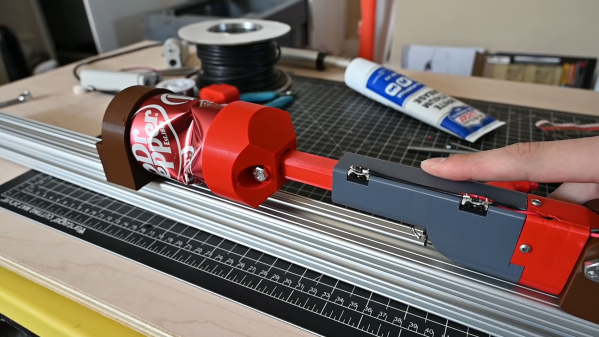
The basic design is simple, consisting of a small motor which is geared down through several stages using simple spur gears. The last gear in the train is tasked with turning a lead screw which drives the arm of the linear actuator back and forward.

For simplicity, [Michael] used a 24V brushed DC gearmotor for its low cost and the fact it already has a step-down gearbox integrated into the design. It’s paired with a couple more 3D-printed spur gears to provide even more torque. Instead of a fancy lead screw, the build instead just uses a quarter-inch bolt sourced from Home Depot, which can be had much cheaper. This pushes a 3D-printed arm back and forth thanks to a nut stuck in the arm. It’s all wrapped up in a neat-and-tidy 3D-printed housing. The design is able to push with a force of roughly 220 lbs. For a more practical idea of its strength, it can readily crush an empty soda can.

The video on the design is great, showing how important features like limit switches are added, and how the wiring can be neatly hidden away inside the housing. We’ve seen [Michael’s] work before, too, like strength testing various types of 3D printed gears. Video after the break.

Continue reading “3D Printed Linear Actuator Is Cheap And Strong” →

Sunrise Keyboard Looks The Part

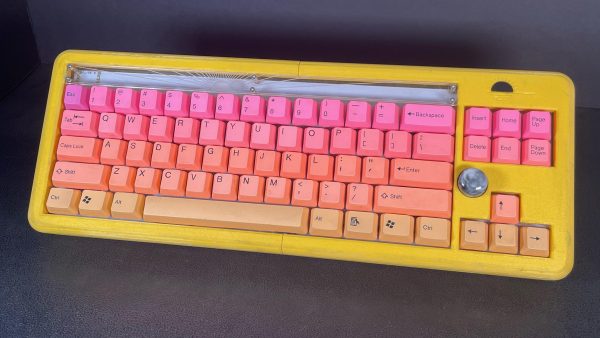
If you’ve been to a bar sometime since the 1930s, you’ve probably spied someone drinking a Tequila Sunrise. It’s a drink that mimics the beautiful colors of the dawn. In much the same way, so does this Sunriser keyboard build from [crashl1445].

Built for a high-school engineering project, the build looks resplendent with its yellow case, paired with yellow, orange and pink keycaps to produce the wonderful sunrise aesthetic. The build relies on an Elite-C v4 microcontroller, an off-the-shelf device specifically designed for building custom keyboards. As you might guess from the name, it features a USB-C port, serving as a modernized alternative to the Arduino Pro Micro for custom keyboard builders. KTT Rose switches are used as per [crashl1445’s] own preference, and there’s even a rotary encoder which acts as a volume knob, installed right by the arrow keys. The case is printed in several parts on a Prusa Mk3+, as the keyboard wouldn’t fit entirely on the build plate as a single piece.

The best thing about building your own keyboard is that you can design it entirely to suit your own preferences and aesthetic; we think [crashl1445] did a great job in this regard. If you’re cooking up your own sweet keyboard build, don’t hesitate to let us know!

Nanovolt Meter Requires Careful Design For Accuracy’s Sake

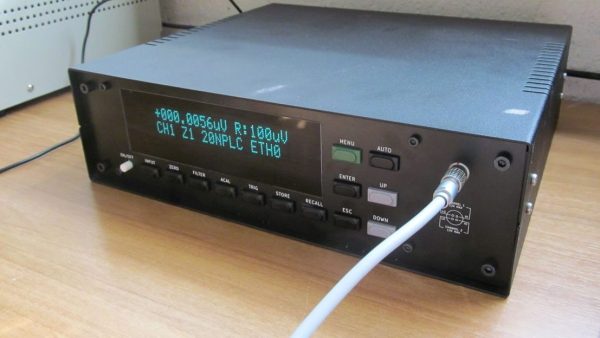
Measuring voltages is fairly straightforward most of the time. Simply grab any old cheap multimeter, hook up the probes, and read off the answer. If, however, you need to measure very tiny voltages, the problem gets more complex. [Jaromir-Sukuba] designed a nanovoltmeter specifically to deal with this difficult case.

The nanovoltmeter is exactly what it sounds like: a voltmeter that is sensitive and stable enough to measure and report voltages on the scale of nanovolts. Having a tool that can do this reliably can be very useful when it comes to measuring very small resistances or working with ever-so-slight differential voltages. Continue reading “Nanovolt Meter Requires Careful Design For Accuracy’s Sake” →

E-Paper Clock Displays Things In A Battery-Friendly Manner

Clock builds are a hacker staple, and many overflow with power-thirsty LEDs and network features. This build from [mattwach] takes quite the opposite approach, sipping away at its batteries thanks to an e-paper based design.

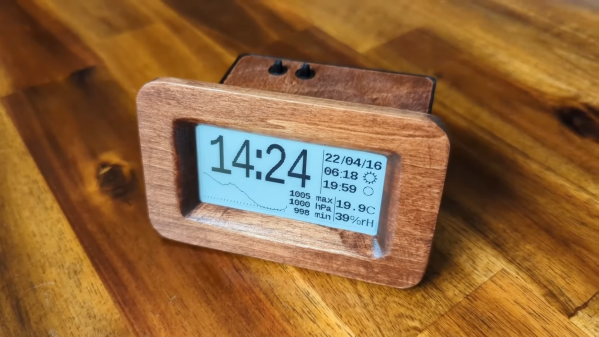
The build relies on a small Waveshare e-paper module which only requires power when the display is actually changing. When static, the display needs no electricity, and this helps save a great amount of power compared to OLED or LCD-based clocks.

An Atmega328p is the heart of the build, running off a 32.768 KHz clock crystal for a combination of precise timekeeping and low power draw. Time is ensured to be both precise and accurate thanks to a GPS module which allows the clock to sync to satellite time when powered up. It’s a common way to sync clocks to a high-quality time source. Most of the time, though, the GPS is kept powered down to save the 30-100 mA that the module typically draws when in use.

Other features include a temperature, humidity, and pressure sensor, with ambient pressure graphed over time. There’s also notification of sunrise and sunset times, along with the current phase of the moon. It’s all wrapped up in a case tastefully manufactured using 3D printed parts and some wooden CNC-cut panels for a nice rustic look.

With the e-paper display and the microcontroller configured for low-power operation, the clock will run for around 6 months on four AAA cells. Overall, it’s a nifty little clock that will provide the time, date, and other information without the need for an Internet connection. Video after the break.

Continue reading “E-Paper Clock Displays Things In A Battery-Friendly Manner” →

The Explosive Art Of Detonographs

The visual arts are a broad field, encompassing everything from the chiselling of marble sculptures to the creation of delicate landscapes in charcoal on paper. However, [Evelyn Rosenberg] has experimented with some altogether more radical techniques over the years, creating her explosively-formed detonographs.

The process of creating a detonograph starts with sketching out a design, and using it to create a plaster mold. The mold exists as a bas relief, upon which metal sheets are laid on top. Various different metals may be layered up to create varying effects, and other objects like leaves, branches, or lace may also be included in the stack up.

Rosenberg’s piece titled “Enchanted New Mexico.”

Then, the metal plate sitting atop the mold is covered with explosive powder. When this is detonated, it smashes everything together with great force. The metal sheet takes on the negative form of the bas relief mold, while also picking up imprints from any leaves or other objects included in the various layers. Dissimilar metals included in the stack-up may also weld together during this process.

With some post-processing like polishing and chemical treatments, the result is a beautiful metal artwork full of dimension and detail. It’s somewhat like an artistic take on the industrial process of explosive welding. Video after the break.

Continue reading “The Explosive Art Of Detonographs” →

Balloon Guitar Is An Absolute Gas, Helium Or Not

Guitars are most typically built out of wood. Whether it’s an acoustic guitar with a big open cavity, or a solid-body electric, there’s generally a whole lot of wood used in the construction. However, [Mattias Krantz] shows us that alternative construction methods are entirely possible, by building his own balloon guitar.

The balloon guitar still has a neck, bridge, and strings just like any other. However, in place of the resonant cavity of an acoustic guitar, there is provision to install a large balloon instead. It’s actually quite interesting to watch — with the balloon installed, the guitar delivers much more volume than when played without a resonant cavity at all.

The guitar was actually built to test if swapping out air in the balloon for helium would shift the pitch of the sound. Of course, a guitar’s pitch comes from the tension on the vibrating strings, so changing the gas in the resonant cavity doesn’t directly affect it. Instead, much like inhaling helium to affect the human voice, the change is to the timbre of the sound, not the fundamental pitch itself. It sounds as if the guitar has been given a subtle treble boost.

It’s a fun build, and one that shows us that it’s possible to build musical instruments in many ways, not just using traditional techniques. If you want to further play with your guitar’s sound, though, consider turning to the world of machine learning.

Continue reading “Balloon Guitar Is An Absolute Gas, Helium Or Not” →