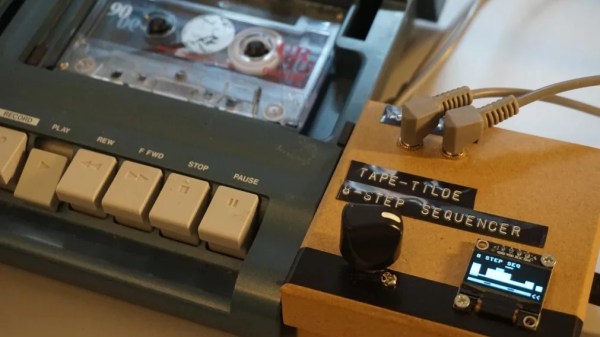
Pitch Sequencer Turns Tascam Tape Deck Into Instrument

The cool thing about magnetic tape is that by varying the speed at which you play it back, you can vary the pitch of the output. [Issac] decided to take advantage of this, executing a fancy digitally-controlled pitch mod on his Tascam Porta 02 tape deck.

The build uses a Raspberry Pi Pico, which employs PWM to control the speed of the tape drive’s motor. This is achieved with the use of an NPN transistor driven by the PWM output of the Pico. This allows accurate control of motor speed, and thus pitch.

With that sorted out, the project was fleshed out with an OLED screen and a rotary encoder. These allow various patches or scripts to be run on the Pico, controlling the motor speed of the tape player in various ways. With a bit of work, [Issac] was also able to create a function that converted MIDI note values into PWM values that determine various motor speeds.

The natural thing to do next was to put in a tape with a looping sample at a set pitch, and then vary it in a sequence controlled by the Pico. The 8 steps of the sequence can be manually set with the rotary control, and in future, [Issac] even plans to add a real MIDI input, allowing the system to act as a monophonic synth.

If you prefer other routes to pitch shifting shenanigans, check out this project. Video after the break.

Continue reading “Pitch Sequencer Turns Tascam Tape Deck Into Instrument” →
Easy Network Config For IoT Devices With RGBeacon

When you’re hooking up hardware to a network, it can sometimes be a pain to figure out what IP address the device has ended up with. [Bas Pijls] often saw this problem occurring in the classroom, and set about creating a simple method for small devices to communicate their IP address and other data with a minimum of fuss.

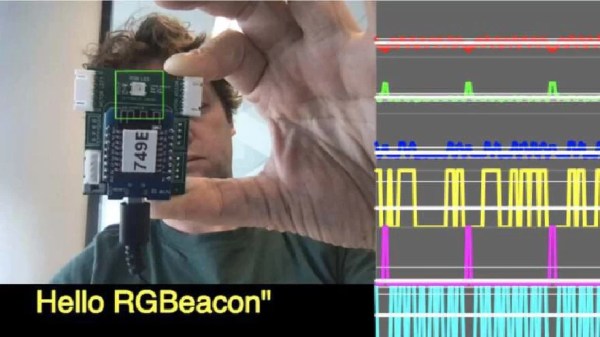
[Bas] specifically wanted a way to do this without adding a display to the hardware, as this would add a lot of complexity and expense to simple IoT devices. Instead, RGBeacon was created, wherin a microcontroller flashes out network information with the aid of a single RGB WS2812B LED.

In fact, all three colors of the RGB LED are used to send information to a computer via a webcam. The red channel flashes out a clock signal, the green channel represents the beginning of a byte, and the blue channel flashes to indicate bits that are high. With a little signal processing, a computer running a Javascript app in a web browser can receive information from a microcontroller flashing its LEDs via a webcam.

It’s a neat hack that should make setting up devices in [Bas]’s classes much easier. It needn’t be limited to network info, either; the code could be repurposed to let a microcontroller flash out other messages, too. It’s not dissimilar from the old Timex Datalink watches which used monitor flashes to communicate!

Caulking Gun Becomes Useful Press Tool For Fuel Line Fittings

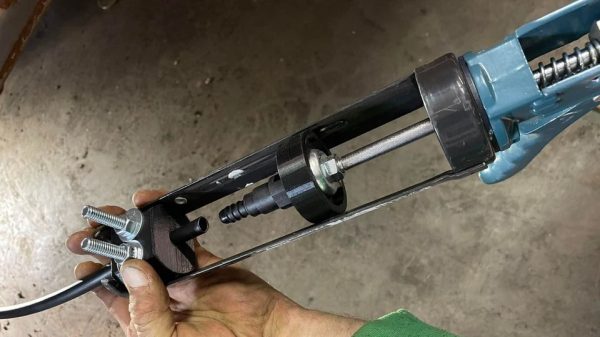
The simple caulking gun is really useful when you’re working on some bathroom repairs or squirting construction adhesives about the place. However, with a few simple mods, it can become a great help in the mechanic’s workshop too.

It’s a great tool for cleanly pushing fittings into nylon fuel line.

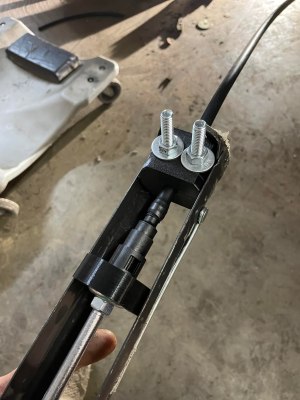
This build consists of a series of 3D-printed parts that can readily be adapted to a garden-variety caulking gun. First up are a pair of fuel line clamps which are fastened together with nuts and bolts, The nylon fuel line is inserted between these, and the bolts are tightened up to hold the line firmly in place at the end of the caulking gun. The fitting to be installed into the line is then placed on the caulking gun’s plunger. It’s then a simple matter of pulling the trigger on the caulking gun to slowly press the fitting into the nylon line.

It’s a great hack which creates a useful linear press with just a few cents of PETG filament. If you find yourself doing a one-off fuel line job on a modern car, this could be just the tool you need. Parts are available on Thingiverse for those eager to print their own. The design is made for 3/8ths inch line, but could readily be modified or recreated to suit other diameters.

3D-printed tools can be useful in all kinds of ways, even in heavy-duty applications like press tooling. It often doesn’t have the same longevity of traditional metal tooling, but for small one-off jobs, the price saving is often more important than the hardiness of the tooling itself. If you’ve whipped up some great 3D-printed tools of your own, don’t hesitate to drop us a line!

A Simple Binary Coded Decimal Watch

Analog and LCD watches are both useful designs, but ultimately are mainstream timepieces. Using a binary watch is an easy way to set one’s self apart as a tech enthusiast, while impressing your hacker friends to boot.

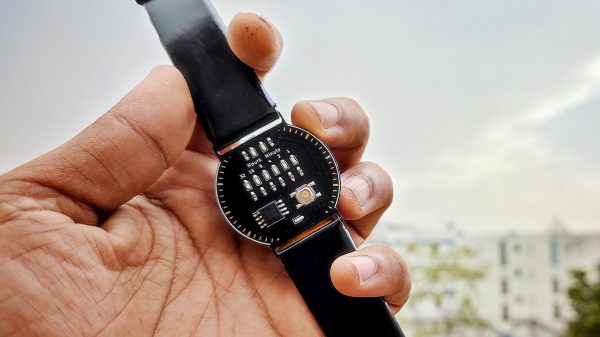
One such build comes to us from [vishalsoniindia], and it uses a single bare PCB which is designed to mate directly to a traditional watch strap. The single tactile button on board is used to activate the watch, showing the current time in hours and minutes in binary-coded decimal on the watch’s LEDs. Long-pressing the button puts the watch in setting mode to correct the time as needed.

The watch relies on an ATtiny85 microcontroller, a lightweight and compact design which is more than powerful enough to run a simple watch. It’s paired with a 74HC595 shift register to run all the LEDs from a minimum number of pins, and there’s also a TP4056 charging circuit on board to keep the lithium-polymer battery topped off.

A project like this is a great way to learn all manner of basic electronics skills, from PCB design, to SMD soldering and even working with basic logic parts like shift registers. As a bonus, you get a cool watch out of it to boot.

We’ve seen some similar designs over the years, as varied as the hackers that build them. Video after the break.

Continue reading “A Simple Binary Coded Decimal Watch” →

Healing Wounds With The Power Of Electricity

Once upon a time, even a simple cut or scrape could be a death sentence. Before germ theory and today’s scientific understanding of medicine, infections ran rampant and took many lives.

While we’re now well-armed with disinfectants, dressings, and antibiotics, scientists are continuing to investigate new and unique methods to improve the treatment of wounds. As it turns out, a little electricity might actually help wounds heal faster.

Continue reading “Healing Wounds With The Power Of Electricity” →

Plinko-Like Build Takes Advantage Of Wireless LEDs

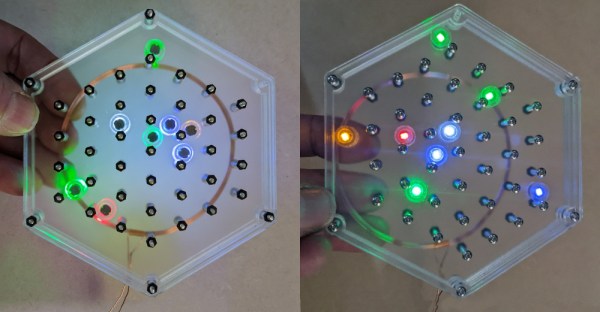
Imagine if you had some magic glowing beads, that would emit beautiful colors without any wires tangling them up. They exist, in the form of wireless induction-powered LEDs, and [Debra] of Geek Mom Projects has been experimenting with them in a new way.

The build takes the wireless LEDs and wraps each one up in a 1/4″-thick clear ring of acrylic. This toughens up the LEDs and helps diffuse their light. They’re then installed in a hexagonal plastic container, featuring a grid of screws not unlike the metal pins of the game Plinko. Thanks to the induction coil mounted behind, the LEDs glow as they ricochet around the metal pins in various ways.

We’d love to see the container full of LEDs mounted on a slowly-turning motor, such that they would tumble around endlessly, glowing all the while. It would be quite mesmerizing, in much the same way as the kaleidoscope project [Debra] built using these parts previously. Video after the break.

Continue reading “Plinko-Like Build Takes Advantage Of Wireless LEDs” →

Automatic Turntable Makes Photogrammetry A Cinch

Photogrammetry is a great way to produce accurate 3D models of real objects. A turntable is often a common tool used in this work as it helps image an object from all angles. [Peter Lin] wanted a way to run the photogrammetry process with minimal human intervention, and set about building an automated turntable setup.

The build relies on a smartphone to take images of the physical object. The phone is triggered to take photos by an ESP8266, which fires the shutter via the phone’s audio socket. The microcontroller then turns the turntable on for a short period of time after each shot, rotating it by a set angle.

The build still requires objects to be repositioned in various orientations on the turntable now and then, in order to capture the top and bottom areas that would otherwise be obscured. However, the grunt work of taking the photos and rotating the objects is now entirely automated.

It’s a useful build for anyone that finds themselves regularly imaging objects to create 3D models. The results of [Peter]’s rig look great, and as a bonus come with life-like textures ready to go. We’ve seen some other great photogrammetry builds before, too. Video after the break.

Continue reading “Automatic Turntable Makes Photogrammetry A Cinch” →