Recycling A Laptop Screen Into A Portable Folding Monitor

There’s plenty of times we’ve seen a laptop fail, break, or just become too slow for purpose despite the fact that it’s still packing some useful components. With all the single-board computers and other experiments lurking about the average hacker workshop, it’s often useful to have a spare screen on hand, and an old laptop is a great way to get one. This recycled display build from [Gregory Sanders] is a great example of how to reuse old hardware.

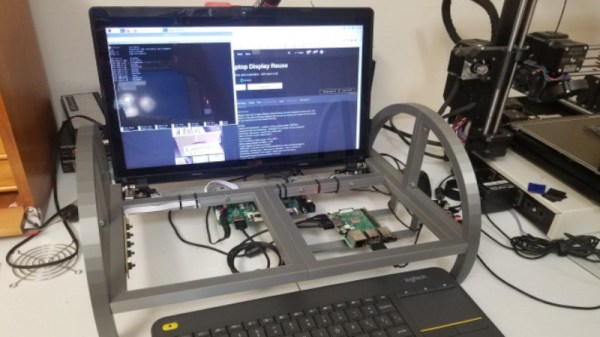
The build doesn’t simply package a laptop monitor in the same way as a regular desktop unit. Instead, [Gregory] designed a custom 3D printed frame with an arch design. The laptop screen is installed onto the frame using its original hinges, and [Gregory] designed in standoffs for an laptop LCD driver board to run the display as well as a generic frame where single-board computers can be installed.

The result is a portable monitor that can be folded up for easy transport, which is also self-supporting with its nice large base. It can also be used with other hardware, as it has a full complement of DVI, HDMI and VGA inputs on board. Of course, while you’re tinkering with laptop displays, you might also consider building yourself a dual-screen laptop as well.

12-Arduino Orchestra Plays Star Wars Fanfare

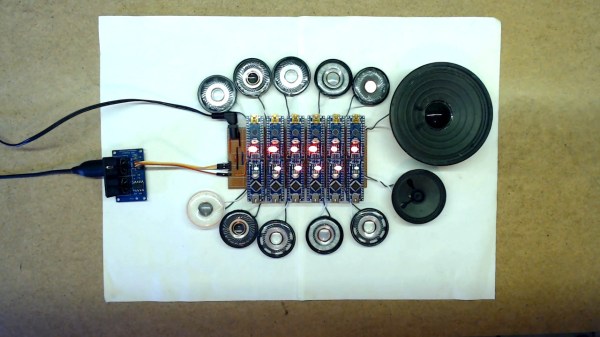
Back in the early days of the musical synthesizer, some designers who wished for polyphony in their instruments would simply build multiple tone-generators for as many notes as they wished to play. [Kevin] took that same approach with his Arduino orchestra, and set about having it play the closing number from Star Wars: A New Hope.

The build consists of twelve Arduino Nanos, each wired up to power, a speaker, and the same MIDI cable. The MIDI cable carries note data for each Arduino on a separate MIDI channel, allowing each to play its own role in the orchestra. [Kevin] then set about arranging the Star Wars music into a MIDI file suitable for the Arduinos, roughly setting six voices to high parts and six voices low. The Arduinos play the notes received using the simple tone() function. The result is a very chiptune rendition of the end of the fourth episode of the world’s most famous space opera.

It may not be neat, tidy, or efficient, but it certainly is fun. Twelve Arduinos bleeping away with their flashing LEDs and cute little speakers makes quite the conversation piece. It’s a similar approach to the Floppotron, which plays more notes by adding more floppy drives. We’ve also seen the same thing done with SEGA sound chips. Video after the break.
Continue reading “12-Arduino Orchestra Plays Star Wars Fanfare” →

A Dual Monitor Setup For The C64, And Yes, It’s VGA Compatible

Few in the 1980s were too fussed about their home computer only supporting a single monitor; indeed, most were satisfied enough by the brand new capabilities on offer at the time. That said, it’s many decades hence, and we really do deserve more. Fear not, for [Ryan Brooks] is here to help with his VG64 VGA Card for the Commodore 64.

The card sits in the cartridge slot of the Commodore 64, and packs a Xilinx CPLD which is responsible for generating the video output signals. It’s hooked up to an SRAM chip which acts as a frame buffer for the video output. Programs can then be loaded on the Commodore 64 which write to the frame buffer, that can then be sent out to an attached VGA monitor hooked up to the cartridge.

It’s not the most useful cart at the moment, as it’s only capable of working with software designed specifically for the hardware. Additionally, it could prove difficult to shift enough data to it to do any kind of fast animation or updates. With that said, it’s an awesome example of just what can be achieved in terms of expanding the Commodore 64, and we’d love to see how far work in this space can go. We’ve seen similar work before, too, albeit with a somewhat smaller 16×2 character LCD. Video after the break.

Continue reading “A Dual Monitor Setup For The C64, And Yes, It’s VGA Compatible” →

A Self-Driving Bicycle Is Something To Marvel At

One of the most annoying things about bicycles is that they don’t stay up on their own, especially when they’re stationary. That’s why they come with stands, after all. That said, if you had plenty of advanced electronic and mechanical equipment fitted to one, you could do something about that, and that’s just what [稚晖君] did.

The video of the project comes without subtitles or any translation, but the gist of it is this. A reaction wheel is fitted to the seat tube, along with a motor which can turn the handlebars via a linkage attached to the head stem. There’s also a motor to drive the bicycle forward via a friction drive to the rear wheel. Combine these with an inertial measurement unit and suitable control system, and you have a bike that can balance while standing perfectly still.

The performance of the system is impressive, and is even able to hold the bike perfectly upright while balanced on a fence rail. Thanks to an onboard camera and LIDAR system, the bike can also drive itself around with no rider on board, which is quite a spooky image. Find a way to do the same while hiding the extra mechanics and you’d have one hell of a Halloween display.

Similar projects have been attempted in the past; we featured a self-balancing bike built as a university project back in the distant past of 2012. Video after the break.

Continue reading “A Self-Driving Bicycle Is Something To Marvel At” →

An Explanation Of A Classic Semiconductor Riddle

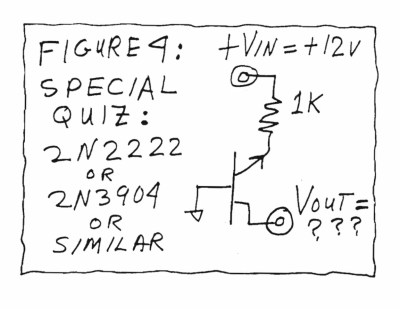
Back in 1996, Bob Pease posed an experiment in an April Fools column. “Take an ordinary NPN transistor, ground the base, pull the emitter up to 12 V with a 1 KΩ resistor and measure the collector voltage referenced to ground.” Do the experiment, and you might be surprised to find a small negative voltage present on the collector. [Filip Piorski] has always loved the riddle, and has explained how it works in a Youtube video.

The key to the trick is the breakdown voltage of the transistor; normally somewhere around 7-8 volts for a typical small NPN transistor. At this point, where the base-emitter junction enters the breakdown regime, it begins to emit light. This light actually travels through the silicon lattice, where it reaches the base-collector junction, which acts like a photodiode under the right conditions. This generates the negative voltage seen at the collector under these conditions.


[Filip] goes on to try the experiment with a TO-3 transistor with the top cut off so he could visualise the effect in action. His photos, taken in a dark room, show tiny flecks of light appearing at spots on the silicon die. If you’ve got more insight on the effect in action, drop a comment below.

It might seem like a simple curiosity, however silicon junctions and their light emissions are an area of active research in semiconductor physics. Video after the break.

Continue reading “An Explanation Of A Classic Semiconductor Riddle” →

Automatic Chessboard Lets Online Players Move The Pieces

Playing chess online is all well and good, and opens up a whole world of competitors that would otherwise be unavailable in one’s local area. But there’s something to be said for playing over the board, which comes up often enough for many players that they refer to it with the acronym OTB. [Carlos] built an automatic chessboard by the name of Phantom, intending to bridge the disparate worlds of chess, from cyberspace to meatspace.

The Phantom board in action.

The basic idea is a chessboard that a player can use in the typical way, moving the pieces on the board as normal. The opposing pieces are then moved automatically to reflect an opposing player’s moves as received from an online chess server.

The board outwardly appears normal, with little to suggest anything is amiss. Only the metallic gleam at the base of each piece gives the game away. Pieces are moved by a SCARA arm hidden inside the board, which uses a magnet to drag them around from position to position. It’s quite something to watch the pieces glide around as if by magic, even more so when one is dragged off the board in a combat situation.

As for the control system, an Arduino Nano 33 IoT handles online connectivity to fetch game data from the Lichess chess server, while an ESP32 is responsible for all the motors, and a regular Arduino Nano scans a matrix of Hall effect sensors responsible for locating pieces on the board.

The system allows for seamless play, detecting when pieces are moved by the player via the Hall effect sensors, and reporting back to the chess server online. Similarly, when the game state is updated, the SCARA arm steps in to move the relevant pieces reflecting the moves of the distant player.

It’s a fun project, and one that will surely light up the many chessheads in the Hackaday community. We’ve seen other automated chess builds before too, like Trap Chess, in which pieces can suddenly fall from the board at any time. Video after the break.

Continue reading “Automatic Chessboard Lets Online Players Move The Pieces” →

Old Phone Becomes MIDI Controller

MIDI controllers come in all shapes and sizes. Commercial products based on keyboards or matrixes of buttons are popular, but there’s nothing stopping you from whipping up your own creations out of whatever strikes your fancy. [Kevin] has done just that, turning an old telephone into a working MIDI device.

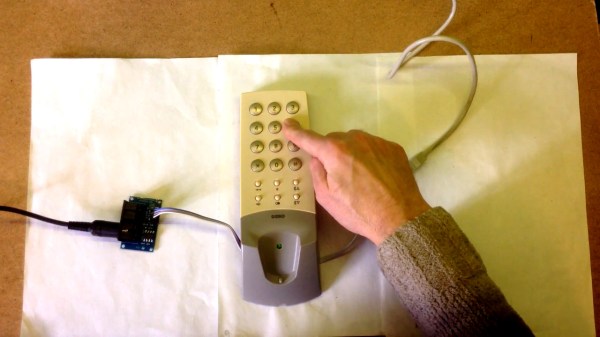
The phone in question is a Doro X20 wired landline phone. Being surplus to [Kevin’s] requirements left it ripe for the hacking. A Raspberry Pi Pico was wired in to the phone’s keypad, slimmed down with a hacksaw in order to allow it to neatly fit inside the original enclosure. Then it was a simple matter of whipping up some code to read the buttons and output MIDI data via the Pico’s serial output.

Later, [Kevin] brought the design into the modern world, setting it up to talk USB MIDI using the Pico’s onboard USB hardware. This makes using it with a computer a cinch, and lets [Kevin] control a DAW using the handset controller.

It’s a fun build, and one that shows how you can easily build your own MIDI hardware using nothing but a soldering iron, some buttons, and a modern microcontroller. From there, the sky really is the limit. Whether you like big knobs, easy playing, or have your own personal tastes, you can build what you like to suit your own style. When you do, drop us a line! Video after the break.

Continue reading “Old Phone Becomes MIDI Controller” →