Wing Can Expand To Fly Really Slow For Short Take-Off And Landing

[Mike Patey] had made a name for himself by building high-performance experimental aircraft. In his latest project, he added a transforming wing that can extend its chord by up to 16 inches for low speed and high angle of attack performance.

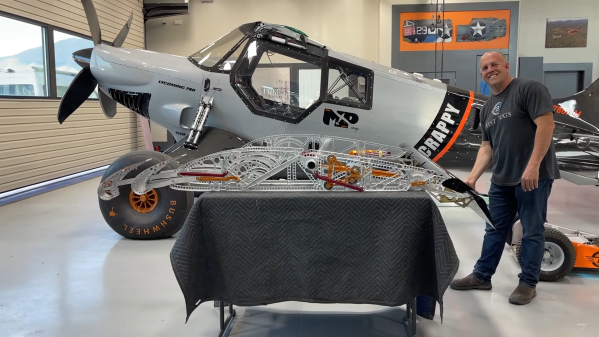
The aircraft in question, a bush plane named Scrappy, has been attracting attention long before [Mike] even started building the wings. Designed for extremely short take-off and landing (STOL) performance, only some sections of the fuselage frame remain from the original Carbon Cub kit. The wings are custom designed and feature double slats on the leading edge, combined with large flaps and drooping ailerons on the trailing edge. The slats form an almost seamless part of the wing for normal flying, but can expand using a series of linkages integrated into each precision machine wing rib. Making extensive use of CFD simulations, the slats were designed to keep the center-of-lift close to the center of the wing, even with 50 degrees of flaps. Without the slats, the pilot would need to use almost all the elevator authority to counteract the flaps and keep the aircraft’s nose up.

Leading-edge slats have been around since before WW2, but you don’t see them used in pairs like this. Aircraft like Scrappy will never be commercially viable, but innovation by people like [Mike] drives aviation forward. [Mike]’s previous project plane, Draco, was a large turboprop bush plane built around a PZL-104 Wilga. Sadly it was destroyed during an ill-considered take-off in 2019, but [Mike] is already planning its successor, Draco-X. Continue reading “Wing Can Expand To Fly Really Slow For Short Take-Off And Landing”

Astronomical Clock Uses Your Spare Clock Motors

We’ll admit we are suckers for clock projects, and the more unusual, the better. We liked the look of [Peter Balch’s] astronomical clock, especially since it was handcrafted and was a relatively simple mechanism. [Peter] admits that it looks like an astronomical clock, but it isn’t the same as a complex instrument from medieval times. Instead, it uses several standard clock motors modified.

We didn’t quite follow some of the explanations for the rotation of the different elements, but the animated GIF cleared it all up. The inner and outer discs are geared at a 6:5 ratio. It takes 2 hours for the inner disc to make one rotation, meaning that every 12 hours the two discs will be back to where they began relative to one another.

Modifying the motors is fine work, requiring a good bit of disassembly and some glue. The electronics that make it tick are quite interesting. To drive the motors, a very specific pulse train is needed, but you also want to conserve battery as much as possible. A simple oscillator with a hex inverter drew more power than desired and an Arduino, even more so. A PIC12F629, though, could sleep a lot and do the job for a very low current consumption. The final clock should run a year on two AA cells.

Is It A Cyberdeck Or A Vintage Toshiba?

Cyberdecks, the portable computers notable for a freely expressed form factor, owe much to post-apocalyptic sci-fi. But they are not always the most practical devices. There’s a reason that all laptops share a very similar form factor: it’s a convenient and functional way to make a computer to take anywhere. So for the ideal compromise, why not make a cyberdeck from a vintage laptop? That’s exactly what [Valrum] has done with a non-functioning Toshiba 3100/20, upgrading the display and slipping in a Raspberry Pi 4, along with a handy removable USB e-ink supplementary screen (The red/black rectangle to the right of the main screen).

These older machines were so bulky that once their original hardware is removed there is plenty of space for upgrades. Even the screen enclosure is big enough to hide the LCD driver board behind a modern panel.  It follows a well-worn path for Raspberry Pi builds of using a Teensy as a USB keyboard controller, but unexpectedly the stock keyboard has been entirely replaced with a hand-wired one, which is nicely executed to appear superficially as though it was original. In an amusing twist this machine has no battery, not because it wouldn’t be possible but because the original Toshiba didn’t have one either. The USB ports are brought out to the space where the floppy would once have been.

With a plentiful supply of unexceptional or non functional older laptops to be had it’s clear that there’s a rich vein to be mined in this type of build. It’s something we’ve seen done before, in a more famous Toshiba laptop.

Skin-Mounted Wearable Bend Sensor Gets Close And Personal

[Mikst] has been working on wearable electronics and sensors for a long time, and shared the results of a different kind of bend sensor that fits directly onto the skin. It’s true that this kind of sensor design isn’t re-usable, but it is also very simple and inexpensive. It’s just a proof of concept right now, but we could see it or some of the other ideas [Mikst] tries, used in niche wearable applications where space is critical, like cosplay.

At its heart the sensor is made from two strands of conductive thread and a small strip of stretchy, conductive fabric common in wearable e-textiles. It is stuck directly to the skin using a transparent, non-woven medical adhesive dressing that is particularly good at conforming to contoured areas of the body. In this case, it is used to stick the stretchy piece of conductive fabric directly onto [Mikst]’s knuckle, where it responds to even small movements. You can watch a multimeter measuring the resistance changes in the video, embedded below.

We’ve seen [Mikst]’s work before in finding unusual solutions to e-textile problems, such as a three-conductor pivoting connection used to mount a wearable hall effect sensor.

Continue reading “Skin-Mounted Wearable Bend Sensor Gets Close And Personal”

Building A Big Ol’ Powerful Wheelbarrow

Sometimes you’ve gotta haul big heavy loads around a wide area. Regular wheelbarrows are fine, but it can quickly grow tiring when one has to make multiple trips. [Workshop from Scratch] instead elected to build a powered wheelbarrow, with plenty of grunt to shift loads about.

The build is absolutely from the ground up, welded up from sections of steel RHS, and given rear steering for plenty of maneuverability. The actual job of steering is handled by a rack repurposed from automotive use, set up with a single-sided attachment to the rear wheel assembly. It’s quite a neat and tidy way of doing the job, and seems to work well. Drive is sent to the front wheels through a hydrostatic lawnmower transmission. A 17-horsepower engine provides plenty of grunt for the job at hand, even coming with electric start already fitted for the ultimate in ease-of-use.

It’s impressive to see just how much of the rig was put together from raw materials; even the fuel tank was fabricated in steel. We’ve seen similar builds from [Workshop from Scratch] before, like this tidy bandsaw. Video after the break.

Continue reading “Building A Big Ol’ Powerful Wheelbarrow”

You Can’t Fix What You Can’t Measure

Last year, as my Corona Hobby™, I took up RC plane flying. I started out with discus-launched gliders, and honestly that’s still my main love, but there’s only so much room for hackery in planes that are designed to be absolutely minimum weight and maximum performance; these are the kind of planes that notice an extra half gram in the tail. So I’ve also built a few crude workhorse planes — the kind of things that you could slap a 60 g decade-old GoPro on and it won’t even really notice. Some have ended their lives in trees, but most have been disassembled and reincarnated — the electronics live on in the next body.

The journey has been really fun. I’ve learned about aerodynamics, gotten an excuse to put together a 4-axis hot-wire CNC styrofoam cutter, and covered everything in sight with carbon fiber tow, which is cheaper than you might think but makes the plane space-age. My current workhorse has bolted on an IMU, GPS, and a minimal Ardupilot setup, though I have yet to really put it through its paces. What’s holding me back is the video link — it just won’t work reliably further than a few hundred meters, and I certainly don’t trust it to get out of line-of-sight.

My suspicion is that the crappy antennas I have are holding me back, which of course is an encouragement to DIY, but measuring antennas in the 5.8 GHz band is tricky. I’d love to just be able to buy one of the cheap vector analyzers that we’ve covered in the past — anyone can make an antenna when they can see what they’re doing — but they top out at 2.4 GHz or lower. No dice. I’m blind in 5.8 GHz.

Of course, I do have one way in, and that’s tapping into the received signal strength indicator (RSSI) of a dedicated 5.8 GHz receiver, and just testing antennas out in practice, but that only gives a sort of loose better-worse indication. More capacitance or more inductance? Plates closer together or further apart? Try it out and see, I guess, but it’s time-consuming.

Moral of the story: don’t take measurement equipment for granted. Imagine trying to build an analog circuit without a voltmeter, or to debug something digital without a logic probe. Sometimes the most important tool is the one that lets you see the problem in the first place.

Fractal Vise Holds Odd-Shaped Objects Tight

A regular vice is great if you want to clamp rectangular objects, but it can fall down a little with more complex shapes. Inspired by an ancient vise [Chris Borge] whipped up his own 3D-printed fractal clamping tool.

The inspiration for this one comes from the [Hand Tool Rescue] video that shows of the clever mechanism. The vice uses a series of interlocking parts that can freely articulate to grip the object of interest via several protruding fingers. In reproducing the design, [Chris] had some issues initially with the joints, but settling on a dovetail similar to that of the original metal vice which got things working nicely.

[Chris] notes that while the design works, it could still use some refinement. Silicone or rubber tips on the fingers could give the vice better grip, and there remain some flexural issues that could be improved. Overall, however, it’s a useful table vice for small jobs on weird shaped things. We’ve seen 3D-printed vices before, particularly in the PCB vice space, but the grip scheme user here is totally unique.

Continue reading “Fractal Vise Holds Odd-Shaped Objects Tight”