Decoding S/PDIF With A Microcontroller Brings A Few Headaches

The average punter shunts audio around with analog 3.5 mm cables, RCA jacks, or Bluetooth on a regular basis. A useful standard that hasn’t really bothered most of us is S/PDIF, standing for Sony/Phillips Digital Interface. It’s a useful way to pump digital audio around over copper cables or optic fiber. [Andrew Jeddeloh] got curious about the standard after contemplating some long cable runs in his home, and decided to try decoding it.

The target for [Andrew]’s development efforts was the STM32L476 Discovery, which had no SPDIF decoding hardware on board. Instead, [Andrew] tinkered with the peripherals he had to see what would work. In the end, a cavalcade of internal timers were daisy chained to allow the microcontroller to recover a clock from the self-clocked S/PDIF signal. This was then used to generate a clock to sync up the onboard SPI hardware to actually read in the 16-bit PCM data from the S/PDIF signal.

[Andrew]’s original broader plan was to pipe the S/PDIF data to the onboard I2S DAC, though he struggled manipulating the remaining resources on the STM chip to do so successfully. Anyone wishing to have a crack can take a look at [Andrew]’s code over on GitHub. If completed, the STM32L476 would become a useful analog endpoint for S/PDIF streams, allowing you to pump tunes digitally over long distances without signal degradation. If you know the key to getting it done, sound off in the comments! Alternatively, if you need to get up and running more quickly, the Teensy platform has you covered!


You Can Now Build Your Own Glowing LED D20 (with A Whopping 2,400 LEDs)

The D20, or twenty-sided die, is most commonly known in the shape of a regular icosahedron. It’s a fantastic, enchanting geometry, and one that has held the balance of fate in innumerable tabletop roleplaying games over the years. It was this sacred geometry that [Greg Davill] chose to bless with the glory of glowing RGB LEDs. Now, [Greg] has shared the files so you can build your own.

The development blog of the D20 is a great read, highlighting the challenges of creating such a compact item that glows so brilliantly. The design uses a full 2400 1.5 mm x 1.5mm LEDs, in the old-school RGB style, split evenly between the twenty sides. That’s right, there’s no fancy self-addressing smart LEDs here — each LED is manually controlled directly by [Greg]’s hardware. A SAMD51 and ICE40UP5K FPGA are put to work running the displays. Each panel is held together in a barely-there 3D printed frame, linked together with ribbon cables to keep things compact. A Sony camera battery is slotted inside the tight confines of the frame to supply the necessary power.

We first covered the project late last year, and it’s great to see it out there now in a form that’s readily reproduced. Assembly of such a board is not for the faint of heart, however, with plenty of fine SMD parts to tangle with. We suspect this is just yet another salvo in the ongoing arms race of LED glowables, and we can’t wait to see what [Greg] — and the rest of the community — comes out with next. If you’ve got a lead on the new glowing hotness, let us know. Video after the break.

Continue reading “You Can Now Build Your Own Glowing LED D20 (with A Whopping 2,400 LEDs)” →

Finger Bend Is A Textile Flex Sensor You Can Sew At Home

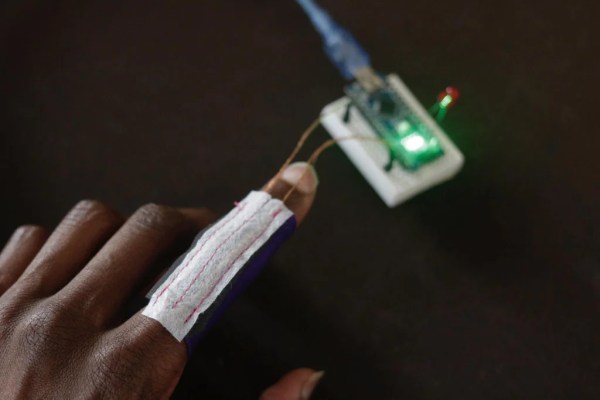
So often, we use control devices for electronics that involve our fingers directly grasping, touching, or moving another object or surface. It’s less common for us to use interfaces that detect the motion of our bodies directly. Flex sensors are one way to do that, and it’s exactly what [WillpowerStudios] aims to do with Finger Bend.

The construction of the sensor is simple, using piezoresistive fabric which changes its resistance when deformed. By sewing this into a sheath that can be placed on the finger, and wiring it up with conductive threads, it can be used to detect the flexion of the wearer’s digits by sampling the resistance with an analog to digital converter on any garden variety microcontroller. Expanding the technique to a full hand is as simple as creating a Finger Bend per digit and wiring up each one to its own ADC channel. If you want to get really fancy, you could even scan through them at speed with a multiplexer.

It’s similar to the technology used in Nintendo’s infamous Power Glove, and while it’s never caught on in the mainstream, it may have applications yet. Video after the break

Continue reading “Finger Bend Is A Textile Flex Sensor You Can Sew At Home” →

Micro Quadcopter Designed In OpenSCAD

Quadcopters are fantastical things, and now come in a huge variety of flavours, from lithe featherweight racers to industrial-grade filming rigs worth tens of thousands of dollars. The Beatle-1 from [masterdezign] comes in at the smaller scale, and its body was created entirely in code.

To create the Beatle-1, [masterdezign] used OpenSCAD, a 3D modelling program that uses code rather than visual tools for producing geometry. Thus, with a series of Boolean operations, extrusions and rotations, a basic lightweight quadcopter frame is created in a handful of lines of text. Then, it’s just a simple job of 3D printing the parts, wiring up four Olimex F1607 motors and hooking up a flight controller and the little drone is ready for takeoff.

The Beatle-1 serves as not only a fun flying toy but also a great example of applying OpenSCAD modelling techniques to real-world applications. Parts are available on Thingiverse for those wishing to roll their own. 3D printed drone frames are popular, and we’ve seen a few around these parts before. Video after the break.

Continue reading “Micro Quadcopter Designed In OpenSCAD” →

Slimming The Raspberry Pi Pico With A Hacksaw

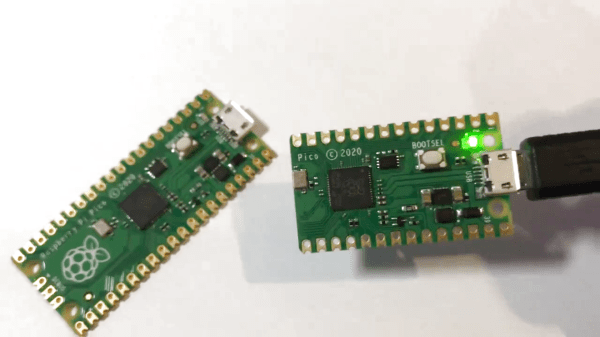
The Raspberry Pi Pico is the hot new star of the microcontroller scene, with its fancy IO hardware and serious name recognition. Based on the RP2040 “Raspberry Silicon” chip, it’s introducing fans of the single-board computer line to a lower level of embedded development. The Pico isn’t big, as its name suggests, but miniaturization is a never ending quest for improvement – so [That Dragon Guy] decided to see if the devboard could be smallified further at a minimum of cost.

While other smaller RP2040 boards are reaching the marketplace, they all cost a lot more than the $4 of the Pico. Thus, [That Dragon Guy] got creative. Having realised that the bottom section of the board was only full of passive traces and pads, he simply hacked it off with a scroll saw and sander. This gives a 30% reduction in footprint, at the cost of some mounting holes, GPIO pins and the debug interface.

In testing, the rest of the board continued to function perfectly well, so we’re calling this a win. It builds on amusing experiments [That Dragon Guy] had done before with the Raspberry Pi B+ which gave us a good chuckle. The Raspberry Pi has always been a minimalist darling, with the Pi Zero of 2015 being a bit of a gamechanger, and much beloved by this writer. Video after the break.

Continue reading “Slimming The Raspberry Pi Pico With A Hacksaw” →

Vintage Spectrometer Gets Modern Interface Upgrade

There’s plenty of specialized, high-end scientific equipment out there running on antique hardware and software. It’s not uncommon for old lab equipment to run on DOS or other ancient operating systems. When these expensive tools get put out to pasture, they often end up in the hands of hackers, who, without the benefit of manuals or support, may try and get them going again. [macona] is trying to do just that with a 740AD spectrometer, built by Optronic Laboratories in the 1990s.

Originally, the device shipped with a whole computer – a Leading Edge 386SX25 PC running DOS and Windows 3.0. The tools to run the spectrometer were coded in BASIC. Armed with the source code, [macona] was able to recreate the functionality in LabVIEW. To replace the original ISA interface board, an Advantech USB-4751 digital IO module was used instead, which dovetailed nicely with its inbuilt LabVIEW support.

With things back up and running, [macona] has put the hardware through its paces, testing the performance of some IR camera filters. Apparently, the hardware, or the same model, was once used to test the quantum efficiency of CCDs used on the Hubble Space Telescope.

Seeing old lab equipment saved from the scrap bin is great, but you can’t always rely on what you want being thrown out. In those cases, you’ve got to build your own from the ground up. Video after the break.

Continue reading “Vintage Spectrometer Gets Modern Interface Upgrade” →

Off-The-Shelf Parts Make A Tidy Heater For Resin Printer

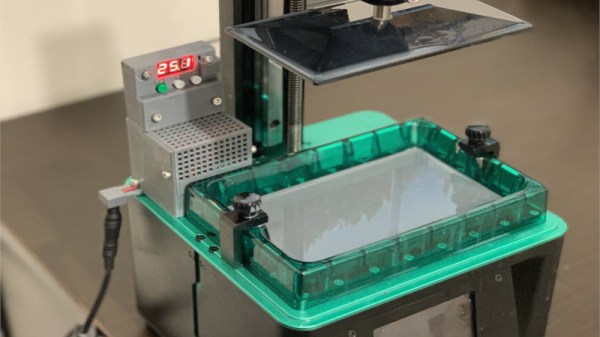
Resin printers can offer excellent surface finish and higher detail than other 3D printing technologies, but they come with their own set of drawbacks. One is that they’re quite sensitive to temperature, generally requiring the resin chamber to be heated to 25-30 degrees Celsius for good performance. To help maintain a stable temperature without a lot of mucking around, [Grant] put together a simple chamber heater for his printer at home.

Rather than go for a custom build from scratch with a microcontroller, [Grant] was well aware that off-the-shelf solutions could easily do the job. Thus, a W1209 temperature control board was selected, available for under $5 online. Hooked up to a thermocouple, it can switch heating elements via its onboard relay to maintain the set temperature desired. In this case, [Grant] chose a set of positive-temperature coefficient heating elements to do the job, installing them around the resin chamber for efficiency.

The heater can preheat the chamber in under fifteen minutes, much quicker than other solutions using space heaters or heat mats. The time savings will be much appreciated by [Grant], we’re sure, along with the attendant increase in print quality.  If you’re still not sure if resin printing is for you, have a read of our primer. And, if you’ve got your own workflow improvements for resin printing, drop us a line!