
Big Infinity Mirror Clock Invites You To Gaze Deeply

[Andy Huot] has a fantastic-looking infinity mirror digital clock that really raises the bar. It uses high quality components, smart use of RGB LED animations, and a clever “stacked diffuser” vertical design to the 7-segment display elements that really enhances the infinity mirror effect. It needs to be seen in action, so check it out.

The end result is expressly portal-like, with the smooth animations of the LEDs really playing into the effect. The size helps, too. It’s 24 inches in diameter, giving it considerable presence.
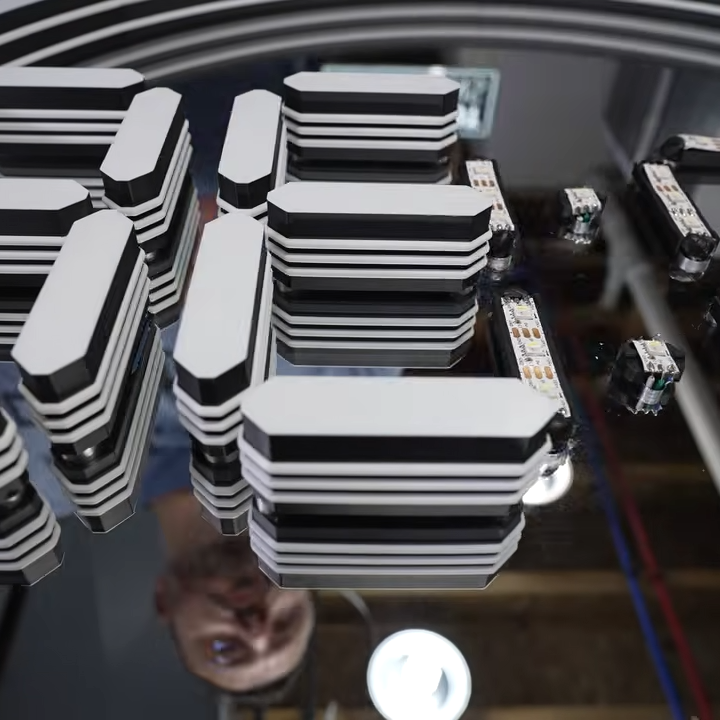
The stacked diffuser design for each display element really enhances the effect.

A basic infinity mirror design consists of lit elements sandwiched between a reflective back surface and a partially-reflective, partially-transmissive top cover. That same basic principle is used here, but with great care given to ensure nothing so much as a fingerprint spoils the illusion. For example, the top cover is a disk of acrylic with a 90% reflective film affixed to the inside surface. That’s easy enough to DIY with some car tint, but [Andy] found that for the very best results it was worth having high-quality film professionally applied.

We like the use of 3D-printed custom jigs for soldering the segments of RGB LED strips, and holding the pre-measured wires in place with some putty is a great way to keep them in place while working. In case you’re wondering, the mirrored acrylic making up the back wall has holes in it for mounting each segment’s LED strip in a holder, and running the wires to the rear.

The video (embedded below) documents every step of the assembly, and it’s a serious build. While the design files for the 3D-printed parts are not free, there’s certainly enough detail for an enterprising hacker to replicate the design in their own way.

Continue reading “Big Infinity Mirror Clock Invites You To Gaze Deeply”
This Mac Is Open Source Hardware

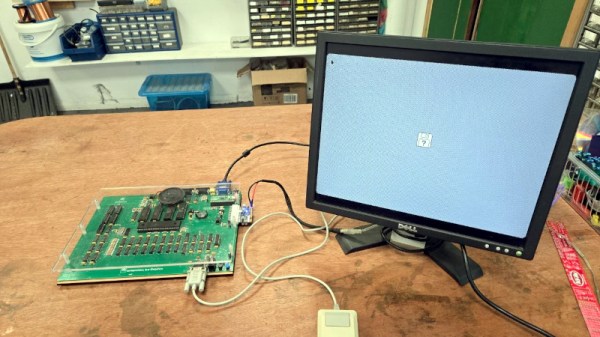
Apple hardware has always been proprietary, sometimes to an extreme. But that’s not to say that it’s impossible to make something that does the same job, which is what [DosFox1] appears to have done with the OSHintosh. It’s an open source PCB that implements a Mac 512k. Is it a 68k Hackintosh? You decide.

While it boots into a classic Mac OS image, it’s not quite a Mac. For a start, there are no disks, and no SCSI. Instead it boots from a disk held in ROM, which we guess will be a lot faster than the floppy from back in the day. They’ve even managed to do it on a 2-layer board, which means that despite its size, it shouldn’t be too expensive to have made.

We’re not sure quite what the legality of dumping a Mac ROM image to the ROM on this board would be, but assume for a moment that you own a copy in a defunct original Mac. This board can’t yet replace the original due to the disk issue, but given that original Macs are now long in the tooth, a modern replacement for those who must have hardware rather than an emulator sounds like a good idea. Perhaps for some people it will join the FPGA Amiga.

Supercon Is Nigh!

The 2026 Hackaday Superconference is just around the corner in November. It’s hard to believe that we’ve been having an annual gathering for so long, but this is number ten. Every year, it’s a great time to refresh your pool of new ideas, hang out with fellow hackers, put your soldering skills to the test, eat some phenomenal tacos, and catch some of the two tracks of talks.

What’s got me stoked right now is that we just finished up talk selection, and this year is going to be a banger! We had more talks submitted than ever, and all of high quality. Frankly, if this keeps up for next year, we might have to figure out a third stage.

This year also marks the move to a bigger venue, with more space for hacking in the courtyard, more space for talks in two halls, and more room for you to all settle down and share your work, or create something new. Even the badge is going to be bigger this year – but that’s all we can say at this time.

If you don’t have your tickets yet, go ahead and get them. Flights are still relatively cheap, and hotels not booked up yet. See you all soon!

The Heavy Disco-Ball Satellite Designed To Do… Nothing

Launched in 1976, LAGEOS-1 (LAser GEOdynamic Satellite) is unusual in that it contains no instrumentation, no electronics, no power supply, and no means of propulsion. It’s spherical, weighs just under 407 kg, and looks a bit like a disco ball. It may not be accurate to say it does nothing, but unlike most satellites its role is entirely passive. It’s also one of the oldest scientific satellites still in service.

The lens-like objects covering the surface of LAGEOS-1 are corner cube retroreflectors, which have the nifty effect of always reflecting incident light right back towards its source.

Ground stations fire short laser pulses at it and measure the time it takes for the light to return, a form of time-of-flight ranging. Since LAGEOS-1’s orbit is highly stable, it provides a reliable reference point for measuring even tiny changes in the Earth itself. The size, shape, rotation, and more of our planet can be measured as a result. LAGEOS data (LAGEOS-2 was launched in 1992) has also been used in tests of general relativity.

Its orbit and construction were deliberately chosen so that atmospheric drag and other disturbances would be minimal. The simple, maintenance-free design combined with an extraordinarily stable orbit means LAGEOS is expected to circle our world for millions of years to come.

LAGEOS-1 also contains a message to the future in the form of two identical plaques prepared by Dr. Carl Sagan just in case there’s anyone around to find it some day. Check out the short 1975 video from NASA, embedded just below.

Continue reading “The Heavy Disco-Ball Satellite Designed To Do… Nothing”

Looking At A TRS-80 12 MB External Hard Drive From 1983

Although hard disks weren’t a common feature yet in many home computers in the 1980s, they were becoming increasingly more affordable. For relative meanings of the word ‘affordable’, naturally. This is illustrated by the 12 MB HDD for the Radio Shack TRS-80 that [Clint] over at LGR recently took a peek at.

Costing a cool $3,495 in 1983 – or $11,932 in 2026 USD – this 12 MB storage wonder used a Tandon TM-603 full-height 5.25″ HDD inside. Lacking a working TRS-80 to try it out with, the video is limited to just a basic powering up and opening up of the unit, but [Clint] will be donating it to a computer museum who can hopefully put it to use again.

The connection to the TRS-80 computer is handled by a ribbon cable, while the HDD has its own built-in power supply, rated at 60 Watt.

On the main board for the external HDD controller there is a Signetics 8X300 microprocessor that forms the brains of what makes it into an external drive for the TRS-80. Despite its age, it still looks brand new inside, so despite the Rifa capacitors in the PSU, [Clint] decided to power it on. This resulted in an auditory experience that’s probably best compared to a very rusty jet engine spinning up after languishing for a decade prior to spooling up for take-off.

Hopefully we’ll find out whether this particular unit and its HDD are still working in 2026.

Continue reading “Looking At A TRS-80 12 MB External Hard Drive From 1983”

How To Fold Curved Lines In Metal Without Fancy Tools

Folding a sheet of metal in a straight line is one thing, but how does one fold multiple curved lines into a sheet of aluminum without fancy machines? [John] demonstrates how to do exactly that with little more than hand tools and a fair bit of patience. The secret is drilling a lot of small holes along each fold line.

Complex shapes are possible with planning, hand tools, and patience.

First, a bit of background. [John] wanted to fabricate a curved piece of aluminum as cover that would match the sleek aerodynamic lines of a Belly Tank Lakester. The trick is that there isn’t a single straight line to be found, and the fold lines are all curves. How can one do such folding with only hand tools?

[John] found that fabrication was possible by drilling small holes all along each fold line, then carefully bending as needed. The line of holes weakens the metal, acting like a score line, and allow the required curves to be made cleanly. There’s some finishing work and straightening involved, but the hard part of making the actual folds is taken care of.

One method that didn’t work was cutting a shallow groove in the metal to create something like a pre-scored fold line. [John] tried this and found that while the metal does indeed fold along the weakened line, the aluminum tends to crack in the process. When making a line of holes instead, the metal between each hole bends nicely.

This technique does mean the finished part ends up with small perforations along each fold, but the part is mounted on the bottom of the car and [John] says that he’d have to look quite closely to notice. A little polishing goes a long way, too.

We have covered many ways to bend sheet metal and while machinery exists to do it exceedingly well, great results can be had with little more than simple tools and some patience.

Watch [John] go through the process in the video embedded below, or skip to 7:55 if you just want to see the end result.

Continue reading “How To Fold Curved Lines In Metal Without Fancy Tools”

Trying To Fix A Suspiciously Cheap Enterprise-Grade Network Switch

When you see a listing for an Ethernet switch whose specification list is in effect ‘yes’, with a four-digit price tag when new, and with the seller asking for less than 10% of said $3,000 asking price in an ‘untested’ condition, the only rational thing to do is of course to mash that ‘buy’ button. This is what [This Does Not Compute] did, and created a video about to show what a great investment decision this was.

Naturally this Juniper EX4100-F-12P switch came without power supply brick for its 48VDC input. Figuring out its pin-out and probing said input showed that the voltage rails had been shorted, giving a first clue as to why this switch had been on sale for so very cheap. Bravely hoping that it would be a straightforward fix, the unit was disassembled.

With a 280 Watt power brick, it’s little wonder that the top of the unit is a one massive aluminium heatsink, including a large heatpipe. Also visible on the lid near the power input was a very-bad-news black skid mark.

From that first discovery the news just got worse and worse, with clear signs of water ingression, rust and corrosion, along with the aftermath of a powered circuit meeting such bad corrosion. After some clean-up it’s clear that some components had violently exploded, ripping apart layers of the PCB and likely parts of traces in those inner sections too.

With no schematics available and no other good repair options via Juniper or anywhere else, it seems that unfortunately this gamble turned out to be merely a pile of e-waste and a few bucks worth of scrap metal. Caveat emptor, once more.

Continue reading “Trying To Fix A Suspiciously Cheap Enterprise-Grade Network Switch”