Is That A Coaster? No, It’s An LED Matrix!

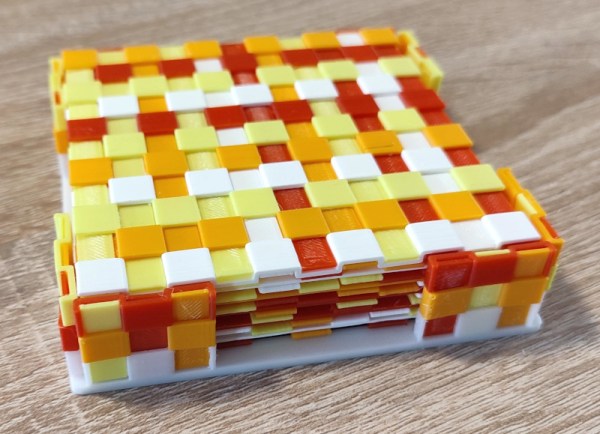
I’m sure you all love to see some colorful blinkenlights every now and then, and we are of course no exception. While these might look like coasters at a distance, do not be deceived! They’re actually [bitluni]’s latest project!

[bitluni]’s high-fidelity LED matrix started life as some 8×8 LED matrices lying on the shelf for 10 years taunting him – admit it, we’re all guilty of this – before he finally decided to make something with them. That idea took the form of a tileable display with the help of some magnets and pogo pins, which is certainly a very satisfying way to connect these oddly futuristic blinky coasters together.

It all starts with some schematics and a PCB. Because the CH32V208 has an annoying package to solder, [bitluni] opted to have the PCB fab do placement for him. Unfortunately, though, and like any good prototype, it needed a bodge! [bitluni] had accidentally mirrored a chip in the schematic, meaning he had to solder one of the SMD chips on upside-down, “dead bug mode”. Fortunately, the rest was seemingly more successful, because with a little 3D-printed case and some fancy programming, the tiny tiles came to life in all of their rainbow-barfing glory. Sure, the pogo pins were less reliable than desired, but [bitluni] has some ideas for a future version we’re very much looking forward to.

Video after the break.
Continue reading “Is That A Coaster? No, It’s An LED Matrix!”

Robot Arm Gives Kids The Roller Coaster Ride Of Their Lives

Unfortunately, [Dave Niewinski]’s kids are still too little to go on a real roller coaster. But they’re certainly big enough to be tossed around by this giant robot arm roller coaster simulator.

As to the question of why [Dave] has a Kuka KR 150 robot in his house, we prefer to leave that unasked and move forward. And apparently, this isn’t his first attempt at using the industrial robot as a motion simulator. That attempt revealed a few structural problems with the attachment between the rider’s chair and the robot’s wrist. After redesigning the frame with stouter metal and adding a small form-factor gaming PC and a curved monitor in front of the seat, [Dave] was ready to figure out how to make the arm simulate the motions of a roller coaster.

Now, if you ever thought the world would be a better place if only we had a roller coaster database complete with 4k 60 fps video captured from real coasters, you’re in luck. CoasterStats not only exists, but it also includes six-axis accelerometer data from real rides of coasters across Europe. That gave [Dave] the raw data he needed, but getting it translated into robot motions that simulate the feeling of the ride was a bit tricky. [Dave] goes into the physics of it all in the video below, but suffice it to say that the result is pretty cool.

More after the break.

Continue reading “Robot Arm Gives Kids The Roller Coaster Ride Of Their Lives”

Goldilocks Beverage Coaster Tells You When It’s Just Right

If you ask us, morning is the only excuse we need for a hot caffeinated beverage — weather be damned. Wherever [gokux] is, they may be experiencing actual winter this year, given that they are out there getting cozy with a hot cup of what-have-you. But how do they know it’s at the right temperature for drinking? Enter the temperature-monitoring smart coaster.

At the heart of this build is a GY-906 infrared temperature sensor, which senses the warmth (or lack thereof) and displays the degrees on a small OLED screen thanks to a Seeed Xiao SAMD21. To make things simple, there is also an ideogram that corresponds to the current temperature — snowflake for too cold, danger sign for too hot, and thumbs up for that just-right range. Although this coaster is mostly 3D-printed, the mug sits on a slotted piece of aluminium that is removable for easy cleaning. This would be a good-looking and useful addition to any desk.

This is isn’t the first temperature-indicating beverage coaster we’ve seen. The most recent one ultimately used a probe, which is likely about as accurate (and messy) as you can get with these things.

Beverage Coaster Indicates Ideal Drinking Temperature

When temperatures plummet, there’s nothing like a hot beverage to keep you warmed up inside. [Palingenesis] aka [Tim] sure does fancy a nice cuppa, but only within a certain temperature range is it ideal to drink. In an attempt to signal when the time is just right, he created various iterations of a hot beverage coaster.

To be clear, this is a plywood sandwich that does not keep the beverage warm, though that would be an interesting addition to the project. Rather, it indicates when the beverage’s temperature is just right using LEDs. When it’s too hot, the red LEDs are lit. The green LEDs flash while it’s just right, and once [Tim]’s tea has gone cold, the blue LEDs take center stage.

The brains of the operation is an STM8S103F module, aka the Blue Pill, which is paired with a DS18B20 temperature sensor. [Tim]’s original coaster has one in a TO-92 package embedded in the top layer, but ultimately he went with the probe version as it reads a truer temperature by virtue of being directly in the liquid. Be sure to check out the video after the break which covers planning the original version.

If you do want to keep you drink warm, here’s an ESP8266-based solution. If you’re more into looks, check out this blinkencoaster.

Continue reading “Beverage Coaster Indicates Ideal Drinking Temperature”

3D-Printed Woven Coasters Save Tabletops In Style

When regular people think of 3D printing, they likely imagine semi-newfangled objects like twisty vases and useless trinkets. But there is so much more to 3D printing, as [andrei.erdei]’s printed, woven coasters demonstrate.

The design is based on the stake and strand basket weaving technique, which uses rigid strips called stakes in one direction and thinner strips called strands in the other. Since the flexibility of PLA is questionable, [andrei] printed the stakes already bent in a square wave pattern that accommodates the strands fairly easily. To tie the coasters together and make them look more polished and commercial, [andrei] designed a holder as well.

The awesome thing about this technique is that you can do so much with it, like varying the stakes’ widths or making them diagonal instead of square. [andrei] designed these in Tinkercad using Codeblocks; of course, they are open source. Be sure to check out the assembly video after the break.

Continue reading “3D-Printed Woven Coasters Save Tabletops In Style”

Gumball Coaster Is 3D-Printed Candy Fun

Marble runs are fun enough on their own, but what if you could eat the marbles? Gumballs are the satisfying answer to that question. To that end, [Adrian Seeley] whipped up a system for producing gumball runs programmatically for entertainment and candy dispensing purposes.

Track descriptions can be coded via basic instructions outlining a marble run, by typing out the order of straights, turns, and ramps that make up the course. Once created as a JSON file, the track description is processed via Javascript to create a tiled physical representation of the track via OpenSCAD, including all necessary support structures. The pieces can then be 3D printed to create an actual physical gumball run that can be easily assembled.

[Adrian] created a small tabletop “gumcoaster” as a prototype. Even at that size, it took 11 hours to assemble. It served as a trial run ahead of a larger version he hopes to build for a candy store display. We’ve seen some great marble runs before too, including those created via procedural generation. Video after the break.

Continue reading “Gumball Coaster Is 3D-Printed Candy Fun”

ESP8266 Coaster Keeps Your Drink Warm

Looking for the perfect winter desk accessory? [Wq] has created a beautiful coaster made out of PCBs  that can keep your drink warm with an internal heater. (Chinese).

An ESP8266 sits as the main controller, with an additional MQTT control option, where the whole unit is powered over a USB-C connection. On board PCB traces, in the shape of a Hilbert curve, create the heating element used to heat beverages placed on the coaster, where [Wq] reports a measured resistance of the PCB trace network at 1.2 ohms. [Wq] writes that an AON6324 MOSFET replaces the D4184 that was previously being used, but might need some testing to get working properly. There are two capacitive touch sensors which has a TTP223E capacitive touch controller attached to detect input, with a multi-colored FM-3528 RGB LED for user feedback.

We love the artistry that went into building the coaster. For adventurous hackers wanting to build their own, the bill of materials (BOM), source code and board files are all available. We’ve seen everything from coasters and to PCB reflow boards, so it’s nice to see experimentation with a combination of these ideas.