NFC Business Cards To FPGA Cubes, Skull Badges To Bandoliers, Here’s The Hardware From Breakfast At DEF CON

We had our biggest Breakfast at DEF CON ever on Sunday. So big, in fact, that the carefully laid plans went awry immediately.

This is the fifth year we’ve hosted the event, which kicks off the final day of DEF CON with some hardware show-and-tell. We really thought we had it all figured out, since this time we actually booked a space in Paris hotel. For the first three years we were just banditing the space — asking everyone to show up at this place and it’ll become an event. Last year we planned to have it in the Hardware Hacking Village, but the casino stopped us from bringing in pastries that morning and we ended up camping out in a dining area that wasn’t open until the afternoon.

Last weekend we had a cafe booked, with pastries and coffee on order. The only problem is that you are all too awesome. We had a couple hundred people show up and the cafe didn’t want us standing, which limited our space to the number of booth seats available. No worries, as is the tradition we spilled out into a lounge area on the casino floor and enjoyed ourselves!

Here’s some of the hardware that showed up at this gathering.

Continue reading “NFC Business Cards To FPGA Cubes, Skull Badges To Bandoliers, Here’s The Hardware From Breakfast At DEF CON”

Simulated Newton’s Cradle Makes A Flashy Desk Toy

Newton’s Cradle was once upon a time, a popular desk toy in offices around the world. For [TecnoProfesor], however, it wasn’t quite flashy enough. Instead, they built a simulated version with flashing LEDs. As you do.

Rather than relying on the basic principles of the cradle to make it work, this relies on two servo motors to move the balls on the ends, with the ones in the middle remaining stationary. Each ball is fitted with an RGB LED, which flashes with the simulated “motion” of the cradle. By using ping pong balls, the light from the LEDs is nicely diffused. The frame is built from wooden dowels, metal rods, and acrylic.

It’s a project that is sure to confuse at first glance, but it’s a great way to learn basic microcontroller skills like interfacing with LEDs and servomotors. We’d love to see a version that works like a real Newton’s Cradle, flashing the LEDs as they are hit by their neighbours. We’ve even seen them automated, for the truly lazy among us.  Alternatively, one could go completely ridiculous and have such a device tweet on every hit, though you might run afoul of the API’s spam restrictions. If you give it a go, drop us a line.

Keep The Kids Entertained With A Time Machine

We often hear it said that today’s kids don’t go out and play as much as they did in the past, but honestly, it’s hard to really blame them. Have you seen some of the games they have now? It’s going to take something a little more exciting than a game of stickball to get them off the couch when they’ve got 4K and VR game systems to play with.

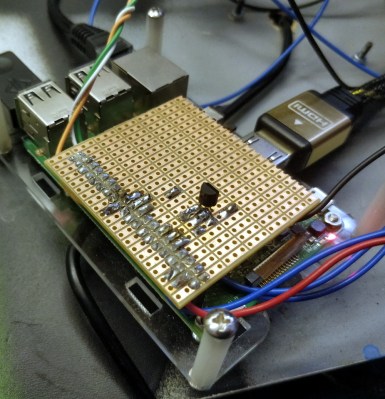
Circuit to control ATX PSU

Which is exactly why [Bobek] is building his kids a time machine. Not a literal one, of course. The Flux Capacitor technology required has yet to be mastered. But it does allow the player to “travel” through time through videos which are played by punching in specific codes they have to unlock by solving puzzles in the real world. Then again, keeping keeping kids active and mentally engaged might as well be “going back in time” in some people’s eyes.

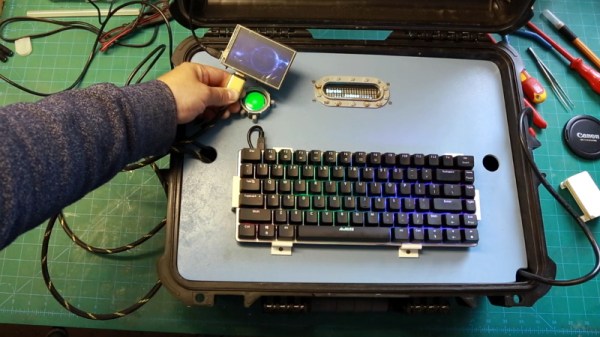
By the looks of things, [Bobek] still has a little work to do on the project, but it’s far enough along that we can get an idea. Inside the bottom of the heavy duty plastic case he’s installed an ATX power supply and a Raspberry Pi 3, and an top of that, there’s a metal plate that holds the power button, an RGB backlit keyboard, and a Vacuum Florescent Display.

After powering on the system, the kids punch in the codes they’ve earned on the keyboard. If accepted, it starts the corresponding presentation which goes over the sights and sounds of the time period they’ve unlocked. In the video after the break you can see [Bobek] test the device with a small display hanging off the end of an HDMI cable, but presumably the system will eventually get an integrated display. The kids could also plug it into the TV, but at that point you might be going full circle.

We’ve seen several examples of hackers creating their own electronic gadgets to keep their children entertained. The line might be a little blurry, but we’d rather see kids use their imagination to “fly” a spaceship in their bedroom than play Roblox on their phone.

Continue reading “Keep The Kids Entertained With A Time Machine”

First WOPR Summit Finds The Winning Move

At the climax of 1983’s “WarGames”, the War Operation Plan Response (WOPR) computer famously opines “The only winning move is not to play” when presented with a barrage of no-win scenarios depicting global thermonuclear war. While the stakes aren’t quite as high when it comes to putting on a brand new hacker convention, there’s certainly enough pitfalls that most of us would take WOPR’s advice and never even try. But for those who attended the inaugural WOPR Summit in Atlantic City, it was clear that not only did the team behind it have the tenacity to play the game, but that they managed to prove their supercomputer namesake wrong.

That’s not to say there isn’t room for improvement going forward, but it was hard not to be impressed by such a strong initial showing. The WOPR Summit organizers not only had to contend with the myriad of things that could go wrong, but they had to deal with what actually did go wrong; such as a sizable storm hitting the New Jersey coast just as the event got rolling. Yet from the attendees perspective the weekend-long event went off without a hitch, and everyone I spoke to was excited for what the future holds for this brand-new East Coast event.

It’s never easy to capture 20+ hours worth of talks, workshops, and hands-on projects into a few articles, but we do our best for the good readers of Hackaday. Below you’ll find just a few of the highlights from the first-ever WOPR Summit, but it’s nothing quite like attending one of these events in person. This far out we don’t know when and where the next WOPR Summit will take place, but you can be sure that Hackaday will be there; and so should you.

Continue reading “First WOPR Summit Finds The Winning Move”

Computer Algebra For Electronic Design

Don’t get me wrong. Like most people, there’s nothing I enjoy more than solving a long, involved math problem by hand. But, sometimes, a few pages of algebraic scratches on paper is just a means to an end. I find this especially true during electronic design sessions, be it circuit design or PCB layout; I just need the answer, and any time spent finding it distracts me from the larger task at hand. For me, at least, this seems to happen at least once a week, and about five years ago I decided to do something about it. I had heard of computer algebra packages, of course, but they weren’t taught as part of the undergraduate engineering curriculum when I went to school. So, I set about learning one: let the computers do the math!

The package I chose is wxMaxima, a document-based front-end to the Maxima computer-algebra system. Descended from code originally written in the late 1960s, it’s a general-purpose package supporting symbolic computation for algebra and calculus. There’s solid, mature code underneath with a modern UI veneer on top. Plus, it’s FOSS.

As I’ve progressed, I’ve found that some additional functions make the Maxima environment especially convenient for circuit design. A few are simple enough that I’d typically just re-create them as needed, so I never really got organized – there were several versions of my “library” floating around on various machines. I finally got my act together, cleaned up the most-frequently used functions, and put them into a GitHub repo.

Let’s have a look at how we can use them to take the tedium out of math for some design problems.

Continue reading “Computer Algebra For Electronic Design”

One More Weekend To Sculpt Your Circuits!

Drop what you’re doing and get thee to thy workshop. This is the last weekend of the Hackaday Circuit Sculpture Contest, the perfect chance for you to exercise the creative hacker within by building something artistic using stuff you already have on hand.

The concept is simple: build a sculpture where the electronic circuit is the sculpture. Wire the components up in a way that shows off that wiring, and uses it as the structure of the art piece. Seven top finishers will win prizes, but really we want to see everyone give this a try because the results are so cool! Need proof? Check out all the entries, then ooh and ah over a few we’ve picked out below. You have until this Tuesday at noon Pacific time to get in the game.

These are just three awesome examples of the different styles we’ve seen so far in the contest. Who needs a circuit board for a retro computer? Most people… but apparently not [Matseng] as this Z80 computer is freformed yet still interactive.

Really there can’t be many things more horrifying than the thought of spider robots, but somehow [Sunny] has taken away all of our fears. The 555 spider project takes “dead bug” to a whole new level. We love the angles in the legs, and the four SMD LEDs as spider eyes really finish the look of the tiny beast.

Finally, the 3D design of [Emily Valesco’s] RGB Atari Punk Console is spectacular. It’s a build that sounds great, and looks as though it will hold up to regular use. But visually, this earns a place on your desk long after the punky appeal wears off. We also like it that she added a color-coded photograph to match up the structure to the schematic, very cool!

What are you waiting for, whether it’s a mess of wires or a carefully structured electron ballet, we want to see your Circuit Sculpture!

Old Game Development IDE Goes FPGA

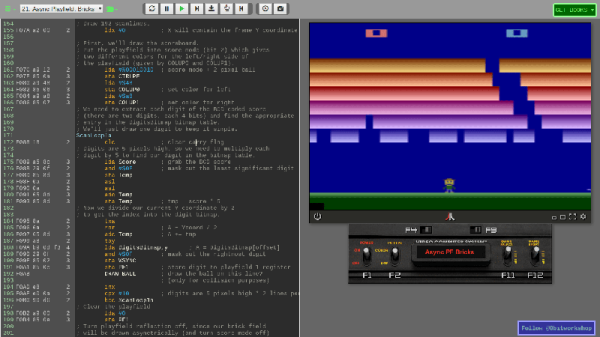
If you have a thing for old game development — things like the Atari 2600 or similar period arcade games — you might already know about the 8bitworkshop IDE. There you can develop code in your browser for those platforms. In a recent blog post, the site announced you can now also do FPGA development in the IDE.

According to the site:

Most computers are fast enough to render a game at 60 Hz, which requires simulating Verilog at almost 5 million ticks per second.

To activate Verilog, you need to select the hamburger menu to the top left, select Platform, and then under Hardware, check Verilog. What makes this different from, say, EDA Playground, is that the output can be waveforms or the output to a virtual TV monitor. For example, here’s one of the examples:

The Verilog code is generating horizontal and vertical sync along with an RGB output and the results appear on the monitor to the right. There is a handle at the bottom of the screen. If you drag it up you will see the logic analyzer output. Drag it down and you’ll see the screen again. The examples include an 8-bit and 16-bit CPU, and example games that can even read the mouse.

Honestly, we don’t think anyone would suggest using Verilog to write in-browser games. That isn’t really the point here. However, if you are trying to learn Verilog, it is great fun to be able to produce something other than just abstract waveforms from simulation. The only downside is that to move to a real piece of hardware, you’d need to duplicate the interfaces provided by the IDE. That would not be very hard, and — of course — if you are just using it to learn you can try a different project for the real world.

If you need help getting going in Verilog, we have a series of boot camps that can help. Those tutorials use EDA Playground, but they’d probably work here, too. If you try them in the IDE, be sure to let us know your experience.