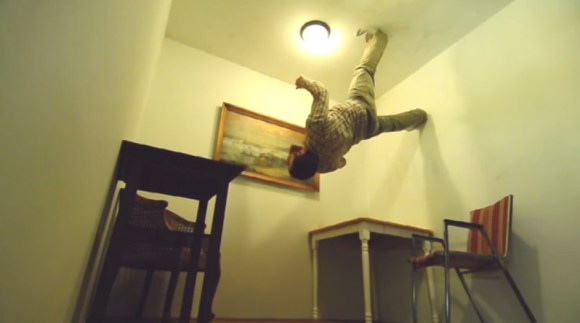
This Diy Fume Extractor Will Be A Showpiece For Your Workbench

We have no idea how well this diy fume extractor works, but it sure does look great! We’ve been thinking that it’s time to stop trying to blow away the solder fumes while working on project and this might be just the kind of motivation we need. The 6″ cube doesn’t get in the way of your work, and since it includes a carbon filter it should keep the smell of burning flux to a minimum.

[Jeff’s] project basically brings together a 120mm PC cooling fan with a power source. The fan mounts inside of a steel enclosure he picked up from Digikey. The face plates that come with it were modified to accept the fan, as well as the grill hardware that goes with it. Before assembling he painted the box with some Rustoleum “Hammered” black spray paint. This gives it a texture that will hide any imperfections in your application.

We’re a bit hazy on how this is being powered. It sounds like he’s plugging the cord into mains but we don’t see any type of regulator to feed what must be a 12V DC fan. There are build instruction available but they didn’t clear up our confusion.

Tutorial Explains The Concepts Behind An IMU

[Anilm3] wrote in to share the IMU tutorial series he is working on. An Inertial Measurement Unit is most often found in self-balancing robots and quadcopters, providing enough high-speed sensor data to keep up with the effects of gravity.  He previously used some all-in-one IMU devices in school which did most of the work for him. But he wanted to grind down and look at what each sensor spits out and how those measurements are used. The first installment deals with the accelerometer, using its data to calculate pitch and roll. For these demonstrations [Anilm3] is using this ADXL345 sensor board, an Arduino, and some processing sketches for testing.

Whenever working with sensors you need to take noise into consideration. The post shows how to implement a low-pass filter in the code which will help smooth out the readings. The filtered data is then fed to a couple of mostly-painless formulas which calculate the movement of the accelerometer in degrees. The demonstration sketch is mapped to a 3D cube to give you an idea of how accurate the accelerometer is. There’s a little bit of lag which would let a self-balancing robot have a nasty fall. The solution to this issue will be discussed in upcoming parts of the series. The next installment tackles the gyroscope sensor.

Qube Robots Use Well-designed Laser-cut Acrylic

These robot cubes, called BOXZ, use an interesting interlocking part design to mount and protect the parts within. But to really make them pop you need to color and apply your own papercraft skins.

The actual hardware is quite simple. They’ve used an Arduino, along with motor driver and Bluetooth shields, to control a set of geared DC motors. There’s a battery pack which holds four AA cells and a pair of servo motors which seem to be there to act as arms. This base can then be adorned with sensors to add functionality (line following, wall following, obstacle avoidance, etc.).

Despite the simple appearance of the cube, the chassis is the most complicated part. It uses sixteen pieces of acrylic, but they may also be hand cut from cardboard by printing out templates and gluing them onto the material. The parts are designed with interlocking tabs which we often see used on laser-cut wooden box parts.

We’ve embedded the video presentation of BOXZ after the break.

Continue reading “Qube Robots Use Well-designed Laser-cut Acrylic”

An Ice Tube Clock For The TI Launchpad

Because Nixies, Decatrons, and VFD tubes really are that cool, [cubeberg] over on the 43oh forums designed an IV-18 clock for the TI Launchpad.

Like adafruit’s Ice Tube clock, [cubeberg]’s project uses a surplus Russian IV-18 VFD tube conveniently sourced on eBay. On the board, there are three buttons for changing the time and setting the alarm along with a MAX6921 VFD tube driver and a small switching regulator to boost the 5 Volts on the Launchpad to the 50 V the tube requires.

There was a little bit of space left on [cubeberg]’s PCB design, and he filled that space with a header for a buzzer and a temperature sensor. Right now, the code doesn’t support an alarm function and he’s still waiting on a few components to finish off the thermometer portion of the board, but it’s still the makings of a very nice clock.

If you’d like to grab your own Launchpad ice tube clock, [bluehash] is organizing a group buy for 430h forum members. If they can get 15 pieces built, the clock will cost less than $5/unit. Very cool, and very cheap when you consider TI is practically giving Launchpads away.

More LED Madness!

So last week [Caleb] posted an article about hacking a floating LED ball.  In response, here’s a couple simple LED hacks or repurposings that I’ve come up with recently.

glow-cube-LED

LED Solar Glow Cube: If you’ve ever seen path lights lighting up people’s gardens or walkways you may have wondered what components they had in them and how they could be repurposed.  As shown in this article, there’s not much too them other than a circuit board, rechargeable battery, and, of course, a solar panel. Combine this with some leftover foam with a hole in it, and you have the device pictured above.  Really simple, but the results are pretty cool as seen in the video after the break.

LED light-nunchucks

LED Nunchucks: If you thought that wheel lights were only for actual wheels, than you haven’t seen these nunchucks built with some PVC pipe and acceleration-sensitive wheel lights. This may not be much of a “hack” in that they are quite easy to build, but the results are pretty neat, being fun to sling around or even for use in long-exposure photography.  Check out the videos after the break of these nunchucks in action and of some LED light paintings that can be made with them. Continue reading “More LED Madness!”

Toorcamp: Nibble Node.js Widget

The hardware hacking village at Toorcamp provided space and tools to work on hardware. It was interesting to see what hardware hacks people had brought to work on. One example is [Owen]’s Nibble Node.js Widget. The widget combines the popular node.js platform and custom hardware to create a node for the “internet of things.” The hardware consists of a Arduino Pro Micro, a bluetooth module, a LCD display, and a speaker in a laser cut box.

By using a custom package in node.js, the Nibble becomes an object which can be controlled by its methods. This allows for the developer to push messages to the display and control the device without worrying about the details of the hardware. Since node.js is designed for web applications, it’s simple to make the device controllable from the web.

[Owen] also wrote an emulator for the DCPU from the upcoming game, 0x10c. DCPU assembly is passed in from node.js, which compiles it and sends it to the Nibble. The device can then run the application using the DCPU emulation, which also allows for control of the display and the speaker.

There’s a lot of neat things that can be done with this minuscule cube, and [Owen] plans to release an NPM package for the node.js code.

Turning [M. C. Escher] Prints Into Real Objects

September is coming, and soon college freshmen the world over will be decorating their dorm room walls with Dark Side of the Moon posters and [M.C. Escher] prints. Anyone can go out and simply buy a prism, but what if you wanted a real-life version of objects and buildings from [Escher]’s universe? Professor [Gershon Elber] at the Technion at the Israel Institute of Technology decided to turn [Escher]’s prints into reality.

First beginning with simple shapes such as a Penrose Triangle and a Necker Cube, [Elber] decided to branch out into much more impossible shapes such as [Escher]’s Waterfall, Belvedere, and Relativity. These buildings are extremely hard to visualize in any traditional computer design program, so [Elber] wrote a plugin for his IRIT computer modeling program to design the buildings before committing them to a 3D printer.

In the video after the break, you can see a few rotating views of the resulting [Escher] buildings. Of course they only work from exactly one point of view – and even then, only with one eye closed – but it’s amazing to see these famous architectural studies brought into the real world.

Continue reading “Turning [M. C. Escher] Prints Into Real Objects”