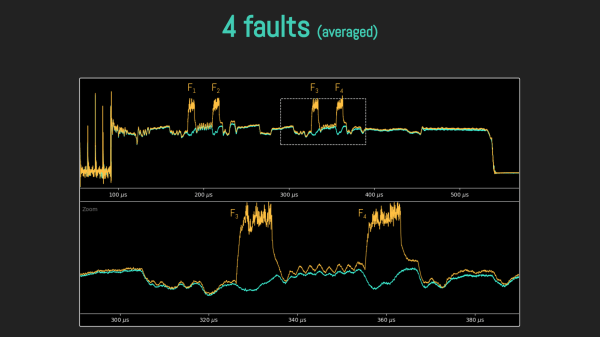
A slide from the presentation, showing the power trace of the chip, while it's being pulsed with the laser at various stages of execution

Defeating A Cryptoprocessor With Laser Beams

Cryptographic coprocessors are nice, for the most part. These are small chips you connect over I2C or One-Wire, with a whole bunch of cryptographic features implemented. They can hash data, securely store an encryption key and do internal encryption/decryption with it, sign data or validate signatures, and generate decent random numbers – all things that you might not want to do in firmware on your MCU, with the range of attacks you’d have to defend it against. Theoretically, this is great, but that moves the attack to the cryptographic coprocessor.

In this BlackHat presentation (slides), [Olivier Heriveaux] talks about how his team was tasked with investigating the security of the Coldcard cryptocurrency wallet. This wallet stores your private keys inside of an ATECC608A chip, in a secure area only unlocked once you enter your PIN. The team had already encountered the ATECC608A’s predecessor, the ATECC508A, in a different scenario, and that one gave up its secrets eventually. This time, could they break into the vault and leave with a bag full of Bitcoins?

Lacking a vault door to drill, they used a powerful laser, delidding the IC and pulsing different areas of it with the beam. How do you know when exactly to pulse? For that, they took power consumption traces of the chip, which, given enough tries and some signal averaging, let them make educated guesses on how the chip’s firmware went through the unlock command processing stages. We won’t spoil the video for you, but if you’re interested in power analysis and laser glitching, it’s well worth 30 minutes of your time.

You might think it’s good that we have these chips to work with – however, they’re not that hobbyist-friendly, as proper documentation is scarce for security-through-obscurity reasons. Another downside is that, inevitably, we’ll encounter them being used to thwart repair and reverse-engineering. However, if you wanted to explore what a cryptographic coprocessor brings you, you can get an ESP32 module with the ATECC608A inside, we’ve seen this chip put into an IoT-enabled wearable ECG project, and even a Nokia-shell LoRa mesh phone!

Continue reading “Defeating A Cryptoprocessor With Laser Beams”

Reinterpreting The Lua Interpreter

The idea behind Lua is a beautiful one. A simple and concise syntax offers almost all of the niceties of a first-class language. Moreover, a naive implementation of an interpreter with a giant switch case can be implemented in an afternoon. But assembly is your go-to to get decent performance in a JIT-style interpreter. So [Haoran Xu] started to ask himself if he could achieve better performance without hand-rolled assembly, and after a few months of work, he published a work-in-progress called LuaJIT Remake (LJR).

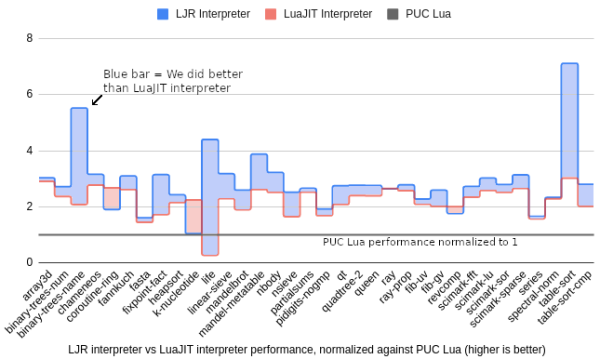
Currently, it supports Lua 5.1, and on a smattering of 34 benchmarks, LJR beats the leading fastest Lua, LuaJIT, by around 28% and the official Lua engine by 3x. [Haoran] offers a great explanation of interpreters that provides excellent background and context for the problem.

But the long and short of it is that switch cases are expensive and hard to optimize for compilers, so using tail calling is a reasonable solution that comes with some significant drawbacks. With tail calls, each case statement becomes a “function” that is jumped to and then jumped out of without mucking with the stack or the registers too much.

However, the calling convention requires any callee-saved registers to be preserved, which means you lose some registers as there is no way to tell the compiler that this function is allowed to break the calling convention. Clang is currently the only compiler that offers a guaranteed tail-call annotation ([[clang::musttail]]). There are other limitations too, for instance requiring the caller and callee to have identical function prototypes to prevent unbounded stack growth.

So [Haoran] went back to the drawing board and wrote two new tools: C++ bytecode semantical description and a special compiler called Deegen. The C++ bytecode looks like this:

void Add(TValue lhs, TValue rhs) {
  if (!lhs.Is<tDouble>() || !rhs.Is<tDouble>()) {
    ThrowError("Can't add!");
  } else {
    double res = lhs.As<tDouble>() + rhs.As<tDouble>();
    Return(TValue::Create<tDouble>(res));
  }
}
DEEGEN_DEFINE_BYTECODE(Add) {
  Operands(
    BytecodeSlotOrConstant("lhs"),
    BytecodeSlotOrConstant("rhs")
  );
  Result(BytecodeValue);
  Implementation(Add);
  Variant(
    Op("lhs").IsBytecodeSlot(),
    Op("rhs").IsBytecodeSlot()
  );
  Variant(
    Op("lhs").IsConstant(),
    Op("rhs").IsBytecodeSlot()
  );
  Variant(
    Op("lhs").IsBytecodeSlot(),
    Op("rhs").IsConstant()
  );
}

Note that this is not the C keyword return. Instead, there is a definition of the bytecode and then an implementation. This bytecode is converted into LLVM IR and then fed into Deegen, which can transform the functions to do tail calls correctly, use the GHC calling conventions, and a few other optimizations like inline caching through a clever C++ lambda mechanism. The blog post is exceptionally well-written and offers a fantastic glimpse into the wild world of interpreters.

The code is on Github. But if you’re interested in a more whimsical interpreter, here’s a Brainf**k interpreter written in Befunge.

Telnet Gets Stubborn Sony Camera Under Control

According to [Venn Stone], technical producer over at LinuxGameCast, the Sony a5000 is still a solid option for those looking to shoot 1080p video despite being released back in 2014. But while the camera is lightweight and affordable, it does have some annoying quirks — namely an overlay on the HDMI output (as seen in the image above) that can’t be turned off using the camera’s normal configuration menu. But as it so happens, using some open source tools and the venerable telnet, you can actually log into the camera’s operating system and fiddle with its settings directly.

As explained in the write-up, the first step is to install Sony-PMCA-RE, a cross-platform suite of tools developed for reverse engineering and modifying Sony cameras. With the camera connected via USB, this will allow you to install a program on the camera called Open Memories Tweak. This unlocks some developer options on the camera, such as spawning a telnet server on its WiFi interface.

With the a5000 connected to your wireless network, you point your telnet client to its IP address and will be greeted by a BusyBox interface that should be familiar to anyone who’s played with embedded Linux gadgets. The final step is to invoke the proper command, bk.elf w 0x01070a47 00, which sets the specific address of the camera’s configuration file to zero. This permanently disables the HDMI overlay, though it can be reversed by running the command again and setting the byte back to 01.

As you might expect, the Sony-PMCA-RE package is capable of quite a bit more than just unlocking a telnet server. While it might not be as powerful as a firmware modification such as Magic Lantern for Canon’s hardware, those looking for a hackable camera that won’t break the bank might want to check out the project’s documentation to see what else is possible.

Continue reading “Telnet Gets Stubborn Sony Camera Under Control”

Honey, We Shrunk The Nuclear Reactor

[Power Engineering] took a trip to the Westinghouse facility that provides maintenance for nuclear reactors. The research division there has a new microreactor called eVinci and — according to the company — it is a disruptor. Technically, the device is a heat pipe-based passive cooling design that can generate 5 MW of electricity or 13 MW of heat from a 15 MW heater core. You can see a video about the device below.

The company says its initial targets are remote areas like mines that usually depend on diesel generators. Hundreds of passive heat pipes inside a graphite core which contains TRISO (tristructural isotropic) fuel pellets. The heat pipes allow efficient transfer of thermal energy with no pumps.

Continue reading “Honey, We Shrunk The Nuclear Reactor”

The bottom half of a MacBook Air on a purple and pink background has severed wires drawn out of its back to indicate its lack of a screen.

Are Slabtops The Future Of Computing?

The most popular computer ever was the Commodore 64 with its computer-in-a-keyboard form factor. If you have a longing for a keyboard computer with more modern internals, one of the easiest solutions today is to pull the screen off a laptop.

[Umar Shakir] wanted to see what the fuss was about regarding a recent Apple patent and took the top lid off of his M1 Macbook Air and turned it into a “slabtop.” The computer works great wired to a monitor but can also be used wirelessly via AirPlay. The approach doesn’t come without its downsides, of course. Newer MacBooks can’t access recovery mode without the built-in screen, and some older models had their WiFi antennas in the top lid, so making one into a slabtop will leave you desk-bound.

While [Shakir] focuses on MacBooks, this approach should work with any laptop. Apparently, it’s a cottage industry in China already. Back in the day, my own daily driver was a Pentium-powered laptop with its broken LCD (and lid) removed. It worked great with whatever CRT was nearby.

If you’re looking for an off-the-shelf keyboard computer of your own, you might want to check out the Raspberry Pi 400.

Custom Prusa MK3 Fan Duct Gives Camera Perfect View

A growing trend is to mount a borescope “inspection camera” near a 3D printer’s nozzle to provide a unique up-close view of the action. Some argue that this perspective can provide valuable insight if you’re trying to fine tune your machine, but whether or not there’s a practical application for these sort of nozzle cams, certainly everyone can agree it makes for a pretty cool video.

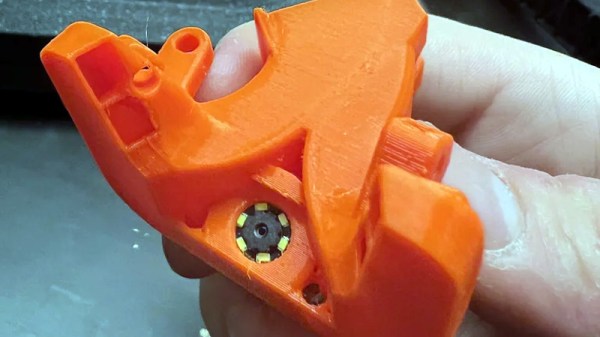
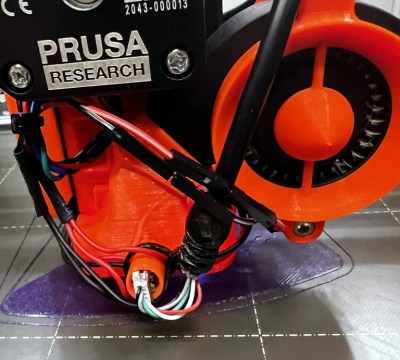
[Caelestis Cosplay] recently decided to outfit his Prusa i3 MK3S+ with such a camera, and was kind enough to share the process in a write-up. The first step was to find a community-developed fan duct, which he then modified to hold the 7 mm camera module. Since the duct blows right on the printer’s nozzle, it provides an ideal vantage point.

The camera module included a few tiny SMD LEDs around the lens, but [Caelestis Cosplay] added holes to the fan duct to fit a pair of 3 mm white LEDs to really light things up. While modifying the printed parts took some effort, he says the hardest part of the whole build was salvaging a 5X lens from a handheld magnifier and filing it down so it would fit neatly over the camera. But judging by the sharp and bright demo video he’s provided, we’d say the extra effort was certainly worth it.

After covering how the camera rig was put together, [Caelestis Cosplay] then goes over how it was integrated into OctoPrint, including how the external LEDs are switched on and off. He’s running OctoPrint on a Raspberry Pi, though as we’ve covered recently, a small form factor desktop computer could just as easily run the show.

Continue reading “Custom Prusa MK3 Fan Duct Gives Camera Perfect View”

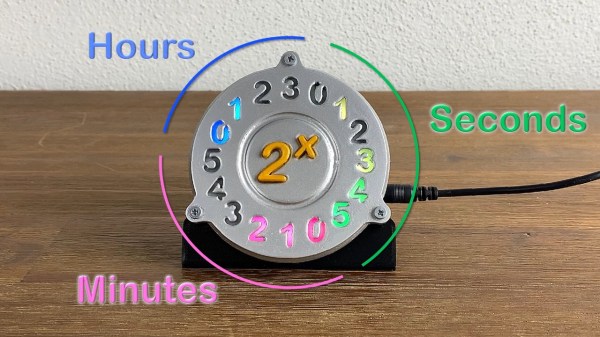
Circular Binary Clock Uses The Power To Tell Time

Should a clock be round? Depends on the style of clock, we suppose. After all, we wouldn’t expect to see a digital clock with a round readout just for fun. But a binary clock — that’s another animal altogether. Whereas [JohnThinger] made just a few weeks back a linear binary clock using an RGB LED strip and an ATtiny, he decided it would look much better in the round.

Before you go decrying the fact that there are numbers other than 1 and 0 on the thing, those are simply the power of two by which one must multiply to get the time. And naturally, it’s done in three phases, with the yellow-green numbers representing the seconds, the pink-red representing minutes, and the blue standing for the current hour. No, the point is not to make life easier. But it’s a good-looking clock, no?

Just as before, an ATtiny85 is the brain, with an RTC chip and an oscillator to keep time. But now, the display involves negative space 3D-printed numbers and an RGB LED ring. Be sure to check it out after the break.

Continue reading “Circular Binary Clock Uses The Power To Tell Time”