The Playstation 3 had a dizzying number of variants from its first launch in 2006 to when they stopped selling the slim models over a decade later in 2017. Of all those, you’ve probably never heard of the water-cooled Playstation 3 Pro, for the simple reason that it did not exist until [Zac] of Zac Builds created it in a video to push the limits of the now-vintage hardware.
This hack isn’t totally unique; you used to be able to buy watercooling kits for the PS3, but like the console itself, those have long since left the market. Of course [Zac] is hacking this Playstation 3 in 2025, so he’s doing it in a very modern way: with 3D scanning and CNC machining.
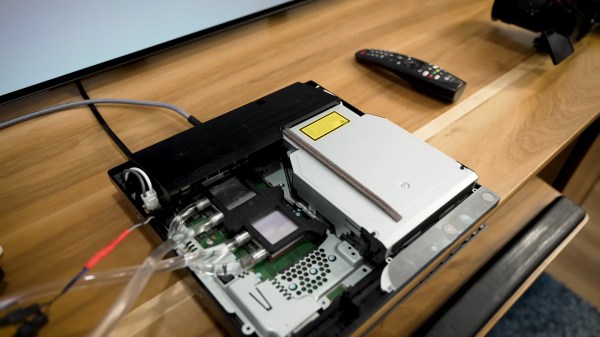
After very, very carefully removing the heat spreaders from the CPU and GPU to replace the dried out thermal paste, [Zac] scans the main board to design mounts for the dual waterblocks. Those mounts are, of course, 3D printed in carbon fibre reinforced nylon. Since the mount is going to be under pressure and rather warm, he anneals the nylon for 24 hours at 85 degrees. 3D printing also comes into play mount the pump and radiator into a handsome case that nearly looks like something Sony could have put out back in the day. That whole workflow seems normal today, but would have been borderline science-fiction with the console was new. .
Note that this is not a 2007 unit. [Zac] picked the newest PS3 he could that was still hackable–each revision got more efficient as the chips moved to smaller architectures, but Sony did eventually lock down the firmware to prevent overclocking. Which is of course the point here: since the stock hardware leaves a lot on the table in terms of thermal management, [Zac] figured there would be great performance boosts available.
As it happens, [Zac] was right about performance boosts– on GPU limited titles, he’s getting upto 50% higher frame rates. (Which makes sense, given he’s overclocking the GPU by about 50%.) Loading times are also much improved with the inevitable HDD to SSD swap.
The last time we featured a watercooled playstation hack was back in 2011, for a PS3 laptop of all things. The modern workflow makes it much easier. It’s been a few years since we last posted a Playstation 3 hack. Perhaps now, as they age into becoming “retro” we’ll see a revival in that category.
Thanks to [Stephen Walters] for the tip, via Yanko Design, which seems to provide an LLM-assisted (or generated) summary of [Zac]’s video.
Continue reading “The Water-Cooled PS3 Sony Never Made” →