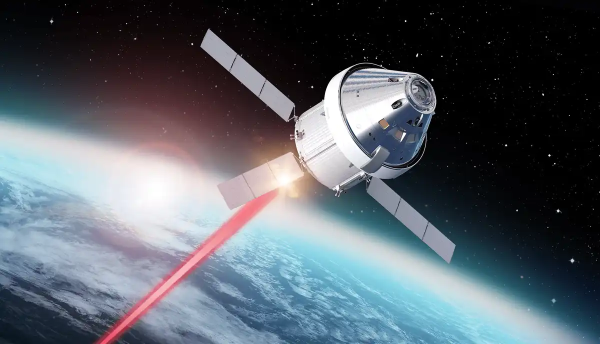
The Nine Dollar Laser Bed

A laser cutter bed has to be robust, fireproof, and capable of adequately supporting whatever piece of work is being done on the machine. For that reason they are typically a metal honeycomb, and can be surprisingly expensive. [David Tucker] has built a MultiBot CNC machine and is using it with a laser head, and his solution to the problem of a laser bed is to turn towards the kitchen ware store.

The answer lay in an Expert Grill Jerky Rack, a wire grille with a baking tray underneath it. Perfect lasering support but for its shininess, so it was painted matte back to reduce reflections and a handy set of clips were 3D printed to secure the grille to the tray.

We like this solution as it’s both effective and cheap, though we can’t help a little worry at the prospect of any laser cutter without adequate enclosure for safety. Having been involved in the unenviable task of cleaning an encrusted hackerspace laser cutter bed, we also like the idea that it could be disposed of and replaced without guilt. Do you have any tales of laser cutter bed cleaning, or have you found a cheap substitute of your own? Let us know in the comments!

Beautiful Engineering In This Laser Unit From A Tornado Jet Fighter

Those of use hailing from the UK may be quite familiar with the Royal Air Force’s Tornado fighter jet, which was designed to fight in a theoretical nuclear war, and served the country for over 40 years. This flying deathtrap (words of an actual serving RAF fighter pilot this scribe met a few years ago) was an extremely complex machine, with state-of-the-art tech for its era, but did apparently have a bit of a habit for bursting into flames occasionally when in the air!

Anyway, the last fleet is now long retired and some of the tech inside it is starting to filter down into the public domain, as some parts can be bought on eBay of all places. [Mike] of mikeselectricstuff has been digging around inside the Tornado’s laser head unit,  which was part of the bomber’s laser-guided missile subsystem, and boy what a journey of mechanics and electronics this is!

Pulse-mode optically pumped YAG laser

This unit is largely dumb, with all the clever stuff happening deep in an avionics bay, but there is still plenty of older high-end tech on display. Using a xenon-discharge-tube pumped yttrium aluminum garnet (YAG) laser, operating in pulsed mode, the job of the unit is to illuminate the ground target with an IR spot, which the subsequently fired missiles will home on to.

Designed for ground-tracking, whilst the aircraft is operating at speed, the laser head has three degrees of moment, which likely is synchronized with the aircraft movement to keep the beam steady. The optical package is quite interesting, with the xenon tube and YAG rod swimming in a liquid cooling bath, inside a metal housing. The beam is bounced around inside the housing using many prisms, and gated with a Q-switch which allows the beam to build up in intensity, before be unleashed on the target. Also of note is the biggest photodiode we’ve ever seen — easily over an inch in diameter, split into four quadrants, enabling the sensor to resolve direction changes in the reflected IR spot and track its error. A separate photodiode receiver forms part of the time-of-flight optical range finder, which is also important information to have when targeting.

There are plenty of unusual 3-phase positioning motors, position sensors, and rate gyros in the mix, with the whole thing beautifully crafted and wired-up military spec. It is definitely an eye opener for what really was possible during the cold war years, even if such tech never quite filtered down to civilian applications.

We’ve seen a few bits about the Tornado before, like this over-engineered attitude indicator, and here’s the insides of an old aircraft QAR (Quick Access Recorder)

Continue reading “Beautiful Engineering In This Laser Unit From A Tornado Jet Fighter”

How To Make Laser-cut Decals On The Cheap

Want to make a sweet adhesive decal with a complex design and floating elements, but all you have is a laser cutter and some tape? Good news, because that’s all you need with this method of creating adhesive tape decals on a laser cutter demonstrated by the folks at [Lasers Over Los Angeles]. The overall technique is very similar to creating vinyl decals and using tape transfer to apply them, but is geared towards laser cutters and nice, cheap tape.

This method also makes applying to non-flat surfaces a breeze.

The way it works is this: paper-based tape (such as blue painter’s tape) is laid down in strips on the laser cutter’s honeycomb bed, forming a nice big rectangle big enough for the intended design. Then, the laser cutter cuts vector art into the tape, resulting in an adhesive decal ready to be stuck to some other surface. Transferring is done by using good quality clear packing tape to “pick up” the decal, then move it to where it needs to be.

To do this, one lays strips of packing tape onto the top of the design on the laser bed, then lifts the design up and away. Move the design to its destination (the clear packing tape helps in eyeballing the final position), press the decal onto the final surface, and carefully peel away the clear packing tape. This works because the packing tape sticks only weakly to the back of the painter’s tape; it’s a strong enough bond to hold the decal, but weak enough that the decal will stick to a surface even better.

It’s true that painter’s tape isn’t as durable as vinyl and the color selection is a bit limited, but design-wise one can go as big as the laser bed allows, and the price is certainly right. Plus it’s easily cut by even the most anemic of diode lasers.

Speaking of desktop vinyl cutters, they may have small working areas compared to most laser cutters, but they have some fantastic workshop applications. They can even do home PCB fabrication, by way of knocking out three essential pieces: the etching mask, solder mask, and solder stencil.

A vortex puff hitting the craft

Swap The Laser For A Vortex Cannon And You Have… Lift?

When people are thinking of the future of space travel, an idea that floats around is a spaceship with a giant solar sail pushed along by a massive laser. Inspired by the concept but lacking a giant laser, [Tom Stanton] build a small craft powered by a vortex cannon.

Creating a vortex is hard enough, but creating a vortex with enough oomph to travel a longer distance and push something takes some doing. [Tom] started with some cheap solenoids, but had a few issues. Their interior nozzles were quite small, which restricted airflow. He used four valves all plumbed together to provide the volume of air needed. Additionally, he found that their response time was lacking. They couldn’t quite switch off quickly enough so instead of a puff of air, it pushed out something closer to a stream. To compensate, [Tom] 3d printed and tried a few different sizes of cone nozzles to see if that helped. Unfortunately, it did not. So he combined the nozzle with an expansion chamber that allowed the pressure wave to shorten, then it narrows to speed it up again. This provided a decent vortex.

Next [Tom] turned to his craft. After designing a 3d model, he had a template to cut out some shapes from paper and taped them together to form a light vehicle that can capture the vortex. The initial tests weren’t too promising as the craft twisted and the string that it traveled on had too much friction. Switching to a vertical test showed more promise but trying to generate multiple vortexes rapidly was unsuccessful as the turbulence from the previous rings broke up the newer rings.

So what’s to be learned from this? It seems like he doesn’t have much to show. [Tom] tweaked and iterated his way to a working vortex cannon and has continued to refine his craft. Hopefully, in the future, we’ll see a fully-functional version of this. The lesson is to keep enumerating the possibilities. Like this webcam based posture sensor iterating its way to success. Video after the break.

Continue reading “Swap The Laser For A Vortex Cannon And You Have… Lift?”

The inside of a Laser-Induced Breakdown Spectrometer

Spectrometer Detects Chemicals By Zapping Samples With A Laser Beam

Here at Hackaday, we love projects that result in useful lab equipment for a fraction of the cost of professional gear. [Lorenz], over at Advanced Tinkering, built his own instrument for Laser-Induced Breakdown Spectroscopy, or LIBS, and it’s quite an impressive device. LIBS is a technique for analyzing substances to find their chemical composition. Basically, the idea is to zap a sample with a powerful laser, then look at the little cloud of plasma that results and measure the wavelengths emitted by it.

A plot showing the spectrum of hematite
The spectrum of hematite (iron oxide), compared to that of pure iron

The laser [Lorenz] used is a Nd:YAG unit salvaged from a tattoo removal machine. After it fires a pulse, a photodiode detects the light and triggers a spectrometer, which consists of a diffraction grating, a few lenses and mirrors, and a linear CCD sensor. The grating splits the incoming lights into its constituent components, which fall onto the CCD and trigger its pixels. An STM32 Nucleo board reads out the results and sends them to a PC for further processing.

That processing bit turned out to be a full project on its own. [Lorenz] called upon [g3gg0], who software that simplifies the operation of the spectrometer. First, it helps with the instrument’s calibration. Point the detector at a well-known light source like a laser or a fluorescent lamp, then select the expected wavelengths on the resulting spectral plot. The software then automatically calculates the correct coefficients to map each pixel to a specific wavelength.

The software also contains a database of spectra corresponding to chemical elements: once you’ve taken a spectrum of an unknown sample, you can overlay these onto the resulting plot and try to find a match. The resulting system seems to work quite well. Samples of iron oxide and silver oxide gave a reasonable match to their constituent components.

We’ve seen other types of spectrometers before: if you simply want to characterize a light source, check out this Raspberry Pi-based model. If you’re interested in chemical analysis you might also want to look at this open-source Raman spectrometer.

Continue reading “Spectrometer Detects Chemicals By Zapping Samples With A Laser Beam”

High-Power Laser Salvaged From Headlights

[DiodeGoneWild]’s latest video lives up to the name. He takes apart a laser headlight to recover a pretty powerful blue laser. You can see the video, below.

The headlights work with blue laser diodes that excite phosphor to produce white light. Removing the outside trappings revealed a three-pin laser diode (the case is the third pin). There’s also a substantial heatsink. Removing the diode from the assembly is difficult, but it is easy enough to leave it in the heatsink and use the existing connector.

Of course, the phosphor and a filter have to go. Some destructive work with a screwdriver and pliers broke out the optics from a diode he’d destroyed trying to remove it. Then he replaced the optics on the remaining diode with the modified housing.

With a low-current test, the diode didn’t lase but did act as a regular LED. More current did the trick, though. The laser without the optics made a line rather than a spot but still had enough power to melt some plastic and light matches. To get a parallel beam, the internal lens needs to move closer to the diode, and a drill bit allowed that to happen, which reduced the beam’s divergence quite a bit, but didn’t create the best result.

With the proliferation of cheap laser modules, it is really worth scrapping a headlight? Maybe. But it is an interesting look inside of a modern headlight, either way. We’ve peeked inside these headlights before. Maybe you can turn those old headlights into an oven.

Continue reading “High-Power Laser Salvaged From Headlights”

Integrating sphere test setup

Cannonball Mold Makes A Dandy Integrating Sphere For Laser Measurements

It’s an age-old riddle: if you have a perfect sphere with a perfectly reflective inner surface, will light bounce around inside it forever? The answer is pretty obvious when you think it through, but that doesn’t mean that you can’t put the principle to use, as we see with this homemade Ulbricht sphere for optical measurements.

If you’ve never heard of an Ulbricht sphere, don’t worry — it’s also known as an integrating sphere, and that makes its function a little more apparent. As [Les Wright] explains, an integrating sphere is an optical element with a hollow spherical cavity that’s coated with a diffusely reflective coating. There are two ports in the sphere, one for admitting light — usually from a laser — and one for light to exit. The light bounces around inside the sphere and becomes perfectly diffuse, and creates a uniform beam at the exit port.

[Les]’ need for an integrating sphere comes from the desire to measure the output of some of his lasers with his Raspberry Pi-based PySpectrometer. Rather than shell out for an expensive commercial integrating sphere, or turn one on a lathe, [Les] turned to an unlikely source: cannonball molds. The inside of the mold was painted with an equally unlikely ultra-white paint concocted from barium sulfate and PVA glue. With a few ports machined into the mold, it works perfectly to diffuse the light from his dye lasers for proper measurements.

Lasers can be an expensive hobby, but [Les] always seems to find a way to make things more affordable and just as good. Whether it’s homemade doorknob caps for high-voltage power supplies or blasting the Bayer filter off a cheap CCD camera, he always seems to find a way.

Continue reading “Cannonball Mold Makes A Dandy Integrating Sphere For Laser Measurements”