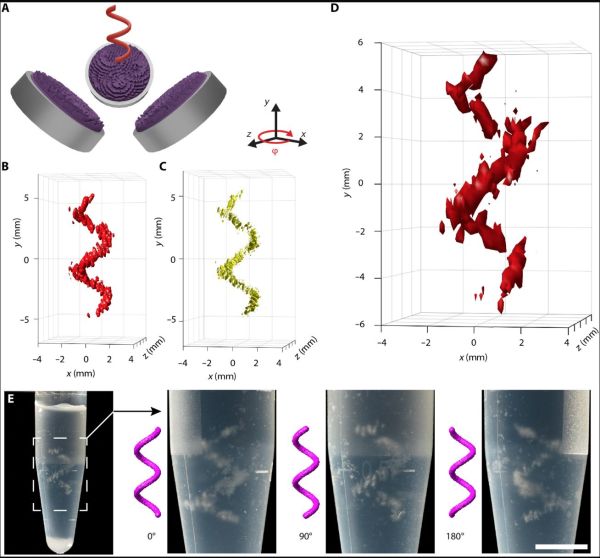
The Huge Apple Toolkit For Fixing Your IPhone

It’s been a frequent criticism of Apple, that their products are difficult to repair. They’ve hit back with a self-repair program for iPhones, and should you wish to take advantage of it they will hire you a tool kit. Not the iFixit box you might expect, instead they give you two hefty suitcases that contain 36 Kg of tools and equipment. Yes, you can repair an iPhone, but they ensure that it’s not for the faint-hearted.

In the kit is an impressive array of everything you might need for your iDevice, including the proper heat plate and press for the job. None of that messing about with a hot air gun for your $49 rental cost and $1200 if you don’t return the tools, but it remains an impossibly difficult and expensive process for all but the most dedicated of Apple fanboy technicians.

The sense from the Verge article is that Apple have had their arm twisted to the extent that they must provide a repair option, but they’ve gone to extravagant lengths to make it something nobody in their right mind would pursue. There’s an attraction in the idea of playing with a fully-equipped Apple repair kit for a few days, but maybe it’s not worth the cost.

Even without the Apple toolkit, it’s still possible to upgrade your iPhone.

Thanks [Nikolai Ivanov] for the tip.

Wireless Power: Here? Now?

Outside of very small applications, Nikola Tesla’s ideas about transmitting serious power without wires have not been very practical. Sure, we can draw microwatts from radio signals in the air, and if you’re willing to get your phone in just the right spot, you can charge it. But having power sent to your laptop anywhere in your home is still a pipe dream. Sending power from a generating station to a dozen homes without wire is even more fantastic. Or is it? [Paul Jaffe] of the Naval Research Laboratory thinks it isn’t fantastic at all and he explains why in a post on IEEE Spectrum.

Historically, there have been attempts to move lots of power around wirelessly. In 1975, researchers sent power across a lab using microwaves at 50% efficiency. They were actually making the case for beaming energy down from solar power satellites. According to [Jaffe], the secret is to go beyond even microwaves. A 2019 demonstration by the Navy conveyed 400 watts over 300 meters using a laser. Using a tightly confined beam on a single coherent wavelength allows for very efficient photovoltaic cells that can far outstrip the kind we are used to that accept a mix of solar lighting.

Wait. The Navy. High-powered laser beams. Uh oh, right? According to [Jaffe], it is all a factor of how dense the energy in the beam is, along with the actual wavelengths involved. The 400-watt beam, for example, was in a virtual enclosure that could sense any object approaching the main beam and cut power.

Keep in mind that 400 watts isn’t enough to power a hair dryer. Besides, point-to-point transmission with a laser is fine for sending power to a far-flung community but not great for keeping your laptop charged no matter where you leave it.

Still, this sounds like exciting work. While it might not be Tesla’s exact vision, laser transmission might be closer than it seemed just a few years ago. We’ve seen similar systems that employ safety sensors, but they are all relatively low-power. We still want to know what’s going on in Milford, Texas, though.

Console Macropad Uses SD Cards For Stylin’ And Profilin’

Macropads are great to have around for hotkey input, but things can get out of hand pretty quickly when you realize just how many shortcuts are in your life. To avoid ending up with another keyboard-sized keyboard, some hackers will use a handful of switches and a lot of layers to turn a few keys into many. And instead of worrying about legends, they use blank keys and leave the labels to be displayed on some kind of screen.

Among them is [QCJ3], who built this nifty little console-style macropad. Uninterested in managing microcontroller memory, [QCJ3] went the tangible route and loaded various profiles onto a micro SD card. Each text file on a given card holds a label, a color for the keyswitch LED, and of course, the keystrokes that make up the macro itself.

There are myriad ways to build a macro pad, from designing with bare chips (if you can get them) to programming a pre-built key matrix.  Grab the files if you like the console look and call it a day, or build a completely new enclosure that fits your hand exactly. Whatever you build, consider entering it in our brand spankin’ new Odd Inputs and Peculiar Peripherals Contest, which runs now through July 4th. If you need more inspiration, just peep the projects under macropad tag, or peruse the much heftier keyboard tag.

Via KBD

A multi-PCB setup to drive a CRT vector monitor

Color Vector Display Controller Brings Arcade Classics Back To Life

If you’ve been reading Hackaday long enough, you’ve probably come across a few hacks where someone made simple animations or even video games on an analog oscilloscope screen. Those hacks generally use vector graphics, where the cathode ray tube’s electron beam directly draws geometric shapes onto the screen. This gives the image a unique look that’s quite distinct from the pixel-based raster displays used on TVs and most computer monitors.

Vector displays were also used in several arcade machines of the early 1980s, including classics like Tempest, Gravitar and Star Wars. In order to emulate these games more faithfully than would be possible on a raster monitor, [Robin Champion] designed the vstcm: a color vector monitor controller to easily drive RGB vector monitors.

Star Wars (1983) displayed on CRT monitorThe design is based on [Trammell Hudson] and [Adelle Lin]’s v.st system, and therefore features a Teensy microcontroller as well as a couple of digital-to-analog converters. While the v.st can only connect to monochrome X/Y systems like oscilloscopes, the vstcm can work with RGB monitors to allow near-perfect emulation of color vector-based games. A custom software interface connects the vstcm to AdvanceMAME, a special version of the well-known arcade emulator that facilitates the connection of unusual display systems.

The end result definitely looks the part, although [Robin] notes that performance is not at the level it could be and requests those familiar with the Teensy platform to help optimize the code. If you’d like to build the vstcm but can’t find a vector monitor, you can always modify the yoke of a conventional CRT. Want to learn more about vector displays? Check out this thorough introduction.

Bottoms Up: Soda Can Help With Almost Any Project

If there’s any one thing that the average hacker is short on at a given moment (besides chips), it’s transient small part storage. Just as new projects are built from small parts, diagnostics and teardowns of commercial equipment invariably result in small parts. We think [amenjet] may have the answer — small parts holders made from the bottoms of soda cans.

You start by cutting the bottom off of an empty can however you like. In the first video after the break, [amenjet] scores the can on what could be a purpose-built jig before cutting along the line with tin snips, but you could use regular scissors if that’s all you have. Then it’s just a matter of shoving it into the circle around the perimeter of the print to secure the sharp edge.

The underside of the print is graduated and ends with a small hole fit for a disc magnet. To keep the prints from scratching the table, [amenjet] covered the bottoms with crushed velvet. After making about a dozen of these things, they CNC’d a tray to hold three of them, which you can see in the second video. Each cavity in the tray is lined with more crushed velvet for elegance and stability.

Between the concavity of the can bottom and that little lip, it should be particularly easy to actually retrieve a tiny part from the pile and grab on to it. Between the utility and the recycled aspect, this could easily be an entry into the second Challenge of the 2022 Hackaday Prize, which runs now until Sunday, June 12th. This round is all about reusing, recycling, and revamping anything and everything to keep it out of the landfill. Start your entry today!

Continue reading “Bottoms Up: Soda Can Help With Almost Any Project”

Upcycled Practice Amp Build Goes To Eleven

What do you call someone who gives the toddler in your life a musical instrument as a gift? In most cases, “mortal enemy” is the correct answer, but not everyone feels quite so curmudgeonly, and might even attempt to turn up the volume a bit. Such is the case with this wonderfully detailed practice amp for the grandkids’ electric ukelele.

The aptly named [packrat] [Professor Mayhem] really made this build a tour de force of scrap bin sourcing. The amp is built around a module salvaged from an old TV, a stereo Class-D amp that was modified to provide 30 watts output and a volume control. The driver came from a flood-damaged speaker unit, and the power supply from a gutted wall wart. The case was built with scrap plywood and covered with pebble-grain fabric to give it that pro audio look, while the chassis for the electronics was bent from a piece of sheet steel.

But it’s the tiny details that really sell this project. Everything from the pilot light to the pointer knob screams 1970s, as do the painstaking front panel lettering and vinyl “Monkeydyne” logo. [Professor Mayhem] even went the extra mile to create an etched-brass serial number plate, a mock specs and safety label, and even a QA inspection tag that was (sort of) stapled inside the cabinet.

We tip our hats to [Professor Mayhem] for this four-month labor of love and obvious nostalgia trip, which the kids are sure to love. [Professor Mayhem] does admit that some will argue with his decision to use a Class D amp and a switch-mode power supply, but let’s be real — for the application, it’s probably more than sufficient.

Thanks for the tip, [packrat].

Robotic Hand Uses Old CD-ROM Parts

Robotic arms and actuators are compelling things to watch, and as popular among the maker set as they are crucial to modern industry. [kthod2000] built a design of their own, which relies on parts salvaged from old CD-ROM drives. 

The arm itself is constructed of many components which appear to be 3D printed, with three main motors visible along its length. These look to be the eject motors harvested from several optical drives, which usefully come with a threaded screw on the output shaft that makes them perfect for a linear-drive application. Run by a TMC2208 driver via a microcontroller, the eject motors control the motion of several stages of the robot arm as it moves up and down.

The intention seems to be that one of these three-tiered assemblies could act as a single finger. Ganged up multiple times, this could allow the creation of something akin to a full five-digit robot hand. [kthod2000] has also done plenty of work on the software side of things that handles controlling the arm. The kinematics can all be simulated on screen in concert with the real motion of the arm.

We’ve seen similar builds before, too, like this plotter built out of scrap DVD drives. They’re a great source of quality electromechanical components for small projects, so it’s no surprise to see them put to work here. Video after the break.

Continue reading “Robotic Hand Uses Old CD-ROM Parts”