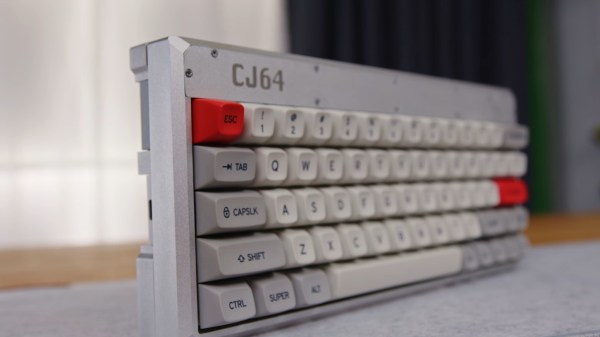
An M-Core module plugged into its devboard. Around it are Ethernet, HDMI, Type-C, two USB-A ports, one MicroSD card socket and one unpopulated footprint for a WiFi module

MangoPi To Bring A SD-Card-Sized Linux Module

Today’s Diminutive Device is a small castellated System-On-Module (Twitter link, nitter proxy) from [MangoPi] called M-Core, with a quad-core A53 CPU and 1 GB of RAM. As such, it’s very capable of running Linux, and even sports an HDMI output! Taking a closer look at the devboard picture, we can spot traces for three USB 2.0 ports, what seems to be two SDIO interfaces for MicroSD or WiFi cards, and an Ethernet MagJack with its termination network. This is a decent set of interfaces, rivaling what we’d expect out of a Pi Zero!

More importantly, this module is as small as an SD card itself – or as an OLED display that we hobbyists sprinkle onto our projects. Having power of Linux in such a small footprint is certainly something to behold! The back of the module is mostly flat, save for a few decoupling capacitors on the other side of the CPU – it seems, an Allwinner H616. On top of it, we can see the CPU itself, a small buck regulator and a DDR3 RAM chip, as well as tightly-packed passives. There’s even an unpopulated footprint for a DFN8 QSPI flash chip – with a lightweight enough OS build, you could perhaps dedicate your MicroSD card to storage only.

The devboard for uses the “FlexyPins”-like connectivity technique we’ve covered recently, and [MangoPi] say they bought those pins on TaoBao. We can’t help but be a bit amused at the thought of putting HDMI through such connections, but it seems to work well enough! Castellated modules like these are relatively easy to work with, so it shouldn’t be hard to literally pop this module out of the devboard and figuratively pop it onto your PCB. Next step is, reportedly, porting Armbian to this board, likely solving quite a few software support hurdles.

MangoPi have been posting updates on their Twitter page over the last few weeks, and, as it comes with the format, a lot of questions are left unanswered. Why does the devboard only show a single linear regulator of the kind we typically expect to deliver 1 A at most? Will we get higher-RAM versions? What’s the price going to look like? Will this module ever get to market? We can only hope, but if it does indeed, we are sure to see a few projects with these, whether it’s smart glasses, smart displays, phones, handhelds or malicious wall chargers. As usual, community makes or breaks an SBC, and we shall watch this one closely.

We thank [WifiCable] and [DjBiohazard] for sharing this with us!

The Tracer board strapped to the frame of a bicycle with a red Velcro strap

Tracer, A Platform For All Things Movement Logging

[elektroThing] is building a lightweight, battery-powered board to track and measure movement of all kinds, called Tracer. Powered by an ESP32, it has a LSM6DSL 6DoF accelerometer & gyroscope sensor, and a VL53L0X Time-of-Flight sensor. A small Li-ion battery in a holder reportedly provides for 5 hours of streaming data over Bluetooth Low Energy (BLE) at 100 Hz. It’s essentially a wireless movement sensor platform to be paired with a more powerful computer for data logging and analysis. What’s such a platform good for?

They show it attached to a tennis racket, saying you could use the data to, for a start, count the strokes done in a given match. They’ve also strapped it to a bicycle’s crankshaft and used it as a cadence sensor – good for gauging your cycling efficiency! But of course, this can be used in more applications than sport. A device like this could be used for logging movement of any relatively nearby objects, be it your cat, an office chair, or a door someone might slam a bit too hard at times. Say, you wanted to develop a sleep tracker and were to collect some data for defining your algorithms and planning your hardware requirements – this would work wonders.

There’s already available example code for streaming data into the Phyphox data logging and graphing app, as well as schematics – hopefully, the full board files will be available soon. A worthy open-source opponent to commercial devices available for similar purposes, this platform is good news for any hacker that wants to do motion measurement projects without reinventing quite a few wheels at once. We are told this board might get to CrowdSupply soon, and we can’t wait! Platforms like these, if done well, can grow an offspring of new projects for us to have fun with, and our paid projects get all that much easier to work on.

We’ve shown projects with such sensors before – here’s one that helps your rifle aim by giving you data to debug your last-second rifle movements, and another that logs movement data from inside a football. There’s a million endpoints you could stream your data into, and we are told you could even use Google Sheets. Just a year ago, we held our Data Logging contest and the entries we received will surely point out quite a few under-explored areas in your daily life!

Watching A Spacewalk In Real Time

If you go to, say, a football game, you probably don’t get to see as much of the game as close as you do when you stay home and watch on TV. But there’s something about being there that counts. That’s probably how [Sebastian Voltmer] feels. While we’ve all seen video of astronauts and cosmonauts spacewalking, [Sebastian] managed to take a snapshot of a pair of spacewalkers from his telescope.

Of course, this wasn’t your ordinary department store Christmas gift telescope. The instrument was a Celestron 11 inch EdgeHD Schmidt-Cassegrain telescope on a very expensive GM2000 HPS mount. An ASI290 planetary camera took the shot. You can see the gear and more about the photos in the video below.

Continue reading “Watching A Spacewalk In Real Time”

Texture Map GCode Directly In Blender With NozzleBoss

We’ve seen this funky dual disk polar printer already recently, but [Heinz Loepmeier] has been busy working on it, so here’s an update. The primary focus here is nozzleboss, a blender plugin which enables the surface textures of already sliced objects to be manipulated. The idea is to read in the gcode for the object, and convert it to an internal mesh representation that blender needs in order to function. From there the desired textures can be applied to the surfaces for subsequent stages to operate upon. One trick that nozzleboss can do is to create weight maps to tweak the extrusion flow rate or print velocity value according to the pixel value at the surface — such ‘velocity painting’ can produce some very subtle surface effects on previously featureless faces. Another trick is to use the same weight maps and simply map colours to blender text blocks which are injected into the gcode at export time. These gcode blocks can be used swap tool heads or extruders, enabling blending of multiple filament colours or types in the same object.

Some nice examples of such printing manipulation can be seen on [Heinz’s] instagram page for the project. So, going back to the hardware again, the first video embedded below shows the ‘dual disk polar printer’ fitted with a crazy five-extruders-into-one-nozzle mixing hotend setup, which should be capable of full CMYK colour mixing and some. The second video below shows an interesting by-product of the wide horizontal motion range of the machine, that the whole printing area can be shifted to a nozzle at the other end of the gantry. This enables a novel way to switch extruders, by just moving the whole bed and print under the nozzle of interest! One final observation — is that of the print surface — it does look rather like they’re printing direct onto a slab of marble, which I think is the first time we’ve seen that.

Interesting printer designs are being worked on a lot these days, here’s a really nice 5-axis prusa i3 hack, and if you want to stay in the cartesian world, but your desktop machine is just too small, then you can always supersize it.

Continue reading “Texture Map GCode Directly In Blender With NozzleBoss”

A vintage watch with a new PCB inside, next to a 3D rendered image of the PCB

Modern, Frugal PCB Breathes New Life Into Soviet-Made LED Watch

The first electronic digital watches were admired for their pioneering technology, if not their everyday practicality, when they were introduced in the 1970s. Their power-hungry LED displays lit up only when you pressed a button, and even then the numbers shown were tiny. Their cases were large and heavy, and they drained their batteries rather quickly even when not displaying the time. Still, the deep red glow of their displays gave them a certain aesthetic that’s hard to replicate with today’s technology.

A vintage LED watch displaying "16.42"
Pressing the top-right button enables those beautiful LED modules

When [Benjamin Sølberg] got his hands on an Elektronika-1, a first-generation digital watch designed in the Soviet Union, he set about designing a modern replacement for its internals. Where the original had several custom chips wire-bonded directly onto a substrate, the new board contains an MSP430 series microcontroller as well as an AS1115 display driver. The PCB makes contact with the watch’s pushbuttons through clever use of castellated holes.

For the display [Benjamin] went with period-correct LED modules made by HP, which keep the display’s appearance as close to the original as possible. While these draw quite a bit of current, the rest of the watch has become an order of magnitude more frugal: the stand-by time is now estimated to be about ten years, where the old design often needed new batteries within a year. [Benjamin] uses his renovated watch on a daily basis, apparently without trouble.

If you’ve got an old Soviet digital watch that you’d like to upgrade, you’ll be pleased to hear that the entire design is open source. Just like this retro watch, in fact, that uses a similar LED display. If you’re into original vintage watches, we’ve covered them in depth, too.

Making Windshield Wipers Rock To The Beat

When you’re driving around, you might occasionally notice your indicators or windscreen wipers sync up fortuitously with the music. [Cranktown City] wanted to ensure his wipers would always match the beat, however, and set about making it so. 

After disassembling the wiper motor, The original controller PCB is ripped up, used solely for its home position contacts that help determine the position of the wipers. The battered board is then drilled out to fit a rotary encoder to track the wipers throughout their full motion.

An Arduino is used to read the signal coming from the wiper stalk in order to know what mode the wipers should be in, and uses a motor controller to drive the wipers thusly. It also reads the encoder and home position contacts to track the wiper movement, and uses a proportional controller to control the wiper position. An MSGEQ7 spectrum analyzer is used to track the bass of the music to determine the beat to sync up to.

The final build does work, though in a different way to other designs we’ve seen. Rather than measuring BPM and syncing on a four-to-the-floor pulse, it simply tracks the lower band output and thus is more reactive to funky drum beats.

It’s a fun way to modify your car, even if it did require cutting a chunk out of the hood. If you’re cooking up your own cheeky automotive hacks, be sure to drop us a line. Video after the break. Continue reading “Making Windshield Wipers Rock To The Beat”

Rural Hacker De-Crufts And Rebuilds Hydroelectric Generator

YouTuber [Linguoer] has a knack, and it’s one that we don’t often see on the pages of Hackaday: rewinding and rebuilding dilapidated motors and generators. In the video below, you’ll see [Lin] take a hydroelectric turbine and generator that looks like it’s been sitting at the bottom of a lake, and turn it into a working unit, all while wearing her trademark blue and yellow denim jumpsuit.

Where as most makers would have used a MIG or TIG welder, [Linguoer] uses a simple (probably A/C) stick welder. Generator windings are calculated and wound by hand, and the carcass of what used to be the generator is sandblasted out in the open. Missing parts are fabricated from scratch using nothing more than an angle grinder. “Simple” is the order of the day.

[Linguoer] often refers to herself as “Village Girl”. Whatever specialty tools she uses, they are elementary. And whatever methods she uses, they are manual. You will get the idea very quickly that [Linguoer] isn’t just a person with a skill, but a person with a passion for getting things done no matter the circumstances. [Linguoer] is a hacker if there ever was one!

If hydroelectric hacks spin your pelton wheel, give this Impressive Off-Grid Hydroelectric Plant a whirl.

Continue reading “Rural Hacker De-Crufts And Rebuilds Hydroelectric Generator”