Full Color 3D Printing With The Help Of An Inkjet Head

3D printing is a popular process, though one of the hangups is that parts are typically produced in just one flat color. [Aad] has been working on a simple modification to his Prusa i3 printer, however, that enables the production of full-color parts.

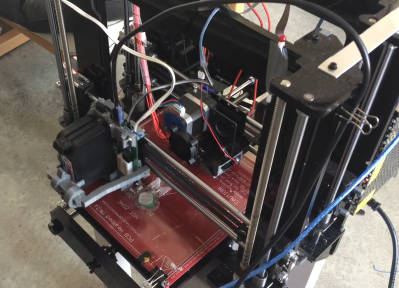
Note the dual vertical assemblies – one carrying the extruder, the other carrying an inkjet print head.

The hack is simple, consisting of a second vertical frame added on to the printer. Rather than mounting a second extruder, however, there’s a inkjet printer head delivering CMYK water-based inks. After the main extruder lays down each layer of clear PLA plastic, the print is then moved under the inkjet head, which lays down colored inks before the next layer is printed, as seen in this print video.

[Aad] notes the results are presently imperfect. The ink seems to bleed between layers, mixing with the plastic after it is laid down. Further testing with different inks and filaments is in the pipeline, however, aiming to improve quality and contrast of the results.

We’ve seen other approaches to the color 3D printing issue before, too. Video after the break.

Continue reading “Full Color 3D Printing With The Help Of An Inkjet Head”

Finally, A Use For Old Cellphones

In what is now a three-year long search, I’ve finally found the perfect use for an old cellphone. And with it, the answer to a burning question: Why aren’t we hacking cellphones?

First, the application. The Octo4a project lets you use an old Android phone as a 3D printer server, web interface, and even time-lapse camera to make those nice movies where the print seems to grow up out of nothing before your eyes. It’s the perfect application for an old phone, making use of the memory, WiFi, graphics capabilities, and even the touch-screen if you want local control of your prints.

Connecting to the phone was the main hurdle that I’ve always seen in developing for cellphone projects, because I have robotics applications in mind. But Octo4a gets around this with low or no effort. Most 3D printers are designed to run on USB anyway, so connecting it to the phone is as simple as buying a USB OTG cable. With the USB port taken over, powering the phone long-run becomes a tiny problem, which can be solved with a Y-cable or a little solder. Keep the OS from going to sleep, somehow, and it’s problem solved!

But here’s why this isn’t a solution, and it points out the deeper problem with cellphone hacking that many pointed out in the comments three years ago. Octoprint is written in Python, and because of this is very easy to write extensions for and to hack on, if that’s your thing. When I first saw Octo4a, I thought “oh great, a working Android Python port”. Then I went to dig into the code.

Octo4a is written in Kotlin and uses the Gradle framework. It’s a complete port of Octoprint, not just to a different platform, but to a different programming language and to an almost entirely different programming paradigm. My hat is off to [feelfreelinux] for doing it, but my guess is that the community of other people fluent enough in Kotlin and Python to help port across upstream changes in Octoprint is a lot smaller than the community of Python programmers would have been. Octo4a is a great project, but it’s not a walk in the park to develop on it.

So all of you who wrote in the comments to my previous piece that it’s the Android software ecosystem that’s preventing phone reuse, well here’s the exception that proves your rule! A dedicated and talented, multi-lingual developer community could pull it off, but the hurdle is so high that few will rise to it.

Anyway, thanks [Feelfree Filip] for your great work! I’ll be putting this on my old S4.
Abandoned Airplane Takes Off Again As Luxury RV

You remember how you wanted to combine everything as a kid? Like lions and tigers into ligers and so on? Well, some kids dream of transportation hybrids. For eighty-year-old [Gino Lucci], now an Air Force retiree, that dream involved a recreational vehicle that combined an airplane fuselage and a delivery truck.

There it was, rusting in a field outside Rolla, Missouri — the vintage plane that would start [Gino Lucci] on the path to fulfilling this dream. This project began when [Gino]’s son spotted the body of a 1943 Douglas R4D military transport aircraft.

Over the next year, [Gino] and his sons painstakingly fused the fuselage to the chassis of an International DuraStar 4400 medium-duty truck. We love how they went about it. [Gino] and the boys just kept putting the two together and cutting away the fuselage in stages until they got it right. After making it roadworthy, it took another two years to work out the kinks.

The Fabulous Flamingo is 38 feet (11.6 meters) long and stands 12.5 feet (3.81 meters) tall. But the best metric is the width. It’s unspecified, but is apparently half an inch (1.27 cm) under the definition of what is street legal in Michigan. They used the plane’s engine cowlings as fenders and got the mirrors off of a ’70s Ford pickup. Floor it past the break and check it out.

This build cost about $20,000 USD all told. If you’ve got that kind of money, you could instead stuff a powerful engine into a tiny plane to get your kicks.

Continue reading “Abandoned Airplane Takes Off Again As Luxury RV”

Two Wire Sensors On LED Strips

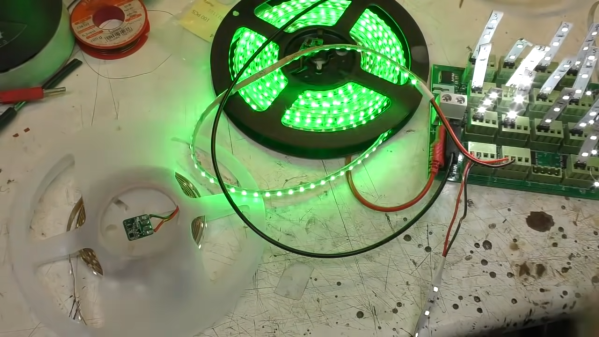
While addressable LED strips are all the rage, [Mike] from [mikeselectricstuff] has been working on an installation using the more basic two-wire strips that are simply controlled via PWM dimming. He’s recently figured out a tidy way to send sensor signals down these strips without adding any additional cabling.

Schematic for hooking up a sensor
The circuit in question.

The build uses 24 V LED tape, which consists of gangs of 6 LEDs in series with a forward voltage of 3V. Thus, these strips don’t even begin to light until approximately 18V is across them.

By adding a 15 V Zener diode and a resistor across the MOSFET which dims the LEDs, a voltage of around 9 V can be put across the LEDs without lighting them up when the MOSFET PWM dimmer is in its off phase. A PIC10F322 microcontroller and an accelerometer can then be run from this voltage, with the aid of a 3.3 V regulator wired in parallel with the LEDs. The regulator must also be able to handle the full 24 V when the LEDs are switched on.

A transistor is also wired up, switching a 2.2 K resistor in parallel with the LEDs. When turned on by the PIC, this transistor causes roughly a 10 mA current to flow through the Zener diode and its series resistor. The voltage developed across that series resistor can be measured as the transistor is turned on and off. In this case, the pulse width used to turn that transistor on is relative to motion detected by the accelerometer on the end of the LED strip.

Turning the LEDs on at 100% duty cycle prevents the system working, as the pulse widths generated by the sensor circuit can’t be detected when the LED line is held high all the time. However, in practice, it matters not — running the LEDs at a maximum 98% duty cycle eliminates the issue.

It’s an ingenious way to send sensor signals down a two-wire LED strip, even if it does take a second to wrap one’s head around it. It also seems to do a great job of adding motion-reactive effects to the LED strips in question. It’s not the first LED project we’ve seen from [Mike], either. Video after the break.

Continue reading “Two Wire Sensors On LED Strips”

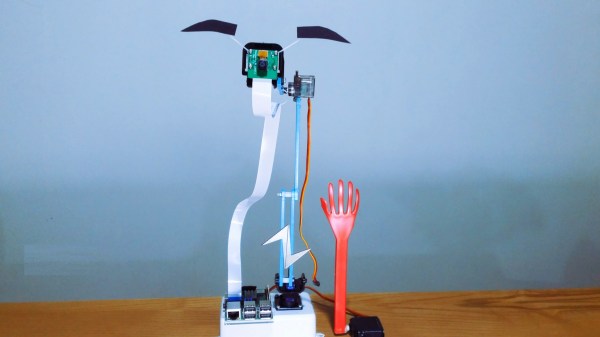
A robot that detects whether you are awake and gently taps you if not.

Wake-Up Robot Does It Gently

For hundreds of years, people have fallen asleep while reading in bed late at night. These days it’s worse, what with us taking phones to the face instead when we start to nod off. At least they don’t have pointy corners like books. While you may not want to share your bedroom with a robot, this wake-up robot by [Norbert Zare] may be just the thing to keep you awake.

Here’s how it works: a Raspberry Pi camera on a servo wanders around at eye level, and the Pi it’s attached to uses OpenCV to determine whether those eyes are open or starting to get heavy. The bot can also speak — it uses eSpeak to introduce itself as a bot designed not to let you sleep. Then when it catches you snoozing, it repeatedly intones ‘wake up’ in a bored British accent.

We were sure that the thing was designed to slap [Norbert] in the face a la [Simone Giertz]’s robot alarm clock, but no, that long-fingered hand just slowly swings down and gently taps [Norbert] on the arm (or whatever is in the path of the slappy hand). Check out the short demo and build video after the break.

Do you want to be awoken even more gently? Try a sunlight lamp. We’ve got dozens in stock, but this one gradually gets about as bright as the sun.

Continue reading “Wake-Up Robot Does It Gently”

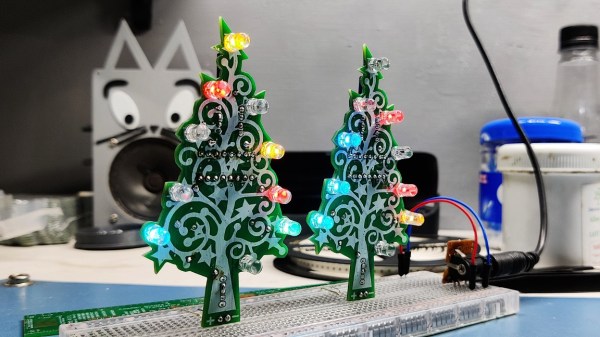
Christmas tree PCB with Blinky Circuit

Is It Finally Time For Christmas Decorations?

[Arnov] is trying to get into the holiday spirit and is doing so the way he knows how. He was thinking of some cool decorations for his Christmas tree and decided the best decorations are the ones you make yourself, so he made his own blinky Christmas tree ornament.

The famed “blinky circuit” is certainly one that we are no strangers to here at Hackaday. Some of our readers will be very pleased to see that he did in fact use a 555 timer and not an Arduino. The 555 timer is wired to drive the clock pin of the CD4017 decade counter and the outputs of the decade counter are wired to the LEDs. The LEDs are lit up sequentially upon each low to high transition of the clock pulse though you may try getting creative with your LED wiring scheme to achieve different blinking effects.

What readers might really take away from this build is [Arnov] detailing how to import images into his CAD tool of choice, OrCAD in his case. We know that can be a bit tricky sometimes. Finally, we love that this project doubles as PCB art and a soldering challenge. It would definitely make for a good demo project at your next beginner soldering workshop.

Cool project [Arnov!]

Continue reading “Is It Finally Time For Christmas Decorations?”

Paper Plate Surround Sound System

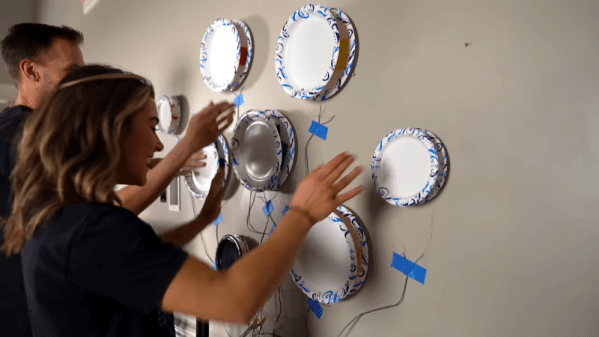
With the holiday season, you might turn to paper plates to cut down on dishwashing after having family or friends over. But what do you do with the extras? If you are [TKOR] you make some speakers. The process is fairly simple and if you know how a speaker works, you won’t find any surprises, but there are some neat techniques you might pick up. You can see the video below.

A drill and a steel rod help with the coil winding duty. You can probably adapt the technique to make other kinds of coils and we’d rig up an encoder to count revolutions, too.

Continue reading “Paper Plate Surround Sound System”