The Eternal Dilemma

It’s two weeks until Supercon! We can almost smell the solder from here. If you’re coming, and especially if it’s your first time, you’re soon to be faced with the eternal dilemma of hacker cons, only at Supercon it’s maybe a trilemma or even a quadralemma: hang out with folks, work on the badge, go to talks, or show off all the cool stuff you’ve been working on the past year?

Why not all four? That’s exactly why we start off with a chill-out day on Friday, when we don’t have much formally planned. Sure, there’s a party Friday night, and maybe a badge talk or some workshops, but honestly you’ll have most of the day free. Ease into it. Have a look at the badge and start brainstorming. Meet some new people and start up a team. Or just bathe in the tremendous geekery of it all. This is also a great time to show off a small project that you brought along. Having the widget that you poured brain, sweat, and tears into sitting on the table next to you is the perfect hacker icebreaker.

On Saturday and Sunday, there will definitely be talks that you’ll want to attend, so scope that out ahead of time and plan those in. But don’t feel like you have to go to all of them, either. Most of the talks will be online, either right away or eventually, so you won’t miss out forever. But since our speakers are putting their own work out there, if you’re interested in the subject, having questions or insight about their talk is a surefire way to strike up a good conversation later on, and that’s something you can’t do online. So plan in a few talks, too.

You’ll find that the time flies by, but don’t feel like you have to do it all either. Ask others what the coolest thing they’ve seen is. Sample as much as you can, but it’s not Pokemon – you can’t catch it all.

See you in two weeks!

(PS: The art is recycled from a Supercon long, long ago. I thought it was too nice to never see it again.)
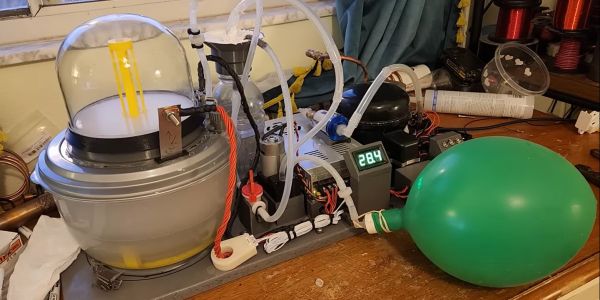
Junk Bin Cyberdish Turns You Into The Satellite Tracker

The good thing about listening in on satellites is that they tend to beam down all kinds of juicy information from their lofty perches. The bad thing about satellites is that to stay in those orbits, they’ve got to be moving really fast, and that means that you’ve got to track them if you want to keep a nice consistent signal during a pass. And that can lead to all sorts of complexity, with motorized two-axis mounts and fancy tracking software.

Or does it? Not if you’re willing to act as the antenna mount, which is the boat [Gabe] from the saveitforparts channel on YouTube recently found himself in when searching for L-band signals from the GOES satellite. His GOES setup uses a 30″ (0.8 m) dish repurposed from a long-range wireless networking rig. Unfortunately, the old security camera pan-tilt unit it was mounted on wasn’t quite up to satellite tracking duty, so [Gabe] pulled the dish off and converted it to manual tracking.

With a freshly wound helical antenna and a SAWbird LNA at the focal point, the dish proved to be pretty easy to keep on track manually, while providing quite the isometric workout. Aiming was aided by an app called Stellarium which uses augmented reality to point out objects in the night sky, and a cheap tablet computer was tasked with running SDR++ and capturing data. Sadly, neither of these additions brought much to the party, with the latter quickly breaking and the former geared more toward stargazing than satellite snooping. But with some patience — and some upper-body strength — [Gabe] was able to track GOES well enough with the all-in-one “cyberdish” to get some usable images. The whole saga is documented in the video after the break.

Kudos to [Gabe] for showing us what can be accomplished with a little bit of junk and a lot of sticktoitiveness. He promises that a legit two-axis mount is in the works, so we’ll be on the lookout for that. We’ve seen a few of those before, and [Chris Lott] did a great overview of satellite tracking gear a while back, too.

Continue reading “Junk Bin Cyberdish Turns You Into The Satellite Tracker”

Why The RP1 Is The Most Important Product Raspberry Pi Have Ever Made

We’ve had about a week to digest the pending arrival of the Raspberry Pi 5, and it’s safe to say that the new board from Cambridge has produced quite some excitement with its enhanced specifications and a few new capabilities not seen in its predecessors. When it goes on general sale we expect that it will power a slew of impressive projects in these pages, and we look forward with keen anticipation to its companion Compute Module 5, and we sincerely hope eventually a Raspberry Pi 500 all-in-one. It’s the latest in a line of incrementally-upgraded single board computers from the company, but we think it conceals something of much greater importance than the improvements that marked previous generations. Where do we think the secret sauce lies in the Pi 5? In the RP1 all-in-one PCIe peripheral chip of course, the chip which provides most of the interfacing on the new board. Continue reading “Why The RP1 Is The Most Important Product Raspberry Pi Have Ever Made”

Implementing Commodore’s IEC Bus Protocol On A KIM-1 Single Board Computer

Although the PET is most likely the more well-known of Commodore’s early computer systems, the KIM-1 (Keyboard Input Monitor) single board computer was launched a year prior, in 1976. It featured not only the same MOS 6502 MPU as later Commodore systems, but also an MCS6530 PIO IC that contained the ROM, RAM and programmable I/O, reminiscent of later I/O chips on Commodore systems. As the KIM-1 was only designed to be used with an external tape drive (and a terminal for fancy users), adding a floppy drive like the ubiquitous 1541 with its IEC bus interface was not a first-party accessory. How the IEC bus can be retrofitted to a KIM-1 system is demonstrated in this video by the Commodore History channel.

The Commodore KIM-1 hardware is almost directly compatible with the C64 hardware. (Credit: Commodore History on YouTube)

What is most notable is just how similar the KIM-1 hardware is to later PET and VIC hardware, with the CIA and PIO ICs featuring the same requisite pins for this purpose, and requiring only the addition of an inverting (SN7406) IC and an EPROM featuring the new code to support the proprietary Commodore IEC bus protocol, which was mostly pilfered byte-for-byte from a C64 kernal ROM.

With some creative breadboarding in place and using nothing more than the on-board LED display and keyboard matrix, it was then possible to write to the inserted floppy disk, and also to read back from it. What’s interesting here is that this essentially replaces the tape drive as target for the KIM-1, which thus retains a lot of the original functionality, but with a big performance boost. While perhaps only interesting as an academic exercise, it’s definitely an interesting look at the early beginnings of what would blossom into the Commodore 64.

Continue reading “Implementing Commodore’s IEC Bus Protocol On A KIM-1 Single Board Computer”

Creating An Automated Hydrogen Generator At Home

Everyone and their pet hamster probably knows that the most common way to produce hydrogen is via the electrolysis of water, but there are still a number of steps between this elementary knowledge and implementing a (mostly) automated hydrogen generator. Especially if your end goal is to create liquid hydrogen when everything is said and done. This is where [Hyperspace Pirate]’s latest absolutely not dangerous project commences, with the details covered in the recently published video.

Automated hydrogen generator setup, courtesy of [Hyperspace Pirate]'s dog drinking bowl.
Automated hydrogen generator setup, courtesy of [Hyperspace Pirate]’s dog drinking bowl.
Since electrolysis cannot occur with pure water, sodium hydroxide (NaOH) is used in the solution to provide the ions. The electrodes are made of 316 stainless steel, mostly because this is cheap and good enough for this purpose. Although the original plan was to use a stacked series of electrodes with permeable membranes like in commercial electrolysers, this proved to be too much of a hassle to seal up leak-tight. Ergo the demonstrated version was attempted, where an upturned glass bell provides the barrier for the produced hydrogen and oxygen. With this system it’s easy to measure the volume of the produced hydrogen due to the displaced water in the bell.

Once enough hydrogen gas is produced, a vacuum pump is triggered by a simple pair of electrodes to move the hydrogen gas to a storage container. Due to hydrogen embrittlement concerns, an aluminium tank was used rather than a steel one. Ultimately enough hydrogen gas was collected to fill a lot of party balloons, and with the provided information in the video it should be quite straightforward to reproduce the system.

Where the automation comes into play is with a control system that monitors for example how long the vacuum pump has been running, and triggers a fail safe state if it’s more than a set limit. With the control system in place, [Hyperspace Pirate] was able to leave the hydrogen generator running for hours with no concerns. We’re hopeful that his upcoming effort to liquify this hydrogen will be as successful, or the human-rated blimp, or whatever all this hydrogen will be used for.

Continue reading “Creating An Automated Hydrogen Generator At Home”

Beating Apple’s Secret Lid Angle Sensor Calibration With Custom Tool

Among the changes made by Apple to its laptops over the years, the transition from a Hall sensor-based sleep sensor to an angle sensor that determines when the lid is closed is a decidedly unpopular one. The reason for this is the need to calibrate this sensor after replacement, using a tool that Apple decided to keep for itself. That is, until recently [Stephan Steins] created a tool which he creatively called the ‘nerd.tool.1‘. This widget can perform this calibration procedure with the press of its two buttons, as demonstrated on [Louis Rossmann]’s YouTube channel.

This new angle sensor was first introduced in late 2019, with Apple’s official reason being an increased level of ‘precision’. As each sensor has to be calibrated correctly in order to measure the magnetic field and determine the associated lid angle, this means that third-party repair shops and determined MacBook owners have to transplant the chip containing the calibration data to a replacement sensor system. Until now, that is. Although the nerd.tool.1 is somewhat pricey at €169 ($179 USD), for a third-party MacBook repair shop this would seem to be a steal.

It is however unfortunate that Apple persists in such anti-repair methods, with recently [Hugh Jeffreys] also calling Apple out on this during a MacBook Pro M1/M2 teardown video. During this teardown [Hugh] came across this angle sensor issue by swapping parts between two otherwise identical MacBook Pros, indicating just how annoying this need to calibrate one tiny lid angle sensor is.

Continue reading “Beating Apple’s Secret Lid Angle Sensor Calibration With Custom Tool”

A handheld computer made on a piece of prototyping board running a Tetris clone

Tetris Clone Uses 1000 Lines Of Code, And Nothing Else

If you’re programming on a modern computer, you typically make use of lots of work done by other people. There’s operating systems to abstract away the complexities of modern hardware, standard libraries to implement common tasks, and tons of third-party libraries that prevent you from having to reinvent the wheel all the time: you’re definitely not the first one trying to draw graphics onto a screen or store data in a file.

But if it’s the wheels you’re most interested in, then there’s nothing wrong with inventing new ones now and then. [Michal Zalewski], for instance, has made a beautiful Tetris clone in just 1000 lines of C, without using anyone else’s code.

The purpose of this exercise is to show that it’s possible to make a game with graphics comparable to modern, complex computing systems, without relying on operating systems or third-party libraries. The hardware consists of not much more than an ARM Cortex-M7 MCU, a 240×320 LCD screen and a few buttons soldered onto a piece of prototyping board, all powered by a set of AAA batteries.

The software is similarly spartan: just pure C code running directly on the CPU core. Graphic elements, some generated by AI and others hand-drawn, are stored in memory as plain bitmaps. They are manipulated by 150 lines of code that shuffles sprites around the display at a speed high enough to generate smooth motion. Game mechanics take up about 250 lines, while sound consists of simple square-wave chiptunes written in just 50 lines of code.

[Michal]’s code is very well documented, and his blog post gives even more details about all the problems he had to solve. One example is the length of keypresses: when do you interpret a keypress as a single “press”, and when does it become “press and hold”? Apparently, waiting 250 ms after the first press and 100 ms after subsequent ones does the trick. [Michal] is a bit of an expert on bare-bones game programming by now: he has previously pushed several 8-bit micros to their very limits. Third-party libraries can make your programming life a lot easier, but it’s good to reflect on the dangers of relying too much on other people’s code.

Continue reading Tetris Clone Uses 1000 Lines Of Code, And Nothing Else”