Simulating High-Side Bootstrap Circuits With LTSpice

LTSpice is a tool that every electronics nerd should have at least a basic knowledge of. Those of us who work professionally in the analog and power worlds rely heavily on the validity of our simulations. It’s one of the basic skills taught at college, and essential to truly understand how a circuit behaves. [Mano] has quite a collection of videos about the tool, and here is a great video explanation of how a bootstrap circuit works, enabling a high-side driver to work in the context of driving a simple buck converter. However, before understanding what a bootstrap is, we need to talk a little theory.

Bootstrap circuits are very common when NMOS (or NPN) devices are used on the high side of a switching circuit, such as a half-bridge (and by extension, a full bridge) used to drive a motor or pump current into a power supply.

A simple half-bridge driving illustrates the high-side NMOS driving problem.

From a simplistic viewpoint, due to the apparent symmetry, you’d want to have an NMOS device at the bottom and expect a PMOS device to be at the top. However, PMOS and PNP devices are weaker, rarer and more expensive than NMOS, which is all down to the device physics; simply put, the hole mobility in silicon and most other semiconductors is much lower than the electron mobility, which results in much less current. Hence, NMOS and NPN are predominant in power circuits.

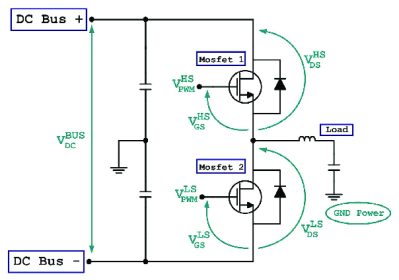
As some will be aware, to drive a high-side switching transistor, such as an NPN bipolar or an NMOS device, the source end will not be at ground, but will be tied to the switching node, which for a power supply is the output voltage. You need a way to drive the gate voltage in excess of the source or emitter end by at least the threshold voltage. This is necessary to get the device to fully turn on, to give the lowest resistance, and to cause the least power dissipation. But how do you get from the logic-level PWM control waveform to what the gate needs to switch correctly?

The answer is to use a so-called bootstrap capacitor. The idea is simple enough: during one half of the driving waveform, the capacitor is charged to some fixed voltage with respect to ground, since one end of the capacitor will be grounded periodically. On the other half cycle, the previously grounded end, jumps up to the output voltage (the source end of the high side transistor) which boosts the other side of the capacitor in excess of the source (because it got charged already) providing a temporary high-voltage floating supply than can be used to drive the high-side gate, and reliably switch on the transistor. [Mano] explains it much better in a practical scenario in the video below, but now you get the why and how of the technique.

We see videos about LTSpice quite a bit, like this excellent YouTube resource by [FesZ] for starters.

Continue reading “Simulating High-Side Bootstrap Circuits With LTSpice”

3D Printed Spirograph Makes Art Out Of Walnut

Who else remembers Spirograph? When making elaborate spiral doodles, did you ever wish for a much, much bigger version? [Fortress Fine Woodworks] had that thought, and “slapped a router onto it” to create a gorgeous walnut table.

Hands holding a 3d printed sanding block, shaped to fit the grooves routed in the table which is visible in the background.
This printed sanding block was a nice touch.

The video covers not only 3D printing the giant Spirograph, which is the part most of us can easily relate to, but all the woodworking magic that goes into creating a large hardwood table. Assembling the table out of choice lumber from the “rustic” pile is an obvious money-saving move, but there were a lot of other trips and tricks in this video that we were happy to learn from a pro. The 3D printed sanding block he designed was a particularly nice detail; it’s hard to imagine getting all those grooves smoothed out without it.

Certainly this pattern could have been carved with a CNC machine, but there is a certain old school charm in seeing it done (more or less) by hand with the Spirograph jig. [Fortress Fine Woodworks] would have missed out on quite the workout if he’d been using a CNC machine, too, which may or may not be a plus to this method depending on your perspective. Regardless, the finished product is a work of art and worth checking out in the video below.

Oddly enough, this isn’t the first time we’ve seen someone use a Spirograph to mill things. It’s not the first giant-scale Spirograph we’ve highlighted, either. To our knowledge, it’s the first time someone has combined them with an artful walnut table.

Continue reading “3D Printed Spirograph Makes Art Out Of Walnut”

Single-Board Z80 Computer Draws Inspiration From Picasso

Picasso and the Z80 microprocessor are not two things we often think about at the same time. One is a renowned artist born in the 19th century, the other, a popular CPU that helped launch the microcomputer movement. And yet, the latter has come to inspire a computer based on the former. Meet the RC2014 Mini II Picasso!

As [concretedog] tells the story, what you’re fundamentally looking at is an RC2014 Mini II. As we’ve discussed previously, it’s a single-board Z80 retrocomputer that you can use to do fun things like run BASIC, Forth, or CP/M. However, where it gets kind of fun is in the layout. It’s the same fundamental circuitry as the RC2014, but it’s been given a rather artistic flair. The ICs are twisted this way and that, as are the passive components; even some of the resistors are dancing all over the top of one another. The kit is a limited edition, too, with each coming with a unique combination of colors where the silkscreen and sockets and LED are concerned. Kits are available via Z80Kits for those interested.

We love a good artistic PCB design; indeed, we’ve supported the artform heavily at Supercon and beyond. It’s neat to see the RC2014 designers reminding us that components need not live on a rigid grid; they too can dance and sway and flop all over the place like the eyes and or nose on a classic Picasso.

It’s weird, though; in a way, despite the Picasso inspiration, the whole thing ends up looking distinctly of the 1990s. In any case, if you’re cooking up any such kooky builds of your own, modelled after Picasso or any other Spanish master, don’t hesitate to notify the tipsline.


RP2040 Spins Right ‘Round Inside POV Display

Sometimes, a flat display just won’t cut it. If you’re looking for something a little rounder, perhaps your vision could persist in in looking at [lhm0]’s rotating LED sphere RP2040 POV display.

As you might have guessed from that title, this persistence-of-vision display uses an RP2040 microcontroller as its beating (or spinning, rather) heart. An optional ESP01 provides a web interface for control. Since the whole assembly is rotating at high RPM, rather than slot in dev boards (like Pi Pico) as is often seen, [lhm0] has made custom PCBs to hold the actual SMD chips. Power is wireless, because who wants to deal with slip rings when they do not have to?

The LED-bending jig is a neat hack-within-a-hack.

[lhm0] has also bucked the current trend for individually-addressable LEDs, opting instead to address individual through-hole RGB LEDs via a 24-bit shift-register. Through the clever use of interlacing, those 64 LEDs produce a 128 line display. [lhm0] designed and printed an LED-bending jig to aid mounting the through-hole LEDs to the board at a perfect 90 degree angle.

What really takes this project the extra mile is that [lhm0] has also produced a custom binary video/image format for his display, .rs64, to encode images and video at the 128×256 format his sphere displays. That’s on github,while a seperate library hosts the firmware and KiCad files for the display itself.

This is hardly the first POV display we’ve highlighted, though admittedly it isn’t the cheapest one. There are even other spherical displays, but none of them seem to have gone to the trouble of creating a file format.

If you want to see it in action and watch construction, the video is embedded below.

Continue reading “RP2040 Spins Right ‘Round Inside POV Display”

Three SPI Busses Are One Too Many On This Cheap Yellow Display

The Cheap Yellow Display may not be the fastest of ESP32 boards with its older model chip and 4 MB of memory, but its low price and useful array of on-board peripherals has made it something of a hit in our community. Getting the most out of the hardware still presents some pitfalls though, as [Mark Stevens] found out when using one for an environmental data logger. The problem was that display, touch sensor, and SD card had different SPI busses, of which the software would only recognise two. His solution involves a simple hardware mod, which may benefit many others doing similar work.

It’s simple enough, put the LCD and SD card on the same bus, retaining their individual chip select lines. There’s a track to be cut and a bit of wiring to be done, but nothing that should tax most readers too much. We’re pleased to see more work being done with this board, as it remains a promising platform, and any further advancements for it are a good thing. If you’re interested in giving it a go, then we’ve got some inspiration for you.

Avian-Inspired Drones: How Studying Birds Of Prey Brings More Efficient Drones Closer

The EPFL LisRaptor with adjustable wings and tail.

Throughout evolution, the concept of powered flight has evolved and refined itself multiple times across both dinosaurs (birds), mammals (bats) and insects. So why is it that our human-made flying machines are so unlike them? The field of nature-inspired flying drones is a lively one, but one that is filled with challenges. In a recent video on the Ziroth YouTube channel, [Ryan Inis] takes a look at these efforts, in particular those of EPFL, whose recent RAVEN drone we had a look at recently already.

Along with RAVEN, there is also another project (LisRaptor) based on the Northern Goshawk, a bird of prey seen in both Europe and North-America. While RAVEN mostly focused on the near-vertical take-off that smaller birds are capable of, this project studies the interactions between the bird’s wings and tail, and how these enable rapid changes to the bird’s flight trajectory and velocity, while maintaining efficiency.

The video provides a good overview of this project. Where the LisRaptor differs from the animal is in having a rudder and a propeller, but the former should ideally not be necessary. Obviously the kinematics behind controlled flight are not at all easy, and the researchers spent a lot of time running through configurations aided by machine learning to achieve the ideal – and most efficient – wing and tail configuration. As these prototypes progress, they may one day lead to drones that are hard to differentiate from birds and bats.

Continue reading “Avian-Inspired Drones: How Studying Birds Of Prey Brings More Efficient Drones Closer”

Resolution: Share Inspiration

It’s been a good 2025 so far! I just got back from Chaos Communication Congress, which is easily my favorite gigantic hacker conference of the year. (Partisan Hackaday pride puts Supercon up as my favorite moderate-sized conference, naturally.) CCC is huge. And it’s impossible to leave an event like that without your to-hack list at least doubling in length.

And then I got back home and started prepping up for the podcast, which meant reading through about a week’s worth of Hackaday in a single sitting. Which in turn adds a few more projects to the list. Thanks for that, y’all!

All of this was possible because people who do crazy nerdy things decided to share their passions with everyone. So in the spirit of the New Year, I’m going to try to document my own projects a little bit better, because if people can’t see what you’re doing, they can’t get inspired by it.

And while it’s my day job, it’s not yours, so I’d like to encourage you to point out a cool project if you see it as well. Because what’s better than inspiring other hackers to pick up the torch on a project you love?