Arduino Vs. Phidgets Vs. Gadgeteer

A few days ago, we saw a dev time trial between the Arduino and Phidgets, a somewhat proprietary dev board that is many times more expensive than an Arduino. The time trial was a simple experiment to see which platform was faster to prototype simple circuits. As always in Hackaday comments, there was a ton of comments questioning the validity and bias of the test. Not wanting to let a good controversy go to waste, [Ian Lee] tossed his hat into the ring with the same dev trial with the Gadgeteer.

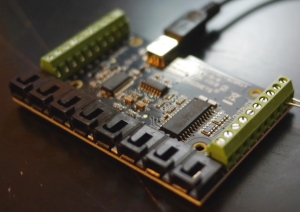
The Gadgeteer has the same design philosophy as Phidgets: modular components and a unique software system -the Gadgeteer is based on .NET Micro Framework – that allows you to get up and running quickly. Unlike Phidgets, the Gadgeteer is priced competitively with the Arduino, and the mainboard is priced within an order of magnitude of a single ATMega chip.

[Ian] pulled off three projects with the three development platforms: blinking a LED, moving a servo, and building a pedometer with an accelerometer. For each trial, the time taken and the price of all components were added up. Here’s the relevant graph:

Continue reading “Arduino Vs. Phidgets Vs. Gadgeteer”

Arduino Vs. Phidgets – Dev Time Trials

Is developing on an Arduino too slow? Are Phidgets too expensive? When might you use one or the other? Hackaday regular [Ken] breaks down what he learned from three experimental time trials.

The main development differences between Arduino and Phidgets are a mix of flavor preferences and some hard facts. The Arduino is open source, Phidgets are proprietary. Arduino requires a mix of hard- and software where Phidgets only needs (and only allows) a connection to a full computer but enables high level languages – it is expected to get the job done sooner and easier. And finally, Arduinos are cheap, Phidgets are 3-5x the cost.

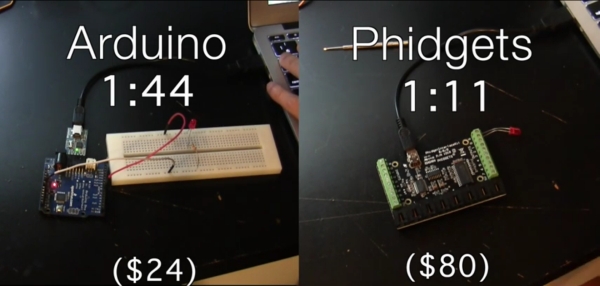
The three time trials were common tasks: 1. Blink an LED. 2. Use a pot to turn a servo. 3. Build a pedometer. For [Ken], the Phidgets won in each of the three experiments, but not significantly: 37%, 45%, and 25% respectively. The difference is only minutes. Even considering time value, for most hackers it is not worth the cost.
HAD - Phidgets3In context, the advantages of a mildly more rapid development on the simplest projects are wasted away by needing to rebuild a permanent solution. Chained to a PC, Phidgets are only useful for temporary or fixed projects. For many of our readers that puts them dead in the water. Arduinos may technically be dev kits but are cheap enough to be disposed of in the project as the permanent solution – probably the norm for most of us.

[Ken] points out that for the software crowd that abhor electronics, Phidgets plays to their preferences. Phidgets clips together their pricey peripherals and the rest is all done in code using familiar modern languages and libraries. We wonder just how large this group could still be; Phidgets might have been an interesting kit years ago when the gulf between disciplines was broader but the trend these days is towards everyone knowing a little about everything. Hackaday readers probably represent that trend more than most, but let us know if that seems off.

[Ken]’s article has much more and much better detailed explanations of the experiments and the tradeoffs between the platforms.

If you enjoy watching parallel engineering, see the time-lapse video below for a split screen of the time trials.

Continue reading “Arduino Vs. Phidgets – Dev Time Trials”

The Mouse Language, Running On Arduino

Although plenty of us have our preferred language for coding, whether it’s C for its hardware access, Python for its usability, or Fortran for its mathematic prowess, not every language is specifically built for problem solving of a particular nature. Some are built as thought experiments or challenges, like Whitespace or Chicken but aren’t used for serious programming. There are a few languages that fit in the gray area between these regions, and one example of this is MOUSE, which can now be run on an Arduino.

Although MOUSE was originally meant to be a minimalist language for computers of the late 70s and early 80s with limited memory (even for the era), its syntax looks more like a more modern esoteric language, and indeed it arguably would take a Python developer a bit of time to get used to it in a similar way. It’s stack-based, for a start, and also uses Reverse Polish Notation for performing operations. The major difference though is that programs process single letters at a time, with each letter corresponding to a specific instruction. There have been some changes in the computing world since the 80s, though, so [Ivan]’s version of MOUSE includes a few changes that make it slightly different than the original language, but in the end he fits an interpreter, a line editor, graphics primitives, and peripheral drivers into just 2 KB of SRAM and 32 KB Flash so it can run on an ATmega328P.

There are some other features here as well, including support for PS/2 devices, video output, and the ability to save programs to the internal EEPROM. It’s an impressive setup for a language that doesn’t get much attention at all, but certainly one that threads the needle between usefulness and interesting in its own right. Of course if a language where “Hello world” is human-readable is not esoteric enough, there are others that may offer more of a challenge.


Image Credit: Maxbrothers2020

Arduino PLC Keeps The Beat

For most of our prototype, hobby, or one-off electronics projects it’s perfectly fine to use a development platform like an Arduino Uno or something to that effect. They’re both easy to program and easy to wire up to projects without breaking the bank. But if you step into an industrial setting where reliability is paramount even in places that are noisy, vibrating all the time, hot, or otherwise unpleasant for electronics, you’ll want to reach for a programmable logic controller (PLC) that are much more robust. There is actually a PLC from Arduino, and if you want to dip your toes into the PLC world then take a look at this drum kit based on the Arduino Opta.

With the PLC at the core of the build, it’s on to making the drumming mechanisms themselves. For that, project creator [JC Audio] is using a series of solenoids attached to camera mounts with a custom 3D printed part that allows for quick assembly and disassembly so he can get the positioning of each drum sound just right. The high hat is taken care of by the noise of an internal solenoid, with the other drums striking various real drums and other solid objects in his shops. The solenoids themselves are driven by a solid-state relay expansion module to ensure there’s enough power

While the build doesn’t sit inside a factory and run for years at a time, a musician’s stage is certainly a rough enough environment that we might reach for a PLC over a standard development board for its benefits. The code for this project is available as well at the project’s GitHub page for those looking for a more advanced timekeeper to play along with their music practice, and for more details on why you might choose a PLC for your project take a look at this Arduino vs PLC showdown from a few years ago.

Continue reading “Arduino PLC Keeps The Beat”

Lo-Fi Tchaikovsky

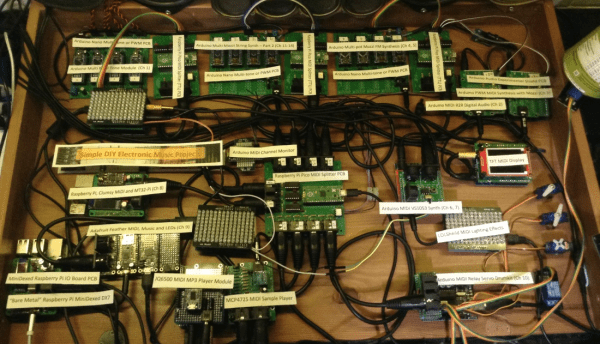
[Kevin] over at Simple DIY ElectroMusic Projects recently upgraded his Lo-Fi Orchestra. To celebrate his 400th blog post, he programmed it to play Tchaikovsky’s 1812 Overture. Two Arduino Nanos, four Arduino Unos, four Raspberry Pi Picos, and one Raspberry Pi have joined the Lo-Fi Orchestra this year, conducted by a new Pico MIDI Splitter. Changes were made in every section of the orchestra except percussion. We are delighted that the Pringles tom and plastic tub bass drums remain, not to mention the usual assortment of cheap mixers, amps, and speakers.

Tchaikovsky’s score famously calls for some “instruments” not found in the typical orchestra — a battery of cannon and a carillon, for example. Therefore [Kevin] had to supplement the Lo-Fi Orchestra for this performance with extras — a JQ6500 MP3 module on clash cymbals, a bare metal MiniDexed Raspberry Pi playing the carillon, and a MCP4725 with a Lots-of-LEDs shield firing off cannon and fireworks, respectively.

Although slightly disappointed that the MCP4725 beat out Mr. Fireworks in the auditions, we do like the result. [Kevin] reports that the latest version is much more reliable and predictable, having eliminated various MIDI faults and electrical noise. It presents a stable platform for future musical presentations, a kind of on-demand Lo-Fi Orchestra jukebox, as he describes it. A detailed review of all the changes can be found in his explanatory blog post. Check out an earlier performance of Holst’s The Planets suite from our coverage back in 2021.

Continue reading “Lo-Fi Tchaikovsky”

The J1772 Hydra Helps You Charge Two EVs At Once

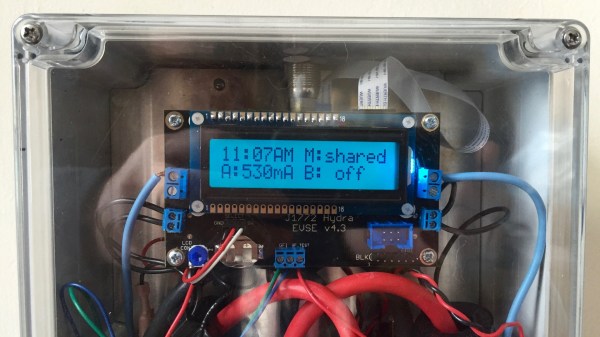
There are plenty of electric vehicle (EV) chargers out there that are underutilized. This is particularly common where older EVs are involved, where the cars may only be able to charge at a few kW despite the charger being capable of delivering more. [Nick Sayer] regularly found 6.6 kW chargers being used by vehicles that could only draw down 3.3 kW at his work. Thus, he built the J1772 Hydra as a nifty double-adapter to charge two cars at once.

The Hydra comes in two versions. One is a “splitter,” which is designed to be plugged into an existing J1772 AC charger. The other is a version designed for permanent installation to an AC power supply as an EV charger in its own right. Either way, both versions of the Hydra work the same way. In “shared” mode, the Hydra splits the available AC power equally between both cars connected to the charger. When one completes, the other gets full power. Alternatively, it can be set up in “sequential” mode, allowing one car to first charge, then the other. This is great when you have two cars to charge overnight and don’t want to wake up to shift the plugs around.

It’s a neat hack that could be useful if you’re running older EVs that rely on slower AC charging. We’ve seen other DIY EV chargers before, too. Expect hacking in these areas to become more commonplace as EVs grow in popularity.

DIY Arduino Based EV Charger Saves Money, Looks Pro

Electric vehicles (EVs) are something of a hot topic, and most of the hacks we’ve featured regarding them center on conversions from Internal Combustion to Electric. These are all fine, and we hope to see plenty more of them in the future. There’s another aspect that doesn’t get covered as often: How to charge electric vehicles- especially commercially produced EV’s rather than the DIY kind. This is the kind of project that [fotherby] has taken on: A 7.2 kW EV charger for his Kia.

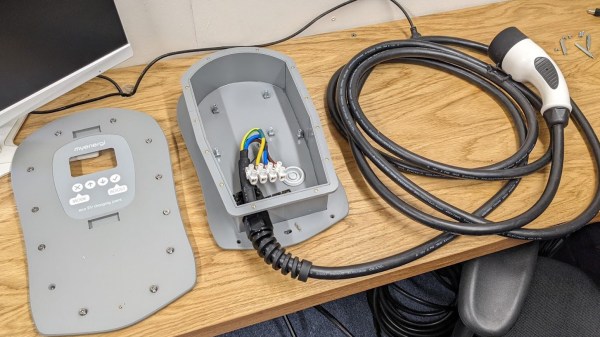
Faced with spending £900 (about $1100 USD) for a commercial unit installed by a qualified electrician, [fotherby] decided to do some research. The project wasn’t outside his scope, and he gave himself a head start by finding a commercial enclosure and cable that was originally just a showroom unit with no innards.

An Arduino Pro Mini provides the brains for the charger, and the source code and all the needed information to build your own like charger is on GitHub. What’s outstanding about the guide though is the deep dive into how these chargers work, and how straightforward they really are without being simplistic.

Dealing with mains power and the installation of such a serious piece of kit means that there are inherent risks for the DIYer, and [fotherby] addresses these admirably by including a ground fault detection circuit. The result is that if there is a ground fault of any kind, it will shut down the entire circuit at speeds and levels that are below the threshold that can harm humans. [fotherby] backs this up by testing the circuit thoroughly and documenting the results, showing that the charger meets commercial standards. Still, this isn’t a first-time project for the EV enthusiast, so we feel compelled to say “Don’t Try This At Home” even though that’s exactly what’s on display.

In the end, several hundred quid were saved, and the DIY charger does the job just as well as the commercial unit. A great hack indeed! And while these aren’t common, we did cover another Open Source EV charger about a year ago that you might like to check out as well.

Continue reading “DIY Arduino Based EV Charger Saves Money, Looks Pro”